Deskphones – Using Polycom IP Phones | AT&T Office@Hand
Article #5672
This article gives a summary of Polycom phone features, and links to articles for more detailed information.
Using Polycom IP Phones
AT&T Office@Hand supports an array of tested Polycom IP Phones which work well with your AT&T Office@Hand service. Click on the links for more information about the Polycom desk phone functions.
Basic Phone Functions
Adjusting the Volume
Mute and Unmute Audio
Changing the Ring Type
Using the Web Configuration Utility of Polycom VVX 310 and 410
Installing Expansion Modules or Sidecars
Supported Models
How to Install Sidecars
VVX 410 & 500 Sidecar Provisioning & Installation
Getting the IP Address from your Polycom Phone
Using the Do Not Disturb (DND) Feature
Enabling / Disabling DND on your Polycom VVX Series phone
Using DND on multiple lines
Using Call Forwarding
Enabling Call Forwarding on Polycom VVX Phones
Disabling Call Forwarding on Polycom VVX Phones
Accessing Call Logs
Recent Calls
View Recent Calls
Sort Recent Call Entries
Sort Entries by Call Type
Edit Recent Contact Entries
Delete a Recent Contact
Save a Recent Contact
View Call Details
Transferring Calls
(On-demand feature) Call Forwarding from Polycom VVX phones
Polycom Phones | Adjust Volume and Mute/Unmute
AT&T Office@Hand supports an array of tested Polycom IP Phones which work well with your AT&T Office@Hand service. Polycom Phones allow you to adjust the volume of the ringtone and audio during a call. These desk phones also allow you to mute or unmute the handset, headset, and speakerphone microphone during calls or conferences.
Adjusting the Volume
The volume of your ringtone and the audio during a call can be adjusted. The volume key adjusts the volume of the handset, headset, speaker, and ringer.
Press one of the Volume keys  to increase (+) or decrease (-) the audio.
Mute and Unmute Audio
Muting the microphone is useful so the other parties cannot hear you. The key mutes local audio during calls and conferences. The microphone mute applies to the handset, headset, and speakerphone. You can still hear the other parties on the line even when your microphone is muted.
The table below summarizes the different kinds of Polycom phones and its mute key behaviors.
| Polycom Model |
Mute Key Behavior |
| VVX 101 & 201 |
None. |
| VVX 300 series |
The mute icon is displayed.
The mute key glows red when activated. |
| VVX 400 series |
| VVX 500 series |
How to mute the audio
During a call or a conference call, press  .
.
This mutes your microphone and the parties cannot hear you anymore.
How to unmute the audio
Press  again to unmute the microphone.
Changing the Ring Type
You can access your Polycom IP phone’s settings to change the ringtone of your incoming calls. Follow these steps to configure your Polycom’s ringtone settings.
- Press Menu on the Polycom IP phone.
- Select Settings.
- Select Basic.
- Select Ring type.
Note: You may choose a loud ringer tone option available on your Polycom Deskphone. Also you can listen to the ring types first before selecting your preferred type.
- Save the Settings.
Back to top
Polycom Phones | Web Configuration Utility of VVX 310 and 410
AT&T Office@Hand supports an array of tested Polycom IP Phones which work well with your AT&T Office@Hand service. This article will guide you on how to use the Polycom Web Configuration Utility for VVX 310 and 410.
After you have set up the Polycom VVX 300, 310, 400, and 410, you are now able to place and answer calls using the default configuration.
To learn more about the Polycom VVX 300, 310, 400, and 410, click here.
- Check the IP address of your Polycom IP phone.
Note: To see the phone’s IP address, select Settings icon from the phone’s Home view then select Status > Platform > Phone.
Scroll down to see the IP address.
- On your computer, launch a web browser then enter the IP address of the IP phone in the address bar.
Note: In this example, we used Mozilla Firefox and the IP address as 123.45.678.90.

- Press the [Enter] key.
The Polycom Web Configuration Utility login window appears.
![Press the [Enter] key.](https://asecare.att.com/wp-content/uploads/2018/12/11074No2SSDec2018.png)
- Select Admin or User and enter your Password in the field provided.
Click Submit.
Note: The default password for an administrator is 456. The default password for a user is 123.
The Utility’s Home screen displays.
- Enter your desired configuration changes to the phone’s configuration.
Note: Click here to learn how you can obtain the SIP configuration information from your AT&T Office@Hand online account.
- Press Save.
- Log out of the Polycom Web Configuration Utility.
Back to top
Polycom Phones | Install Expansion Modules or Sidecars
AT&T Office@Hand supports an array of tested Polycom IP Phones which work well with your AT&T Office@Hand service. This article will guide you on how to Install Expansion Modules or Sidecars.
The Polycom VVX Expansion Modules or Sidecars are consoles you can connect to your Polycom VVX Business Media phones to add additional lines. These devices enable you to handle large call volumes on a daily basis by expanding the functions of your phone. The modules let you accept, screen, dispatch, and monitor calls. It boosts productivity by reducing the number of lost customer calls, shortening transaction times, and increasing the accuracy of call routing.
Supported Models
Polycom VVX Expansion Modules are available for the following Polycom VVX business media phones:
- Polycom VVX-410 Color Gigabit Ethernet Phone
- Polycom VVX-500 Color Touchscreen Phone
How to Install Sidecars
VVX Expansion Modules are powered and signaled by VVX phones and require minimal setup. After you connect an expansion module to a VVX phone, the module is automatically configured to work with the phone.
For more information on setting up VVX sidecars, please check the device’s User Guide on the Polycom support site.
VVX 410 & 500 Sidecar Provisioning & Installation
The Polycom VVX 410 and VVX 500 are desk phones with color displays, gigabit Ethernet, and speakerphones. Up to 3 expansion modules (sidecars) can be attached to these desk phones.
Note: You cannot connect paper display and color display expansion modules together on the same phone.
- VVX Color Expansion Modules takes approximately 20 seconds to power up.
- VVX Expansion Modules with a paper display take approximately three seconds to power up.
- Align the back of the expansion module and the desk phone using the back plate.
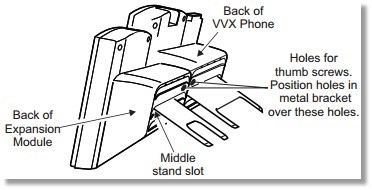
- Fasten both devices to the back plate using the metal bracket and the thumb screws provided.

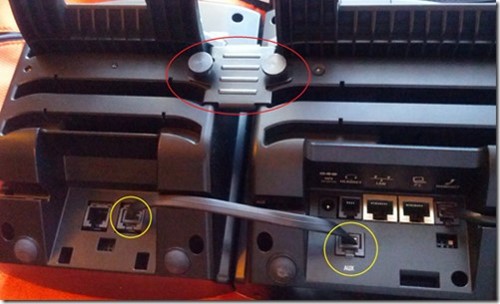
- Connect one end of the RJ11 Cord to the AUX Port of the desk phone and then connect the other end to the IN port of the expansion module.

Note: The LED lights on the module’s line keys flash red and green as the module starts up.
The image below shows an actual picture of how the back of the sidecar and VVX Phone would look like after the metal bracket, thumb screws, and cable connector have been connected.
- Attach the base plate to the back of the desk phone and the expansion module.
- Connect one end of an Ethernet cable to the LAN port of the desk phone and then connect the other end to the router.
Back to top
Polycom Phones | Get the IP Address
AT&T Office@Hand supports an array of tested Polycom IP Phones which work well with your AT&T Office@Hand service. This article will guide you on how get the IP Address from your polycom phone.
Getting the IP Address from your Polycom Phone
- Plug the ethernet cable to the back of the Polycom device and to the router.
Connect the adapter to a power source.
- Make sure the device is ON.
- Press Menu.
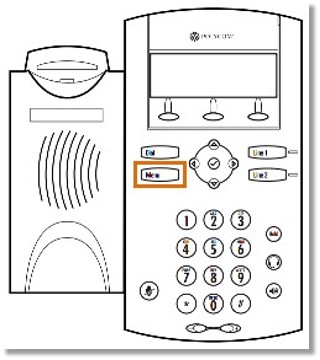
- Select Status from the menu list or press 2.
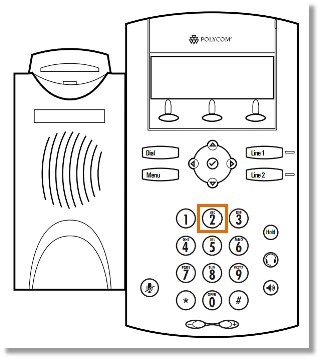
- Select Network from the menu list or press 2.

- Select TCP/IP Parameters from the menu list or press 1.
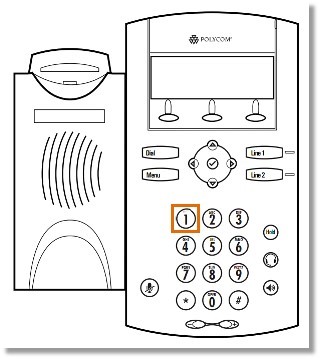
From TCP/IP Parameters, you will see the IP Address of the phone.
DHCP will be displayed as disabled if the phone is set to Static IP.
Note: For other Polycom VVX phones, you may get the IP address by navigating to Settings > Status > Platform > Phone.
Back to top
Polycom Phones | Use the Do Not Disturb (DND) Feature
AT&T Office@Hand supports an array of tested Polycom IP Phones which work well with your AT&T Office@Hand service. This article will guide you on how to use the Do Not Disturb (DND) feature of your Polycom phones.
Do Not Disturb is a feature which prevents your phone from ringing and lets you send all incoming calls directly to your voicemail. DND applies to all lines on your phone. All calls you receive while DND is enabled are logged in your Recent Calls list.
Note: Calls will still be sent to the forwarding number when Call Forwarding and DND are both enabled. Enabling DND on Shared Lines disables ringing only. A visual notification of the call still displays, and you have the option to answer or ignore the call.
Enabling / Disabling DND on your Polycom VVX Series phone
- From the Home button.
- Look for DND. Press More if DND is not on the list.
- Press DND once to activate the Do Not Disturb feature.
Note: Press DND again to disable the feature.
Using DND on multiple lines
Do Not Disturb allows you to toggle between taking all incoming calls, not accepting incoming call queue calls, and not accepting all calls. On your Polycom VVX Series desk phones, you can toggle between taking all incoming calls and do not accept incoming calls.
QUICK TIP: To save power, automatically enable or disable DND for all lines. To automatically enable DND for all lines, tap the Set All option. To disable the feature for all lines automatically, tap Clear All.
- From the Home button.
- Look for DND. Press More if DND is not on the list.
- Press DND once to activate the Do Not Disturb feature.
Note: Press DND again to disable the feature.
Back to top
Polycom Phones | Use Call Forwarding
AT&T Office@Hand supports an array of tested Polycom IP Phones which work well with your AT&T Office@Hand service. This article will guide you on how to enable or disable call forwarding on Polycom VVX Phones.
Enabling/Disabling Call Forwarding on Polycom VVX Phones
Call Forwarding on Polycom VVX Phones allows Users to enable or disable Call Forwarding options from the Polycom phone menus without having to log into the AT&T Office@Hand online account.
Note: Call Forward on Polycom VVX Phones must be enabled on the account by contacting the support before proceeding to the steps below.
Enabling Call Forwarding on Polycom VVX Phones
- Tap the Forward softkey.
- Tap Forward type and select either Always or No Answer.
- Press the number to forward calls to.
- Press Enable.
Disabling Call Forwarding on Polycom VVX Phones
- Tap Forward softkey.
- Disable the selected Forward type.
Limitations:
- The Call Forward configured on the phone will not show in the RingCentral online account.
- The Call Forward type On Busy is NOT supported.
- Call Forwarding set up between multiple devices in a Loop will be restricted to run only 3 times before call is dropped.
- If a User gets an E911 Call Back and Call Forward is enabled on the User’s phone, the configured destination will get the E911 call.
Back to top
Polycom Phones | Access Call Logs
AT&T Office@Hand supports an array of tested Polycom IP Phones which work well with your AT&T Office@Hand service. This article will guide you on how to access call logs on Polycom phones.
All VVX business media phones support a Recent Calls list, a Contact Directory, and a Corporate Directory.
Note: Your phone may not support all of the features described in this section. Check with your system administrator to find out which features are available on your phone. Click on the links for more information.
Recent Calls
View Recent Calls
Sort Recent Call Entries
Sort Entries by Call Type
Edit Recent Contact Entries
Delete a Recent Contact
Save a Recent Contact
View Call Details
Recent Calls
All VVX business media phones maintain a Recent Calls list that includes missed, received, and placed calls. Each list holds up to 100 entries.
You can perform the following tasks from the Recent Calls list:
- Sort, order, and filter calls. The list displays all call types with the most recent call displayed first by default.
- Remove calls from the list.
- Select a call record to view call details.
- Select a call record to automatically call a contact.
View Recent Calls
In the Recent Calls list, you can view a list of up to 100 missed, received, and placed call entries.
View your Recent Calls list by doing one of the following:
- On VVX 500 phones, tap in the status bar.
- For other VVX phones, navigate to Directories > Recent Calls.
Sort Recent Call Entries
The Recent Calls list can be customized so you can view calls by call type, time, and call name. You can sort calls by the time of the call in either ascending (oldest call first) or descending (most recent call first) order. You can also sort calls by name, allowing you to view them in either ascending (alphabetical) or descending (reverse alphabetical) order.
- Select Sort or tap
 .
.
- Under Sort, choose Time or Name.
- Under Order, choose Ascending or Descending.
Sort Entries by Call Type
All call types are displayed by default. If you wish to filter calls, you can choose to display only the missed, received, or placed calls.
- Select Type or tap
 .
.
- Choose Missed Calls, Received Calls, or Placed Calls.
Note: Filtered call list results cannot be saved. All call types will be displayed in the default filter the next time you display the list, even if you have filtered your Recent Calls list to show only a certain call type.
Edit Recent Contact Entries
You can edit a stored contact phone number in your Recent Calls list before returning the contact’s call.
- Select Info or tap
 next to a call record.
- Select Edit or tap
 .
.
- Edit the number, then select Dial or tap
 .
.
Delete a Recent Contact
You can delete contacts from the Recent Calls list.
- Select Info or tap
 next to a call record.
- Select Delete or tap
 .
.
Save a Recent Contact
You can save a contact to the Contact Directory from the Call Details screen.
- Select Info or tap
 next to a call record.
- From the Call Details screen, select Save.
Add to Favorites will be displayed if the person is already in your Contact Directory but is not a Favorite.
View Call Details
In the Recent Calls list, you can view call details, edit call details before calling a contact, save a contact to your directory, and delete call entries.
Select Info or tap  next to a call record.
Back to top
Polycom Phones | Transfer Calls
AT&T Office@Hand supports an array of tested Polycom IP Phones which work well with your AT&T Office@Hand service. This article will guide you on how to transfer calls via Polycom phones.
Transferring Calls via Polycom Phones
Active or held calls can be transferred to another person using any of the two transfer types:
- Blind transfer – allows you transfer calls directly to another line without speaking with the other party first.
- Consultative transfer – speak with the other party before completing the transfer.
Please check the following articles for more information related to this feature:
Transferring calls via IP phones
Using ## in transferring calls
Back to top
Polycom Phones | Call Forwarding from Polycom VVX Phones (On-demand feature)
AT&T Office@Hand supports an array of tested Polycom IP Phones which work well with your AT&T Office@Hand service. This article will guide you on how to enable Call Forward options directly on your Polycom VVX phone.
Note: You will need to contact support to enable this feature.
When this feature is enabled, you may configure Call Forward options directly on your Polycom VVX phone via the Forward softkey.
Limitations
- The Call Forward configured by user on the phone will not show any indication on the Online account.
- The Call Forward on Busy Menu option is not supported.
- Call Forward option on Phone setup between multiple devices in a loop will be restricted to run only 3 times
- A 911 Call Back if received on User’s Phone with Forward enabled will get forwarded to the destination
Using Call Forward on Phone
- Enable Call Forward
- Disable Call Forward
Enable Call Forward
- Tap the Forward softkey.
- Select the Call Forward type: Always or No Answer.
- Press Enable.
Disable Call Forward
- Tap the Forward softkey
- Disable the selected Forward type.
Back to top
See Also:
List of tested deskphones with AT&T Office@Hand
Presence Overview | AT&T Office@Hand
Initiating Conference with two active calls on a Polycom Deskphone
AT&T Office@Hand: Improving the Quality of VoIP Phone Calls
Key Words: 5672, Polycom IP Phones, SoundPoint IP, deskphone, phone function, contacts, call logschange the ring type on Polycom, Polycom VVX, web configuration utility, speed dial, connecting expansion modules to Polycom, installing sidecars, 11082, 11073, 11078, 11076, 11083, 11081, 11079, 11084, 11074
Was this page helpful? Yes No

![Press the [Enter] key.](https://asecare.att.com/wp-content/uploads/2018/12/11074No2SSDec2018.png)


