Manual Provisioning – Cisco Phones | AT&T Office@Hand
Article #5758
This article describes the steps to manually provision your third party Cisco Phone.
Manual Provisioning Cisco Phones | AT&T Office@Hand
Please check Deskphones List of Supported Phones | AT&T Office@Hand first, to know if your device can be set up with Assisted Provisioning. If the model of your Cisco phone is not on the list, then you may set it up via Manual Provisioning.
Note: Cisco 7940 & 7960 phones do not work with Office@Hand.
IMPORTANT: If you are setting up your existing device (from another vendor), you must RESET your phone to factory settings before your proceed with the instructions below.
- Add an Existing Device for your Cisco phone, and then go to Manual Provisioning – How do I set up my deskphone to work with AT&T Office@Hand for steps for steps on how to get the SIP settings for manual provisioning.
- Get your phone’s IP Address, and then log in to its User Interface.
- Determine the type of Cisco phone that you have, and then select from the list below:
Cisco Desk phones: Old models
Cisco Desk phones: New models
Cisco Analog Telephone Adapter (SPA-2102 ATA)
Cisco Analog Telephone Adapter (SPA-122 ATA)
Cisco Phones: Old models
- Click Admin Login.
Note: You will be asked to enter the Admin username and password. The Default settings are:
Username: admin
Password: admin

- Click Advanced.

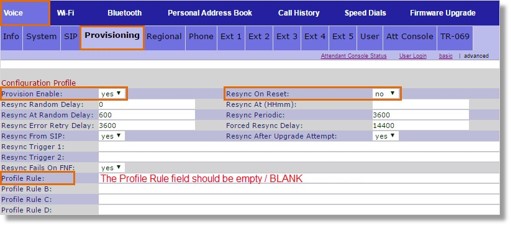
- Go to Voice, and the click Provisioning. Set the following under Configuration Profile:
Provision Enable: yes
Resync On Reset: no
Profile Rule: leave the field empty / blank.
- Scroll down at the bottom of the page, and then Submit All Changes.
Note: Your phone might restart. Just follow Step 1 to 2, and then proceed to the step below:
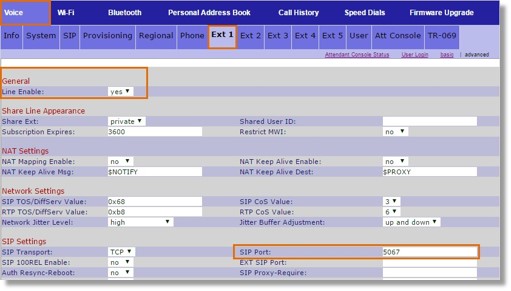
- Go to Voice, and then configure the following settings under Ext 1.
General
Line Enable: yes
SIP Settings
SIP Port: any number between 5060-5090.
- Scroll down and look for Proxy and Registration, and then configure the settings below, using the SIP information from your Office@Hand account.
Proxy and Registration
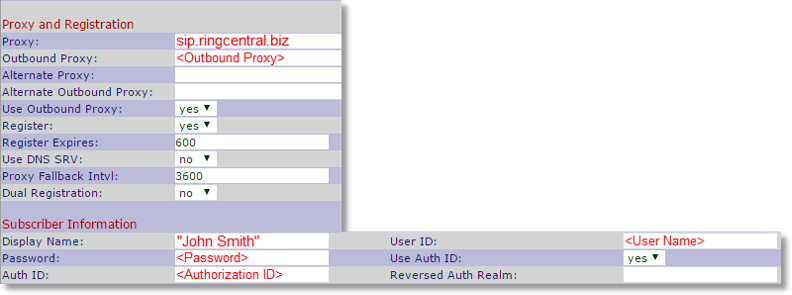
Proxy: sip.ringcentral.biz
Outbound Proxy: enter the Outbound Proxy from your SIP information. Current options are:
sip10.ringcentral.biz = SJC Data Center
sip20.ringcentral.biz = IAD Data Center
Subscriber Information
Display Name: specify the name that will appear on your phone for identification
Password: enter the Password from your SIP information
Auth ID: enter the Authorization ID from your SIP information
User ID: enter the User Name from your SIP information.
Use Auth ID: yes
- Scroll down, and then click Submit All Changes.
Note: Your phone will reboot several times during the provisioning process. DO NOT manually turn off / DO NOT unplug your phone during this process. To know if your phone is Online after Manual Provisioning, go to Checking the Status of your Existing Device.
Cisco Phones: New models
- Click Admin Login.
Note: You will be asked to enter the Admin username and password. The Default settings are:
Username: admin
Password: admin

- Click Advanced.

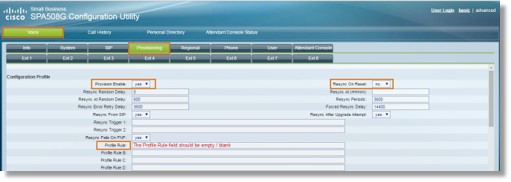
- Go to Voice, and the click Provisioning. Set the following under Configuration Profile:
Provision Enable: yes
Resync On Reset: no
Profile Rule: leave the field empty / blank.
- Scroll down at the bottom of the page, and then Submit All Changes.
Note: Your phone might restart. Just follow Step 1 to 2, and then proceed to the step below:
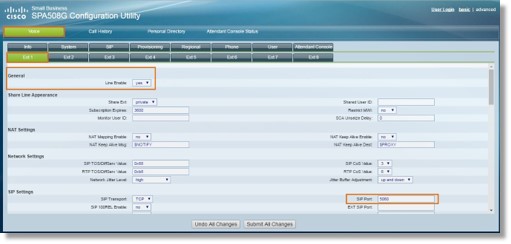
- Go to Voice, and then configure the following settings under Ext 1.
General
Line Enable: yes
SIP Settings
SIP Port: any number between 5060-5090.
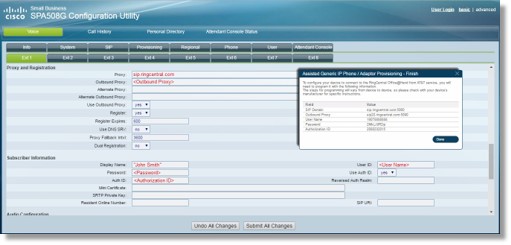
- Scroll down and look for Proxy and Registration, and then configure the settings below, using the SIP information from your Office@Hand account.
Proxy and Registration
Proxy: sip.ringcentral.biz
Outbound Proxy: enter the Outbound Proxy from your SIP information. Current options are:
sip10.ringcentral.biz = SJC Data Center
sip20.ringcentral.biz = IAD Data Center
Subscriber Information
Display Name: specify the name that will appear on your phone for identification
Password: enter the Password from your SIP information
Auth ID: enter the Authorization ID from your SIP information
User ID: enter the User Name from your SIP information.
Use Auth ID: yes
- Scroll down, and then click Submit All Changes.
Note: Your phone will reboot several times during the provisioning process. DO NOT manually turn off / DO NOT unplug your phone during this process. To know if your phone is Online after Manual Provisioning, go to Checking the Status of your Existing Device.
Cisco Analog Telephone Adapter (SPA-2102 ATA)
- Click Admin Login.
Note: You will be asked to enter the Admin username and password. The Default settings are:
Username: admin
Password: admin

- Click Advanced.

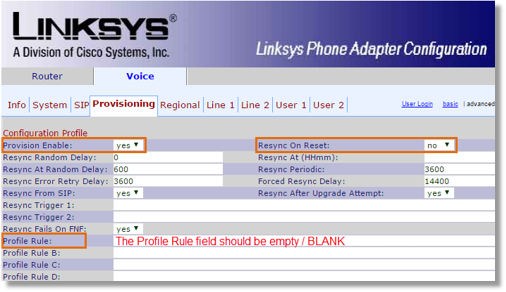
- Go to Voice, and the click Provisioning. Set the following under Configuration Profile:
Provision Enable: yes
Resync On Reset: no
Profile Rule: leave the field empty / blank.
- Scroll down at the bottom of the page, and then Submit All Changes.
Note: Your phone might restart. Just follow Step 1 to 2, and then proceed to the step below:
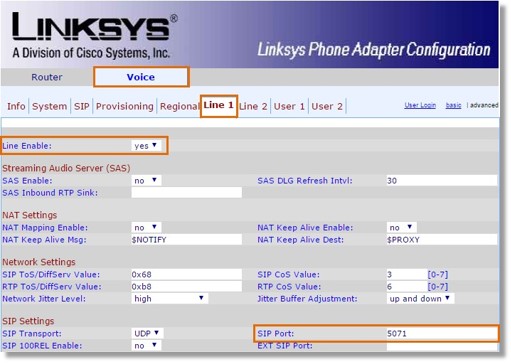
- Go to Voice, and then configure the following settings under Ext 1.
General
Line Enable: yes
SIP Settings
SIP Port: any number between 5060-5090.
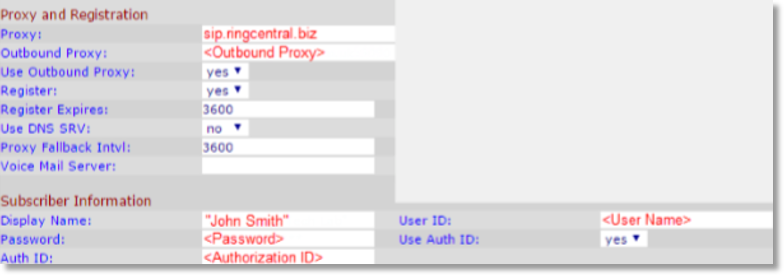
- Scroll down and look for Proxy and Registration, and then configure the settings below, using the SIP information from your Office@Hand account.
Proxy and Registration
Proxy: sip.ringcentral.biz
Outbound Proxy: enter the Outbound Proxy from your SIP information. Current options are:
sip10.ringcentral.biz = SJC Data Center
sip20.ringcentral.biz = IAD Data Center
Subscriber Information
Display Name: specify the name that will appear on your phone for identification
Password: enter the Password from your SIP information
Auth ID: enter the Authorization ID from your SIP information
User ID: enter the User Name from your SIP information.
Use Auth ID: yes
- Scroll down, and then click Submit All Changes.
Note: Your phone will reboot several times during the provisioning process. DO NOT manually turn off / DO NOT unplug your phone during this process. To know if your phone is Online after Manual Provisioning, go to Checking the Status of your Existing Device.
Cisco Analog Telephone Adapter (SPA-122 ATA)
- Click Admin Login.
Note: You will be asked to enter the Admin username and password. The Default settings are:
Username: admin
Password: admin
- Click Advanced.
- Go to Voice, and the click Provisioning. Set the following under Configuration Profile:
Provision Enable: yes
Resync On Reset: no
Profile Rule: leave the field empty / blank.
- Scroll down at the bottom of the page, and then Submit All Changes.
Note: Your phone might restart. Just follow Step 1 to 2, and then proceed to the step below:
- Go to Voice, and then configure the following settings under Line 1.
General
Line Enable: yes
SIP Settings
SIP Port: any number between 5060-5090.
- Scroll down and look for Proxy and Registration, and then configure the settings below, using the SIP information from your Office@Hand account.
Proxy and Registration
Proxy: sip.ringcentral.biz
Outbound Proxy: enter the Outbound Proxy from your SIP information. Current options are:
sip10.ringcentral.biz = SJC Data Center
sip20.ringcentral.biz = IAD Data Center
Subscriber Information
Display Name: specify the name that will appear on your phone for identification
Password: enter the Password from your SIP information
Auth ID: enter the Authorization ID from your SIP information
User ID: enter the User Name from your SIP information.
Use Auth ID: yes
- Scroll down, and then click Submit All Changes.
Note: Your phone will reboot several times during the provisioning process. DO NOT manually turn off / DO NOT unplug your phone during this process. To know if your phone is Online after Manual Provisioning, go to Checking the Status of your Existing Device.
Checking the status of your existing device
To check if your existing device is Online after manual provisioning, go to Admin Portal > Phone System > Phones & Devices > User Phones. Your existing device is Online when you see a Green Check  next to it.
Keywords: manual, provision, setup, configure, configuration, cisco IP phone, ip phone, manually provisioning
Was this page helpful? Yes No


