TOP

AT&T Office@Hand

Learn how to use features from AT&T Office@Hand. Access our self-help options to set up and use this application to communicate with customers.

Back to Product Page
Use the dropdown to get support, or purchase this product

Contacts – Contacts Overview | AT&T Office@Hand
Article #2616

You can click on the Contacts tab to view the contacts you have on your Office@Hand account, both from your Company and Personal contact lists. See below to learn more about Company and Personal Contacts Lists.

Contacts - Contacts Overview+


This article assumes that you are already logged in to your AT&T Office@Hand account, and then click Contacts. If you are an Administrator, you will need to switch to My Extension in order to see the Contacts tab.

Company

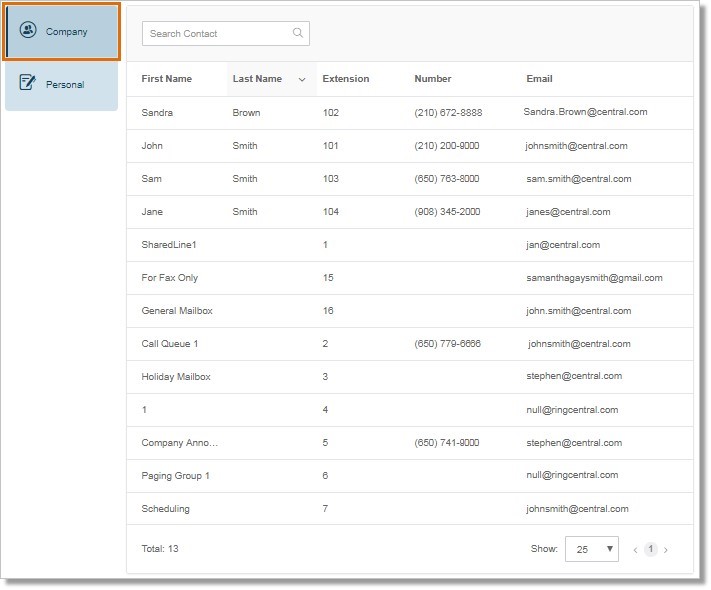
The Company tab displays all the Users in your Office@Hand system. It would show the following information, First Name, Last Name, Extension, Number, and Email.

Only Administrator are allowed to add, edit, or delete a Company Contact (User), see Office@Hand: Adding or Deleting Users via online account.

Only Administrator are allowed to add, edit, or delete a Company Contact

Personal

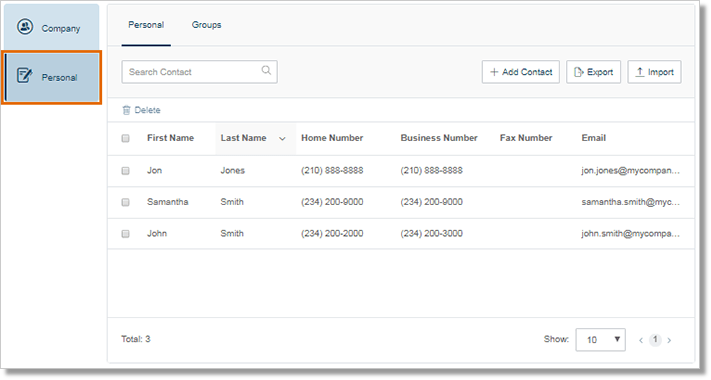
The Personal tab displays your Personal contacts list. It shows the First Name, Last Name, Home Number, Business Number, Fax Number, and Email.

Administrators and Users may add contacts, create groups, import contacts, and export contacts. See the links below to learn more.

Contacts – Personal Contacts | AT&T Office@Hand
Contacts – Export Personal Contacts List | AT&T Office @Hand
Contacts – Import Personal Contacts List | AT&T Office@Hand
Contacts – Grouped Contacts | AT&T Office@Hand

Administrators and Users may add contacts, create groups, import contacts, and export contacts. See the links below to learn more.

Contacts – Add New Contact - Desktop App+

Your AT&T Office@Hand Desktop App by default is integrated with your phone contacts. You will be able to view your personal contacts through your AT&T Office@Hand Desktop App. To add a new contact, follow the steps below.

Note: Your AT&T Office@Hand Desktop App will show your personal contacts from your AT&T Office@Hand Online Account, as well as your Google and Outlook contacts.

  1. Log in to your AT&T Office@Hand Desktop App.
  2. Click Contacts Contacts button.
  3. Click the Add Contact add button button.
  4. Fill out the necessary fields and then, click Save.

Note: Your AT&T Office@Hand Desktop App is integrated with your Outlook’s Phone book as well as your AT&T Office@Hand Online Account’s Personal Contacts list. The Personal Contacts that you will add through the AT&T Office@Hand Online Account will be synced with the Personal Contact List in your AT&T Office@Hand Desktop App, and vice-versa.

Back to top

Contacts – Personal Contacts+

From your Office@Hand account, you can make changes to your Personal Contacts, e.g., add or delete a contact from the list. Follow the steps below to view and make changes to your Personal Contacts list.

This article assumes that you are already logged in to your AT&T Office@Hand account, and then click Contacts > Personal. If you are an Administrator, you will need to switch to My Extension in order to see Contacts > Personal.

You can do the following in this section:

  • Add a Personal Contact
  • Edit a Personal Contact’s Information
  • Delete a Contact from the Personal Contact’s list

Add a Personal Contact

Under the Personal tab, click Add Contact.

The Add New Contact pop-up window contains three (3) tabs where you can enter the contact’s information. Enter your contact’s details, and then click Save.

Tab 1
Personal Info
Tab 2
Phone Numbers
Tab 3
Addresses

First Name
Last Name
Middle Name

Nick Name

Company
Job Title

Email Addresses 1
Email Addresses 2

Birthday

Web Page

Notes

Home Phone
Home Phone 2

Business Phone
Business Phone 2

Mobile Phone

Business Fax
Company Phone
Assistant Phone

Car Phone
Other Phone

Other Fax
Callback Phone

Home Address
Address
City
State/Province
Zip Code

Business Address
Address
City
State/Province
Zip Code

Other Address
Address
City
State/Province
Zip Code

Edit a Personal Contact’s Information

  1. Under the Personal tab, you will see the list of contacts. Click the name of the contact that you want to modify.
  2. Scroll down, and then click the Edit button.
  3. Update the contact’s information, and then click Save.

Delete a Contact from the Personal Contact’s list

Under the Personal tab, you will see the list of contacts. Click the box on the name of the contact that you want to remove, and then click the Delete button.
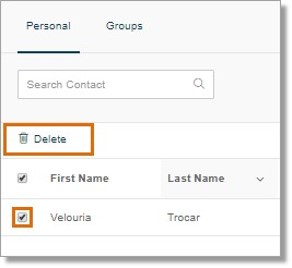
Click the box on the name of the contact that you want to remove, and then click the Delete button.

You can also click the name of the contact that you want to delete, scroll down, and then click Delete.

Back to top
Contacts – Grouped Contacts+

You can create grouped contacts in your AT&T Office@Hand online account. You can also delete and modify your grouped contacts. Follow the steps to learn how.

This article assumes that you are already logged in to your AT&T Office@Hand account, and then click Contacts > Personal. If you are an Administrator, you will need to switch to My Extension in order to see Contacts > Personal.
You can do the following in this section:

Add a Grouped Contact
Add a Contact to the Contact Group
Remove a Contact from the Contact Group
Delete a Contact Group

Add a Grouped Contact

  1. Click Groups.
  2. Under the Groups tab, click New Group.
  3. Enter the Group name on the box provided and a short description in the Notes field.
  4. Under the Add New Group pop-up window, you will see the list of Personal Contacts that has been added to your account. Select the contacts that you want to add to the group, and then click Save.

Add a Contact to the Contact Group

  1. Click Groups.
  2. Under the Groups tab, select the name of the group that you want to modify.
  3. Click Add Member.
  4. Select a contact from the list, and then click Save.

Remove a Contact from the Contact Group

  1. Click Groups.
  2. Under the Groups tab, select the name of the group that you want to modify.
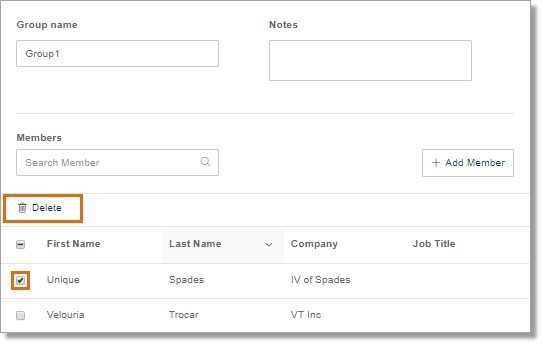
  3. Select the name of the contact that you want to remove from the group, and then click Delete.

    Select the name of the contact that you want to remove from the group, and then click Delete.

  4. Click Save.

Delete a Contact from the Personal Contact’s list

  1. Click Groups.
  2. Under the Groups tab, tick the box on the name of the group that you want to remove, and then click the Delete button.

    Under the Groups tab, tick the box on the name of the group that you want to remove, and then click the Delete button.

  3. You can also click on the name of the group that you want to remove, scroll down and then click the Delete Group.

Back to top

Contacts – Add or Remove Contacts from Favorite - Desktop App+

Your AT&T Office@Hand Desktop App by default is integrated with your phone contacts. You will be able to view your personal contacts through your AT&T Office@Hand Desktop App. To add or remove a contact from your Favorite, follow the steps below.

Note: Your AT&T Office@Hand Desktop App will show your personal contacts from your AT&T Office@Hand Online Account, as well as your Google and Outlook contacts.

Favorites added locally will be synced to AT&T Office@Hand cloud and can be accessed from both mobile and desktop app.

  1. Log in to your AT&T Office@Hand Desktop App.
  2. Click Contacts Contacts button.
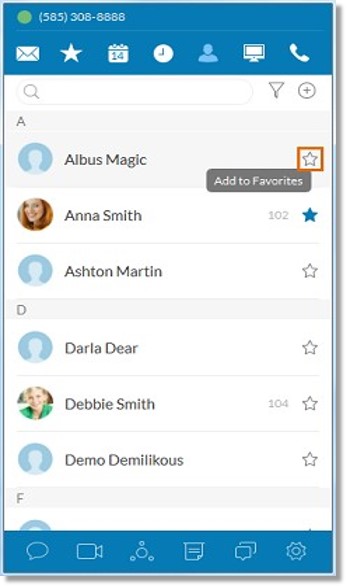
  3. Look for the name you wish to add to your Favorite contacts list and then, click the star Star button or Add to Favorites button.

    Look for the name you wish to add to your Favorite contacts list and then, click the star Star button or Add to Favorites button.

    The selected contact should be on your Favorites list now. To remove the contact from your Favorites, click on the Favorite button on the selected Contact.

    To remove the contact from your Favorites, click on the Favorite button on the selected Contact.

    The selected contact should now be removed from your Favorites list.

Back to top

Contacts – Import Personal Contacts List+

If you have a long list of contacts, you can import that list to your Office@Hand account using a CSV file. This is very convenient because you can add all the contacts from the list at the same time, instead of manually creating a new contact for each person you want to add.

IMPORTANT: To import an existing contact list, export the contact list template file from your extension, then use the exported template (exported_adress_book.csv) when you import your contacts list to your own extension. You will need to use the file that you have exported from your account to list your contacts if you intend to import your contact list to your account. The file that you will import should have the same format and tabs. DO NOT change, add or delete columns from this file.

  1. Log in to your Office@Hand account.
  2. Click the Contacts tab.
    Note: If you are logged in as an Administrator, you need to switch to My Extension view to see the Contacts tab. To switch to My Extension
    view, hover your mouse over Admin Portal, and then click My Extension.
  3. Click on Personal.
  4. Click on Import.
  5. Click on the radio button on what you would like to do with duplicate records, and then click Upload to locate the CSV file that contains the Contacts list that you want to import.
    You have 3 options:
    • Overwrite existing record with the new record.
    • Keep the current existing record and add new record imported from import file.
    • Keep the current existing record and ignore record in import file.
  6. Select the file to upload and click Open to attach file.
  7. Click Start Import.
    If you encounter errors when uploading your Contact list, Troubleshooting Errors when Importing your Personal Contacts List.

Back to top

Contacts – Export Personal Contacts List+

You can export your Personal Contacts from your Office@Hand account in CSV format. The steps below will guide in exporting your extension’s Personal Contacts list. The exported file can be used as a template for importing bulk contacts into your Personal Contacts list.

  1. Log in to your Office@Hand account.
  2. Click the Contacts tab.
    Note: If you are logged in as an Administrator, you need to switch to My Extension view to see the Contacts tab. To switch to My Extension view, hover your mouse over Admin Portal, and then click My Extension.
  3. Click Personal.
  4. Click Export.
    Note: Your contacts will be exported in to “Comma Separated Values” CSV file type. You can save the generated file on your hard drive to import it into your e-mail client later.
    IMPORTANT: You will need to use the file that you have exported from your account, as a template if you intend to import your contact list to your account. The file that you will import should have the same format and tabs. If your Personal Contacts list is empty, it will help if you create a contact first before clicking on Export. DO NOT change, add or delete columns from this file.
  5. Click Start Export.
  6. Save the file on your computer.

Back to top

Contacts – View or Filter - Desktop App+

Your AT&T Office@Hand Desktop App by default is integrated with your phone contacts. You will be able to view your personal contacts through your Office@Hand Desktop App.

Note: Your Office@Hand Desktop App will show your personal contacts from your Office@Hand Online Account, as well as your Google and Outlook contacts.

Click on the links below to jump to a specific topic:

Add a new Contact through your AT&T Office@Hand Desktop App
Add or Remove a Contact to your Favorites via Contacts menu
Synchronize your Outlook Contacts with your Office@Hand Desktop App (Windows)

  1. Log in to your AT&T Office@Hand desktop app.
  2. Click Contacts Contacts app.
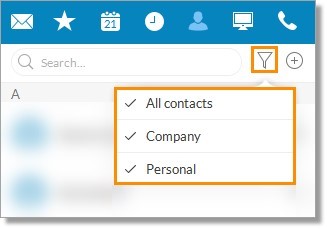
  3. To view or filter your Contacts from your Office@Hand Desktop App, click the Filter button. You will then, be able to view the Contacts section of your Office@Hand Desktop App.

    To view or filter your Contacts from your Office@Hand Desktop App, click the Filter button.

  • All includes your unfiltered contacts from your Office@Hand Desktop app and online account. Using the search on this view allows you to search on your different contact lists and filters.
  • Personal Contacts include your Outlook Contacts and Personal Contacts from your Office@Hand Online Account.
  • Company Contacts include other Users and extensions in your Office@Hand Online Account.

Back to top

Contacts – Synchronize Outlook Contacts - Desktop App+

Your AT&T Office@Hand Desktop App by default is integrated with your phone contacts. You will be able to view your personal contacts through your AT&T Office@Hand Desktop App. To synchronize your Outlook contacts, follow the steps below.

Note: Your AT&T Office@Hand Desktop App will show your personal contacts from your AT&T Office@Hand Online Account, as well as your Google and Outlook contacts.

With the AT&T Office@Hand Desktop App, you are able to synchronize your Outlook Contacts so that you can easily call them or send an SMS to the number that they have on file.

  1. Log in to your AT&T Office@Hand Desktop App.
  2. Click Settings > Contacts.
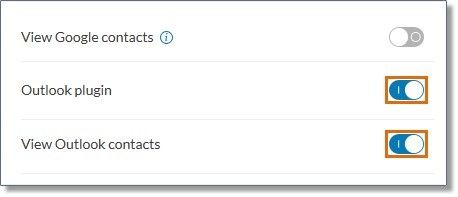
  3. For the Outlook plugin and View Outlook contacts, toggle the switch to ON.

    For the Outlook plugin and View Outlook contacts, toggle the switch to ON.

    Note: Once the Outlook Plugin is enabled, please restart Outlook.

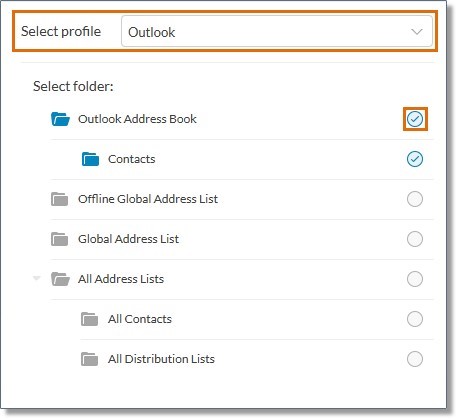
  4. For Select profile, select Outlook and click on the folder of the contact list that you want to be synchronized.

    For Select profile, select Outlook and click on the folder of the contact list that you want to be synchronized.

    The AT&T Office@Hand Desktop App should automatically import the photos from your Outlook Contacts upon syncing.

Back to top

Contacts – Fix Errors when Importing your Personal Contacts List+

You may encounter some issues when importing your Personal Contacts List. See recommendations below to learn how to avoid errors.

  1. Attention: Some of your contacts do not have enough required information and will not be imported. Contacts require at least one of the following: First Name, Last Name, or Company.

    Contacts require at least one of the following: First Name, Last Name, or Company.

    • Make sure to download and use the CSV file exported from your account. For more information, go to Contacts – Export Personal Contacts list | AT&T Office@Hand.
    • Make sure to check your Contacts list on the CSV file that you want to upload. Each of the Contacts are required to have information on at least one of the following fields: First Name, Last Name, or Company Name. The Contact’s Phone Number is also required.
    • Import will fail if a Contact Name on your list has the following symbols: <, >, /, “. Please remove these four prohibited symbols from the Contact Names o the CSV file before importing.
    • If the required fields are populated, save another copy of this file using the same format and a different name. Upload the new copy instead.
  2. Please make sure you are using a valid CSV file and try again.
    • Make sure to download and use the CSV file exported from your account. For more information, go to Contacts – Export Personal Contacts list | AT&T Office@Hand.
    • Make sure to check your Contacts list on the CSV file that you want to upload. Each of the Contacts are required to have information on at least one of the following fields: First Name, Last Name, or Company Name. The Contact’s Phone Number is also required.
    • Import will fail if a Contact Name on your list has the following symbols: <, >, /, “. Please remove these four prohibited symbols from the Contact Names o the CSV file before importing.
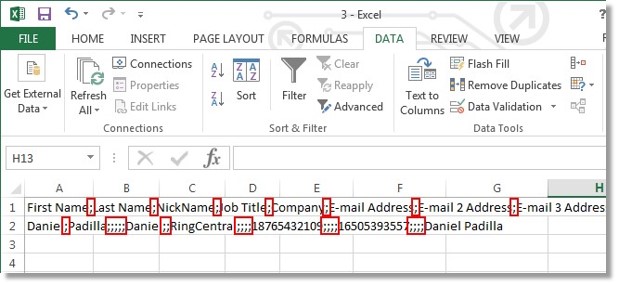
    • Remove the semi-colons from the CSV file.

      Please make sure you are using a valid CSV file and try again.

      To do this, follow the steps below:

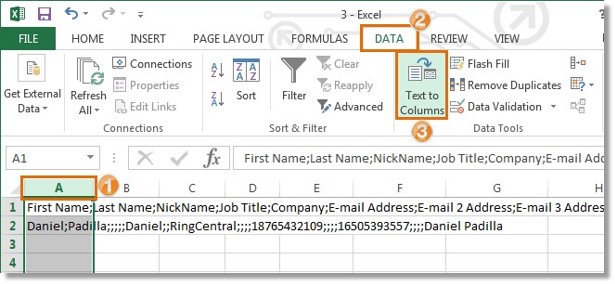
      1. Click on Column A to highlight the contents. Click on the Data tab, and then click on Text to Columns.

        Click on Column A to highlight the contents. Click on the Data tab, and then click on Text to Columns.

      2. On the Convert Text to Columns Wizard, select Delimited as the file type that best describes your data, and then click Next.

        On the Convert Text to Columns Wizard, select Delimited as the file type that best describes your data, and then click Next.

      3. Click the box for Semicolon in the Delimiters section, and then click Finish.

         Click the box for Semicolon in the Delimiters section, and then click Finish.

  3. Contact List not imported after uploading the CSV file.
    • Make sure to download and use the CSV file exported from your account. For more information, go to Contacts – Export Personal Contacts list | AT&T Office@Hand.
    • Make sure to check your Contacts list on the CSV file that you want to upload. Each of the Contacts are required to have information on at least one of the following fields: First Name, Last Name, or Company Name. The Contact’s Phone Number is also required.
    • Import will fail if a Contact Name on your list has the following symbols: <, >, /, “. Please remove these four prohibited symbols from the Contact Names o the CSV file before importing.
    • If the required fields are populated, save another copy of this file using the same format and a different name. Upload the new copy instead.

Back to top


Keywords: contacts, company contacts, personal contacts, names, contact information, 2616, 11118, 2646, 10883, 10884, 2626, 2617, 11121, 3840, 11119