Viewing and Managing Video Meeting Recordings in AT&T Office@Hand Desktop and Web
Article #81465
This article provides information on how to share AT&T Office@Hand Video recordings on the AT&T Office@Hand Desktop and Web.
Once you record an AT&T Office@Hand Video meeting, you can view, download, delete, or share the recording, as well as customize your video recording email notification settings. You can also manage a video highlights version of the recording, summaries, keywords, and transcripts — all generated by artificial intelligence (AI) technology.
Viewing and managing meeting recordings from the recording overview
Finding the overview of a meeting recording
- In the navigation bar, click Video.
- Click Recordings.
- To determine which recordings are displayed, click the dropdown below Recordings and select one of the following:
- All recordings: All your meeting recordings.
- My recordings: Meetings you recorded.
- Shared with me: Meeting recordings shared with you.
Viewing and managing recordings from the recording overview
- View the meeting name: This is the name created by the host when scheduling the meeting. Instant meetings or those without a unique name will appear as AT&T Office@Hand Video meeting.
NOTE: A meeting’s name can’t be changed after the meeting starts.
- Check the status and watch the recording: To the right of the meeting name is a Play button or status message:
- Play button: Your recording is ready. Click to watch it.
- Processing: Your recording is still being created.
- Failed: Your recording wasn’t successful.
- View the length of the recording.
- View the date and starting time of the recorded meeting.

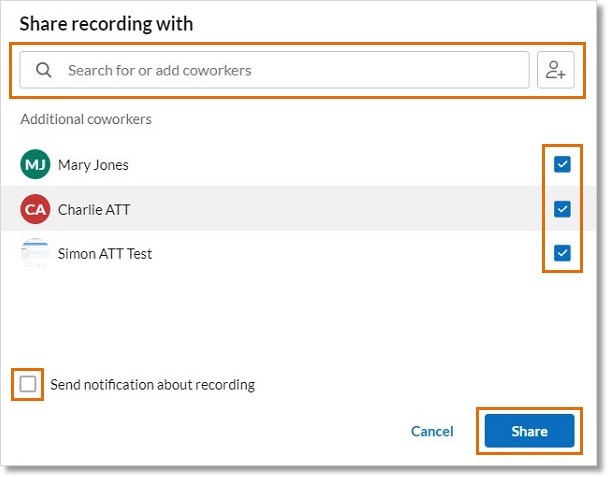
- Share the recording with coworkers:
- Hover over the recording overview.
- Click the Share recording icon that appears at the far right.

- Select coworkers:
- To share with meeting participants, do either of the following:
- Check the box to the right of a person’s name to share with individual participants.
- Check Select all to share with all participants.
- To share with coworkers who weren’t in the meeting, do either of the following:
- Begin entering a coworker’s name in the search bar. When the name appears below, click Add.
- Click the Add coworkers button to the right of the search bar. In the popup window, begin entering a coworker’s name or email address, then click the name when it appears below. Click Add.
NOTE: If the Share button isn’t clickable, you’ve already shared the recording with the selected coworker(s).
- Check Send notification about recording if you’d like to send coworkers an email letting them know the recording was shared.
- Click Share.
- The recording is automatically added to the coworker’s list of recordings, accessible by clicking Video in the navigation bar, then Recordings at the top of the page.
NOTE: You can only share recordings of meetings you host or instant meetings you initiate, and you can only share recordings with coworkers. To share recordings shared with you or share recordings outside your organization, you can download the recording (see below).
- Download the recording, meeting summary and highlights, or transcript:
- Hover over the recording overview.
- Click the Download icon that appears at the far right.
- Select what you want to download:
- Recording: An MP4 (video) file of your recording.
- Summary & highlights: A PDF file containing an Al-generated summary, highlights, and meeting keywords.
- Transcript: A PDF file containing a complete, Al-generated transcript of the meeting.
- Look in your downloads folder or wherever your downloads usually appear.
NOTE: Downloading a recording allows you to share recordings that were shared with you or share recordings with people outside your organization. Simply send the MP4 file as an attachment using email or any messaging app.
- Delete the recording:
- Hover over the recording overview.
- Click the More icon that appears at the far right.
- Select Delete recording.

- Click Delete in the popup window to confirm.
NOTE: Meeting recordings are stored for up to one year, depending on your service plan, then automatically deleted. Learn more about AT&T Office@Hand’s data retention policies.
Viewing and managing meeting recordings from the recording detail window
Finding the detail window for a meeting recording
- In the navigation bar, click Video.
- Click Recordings at the top right.
- To determine which recordings are displayed, click the dropdown below Recordings and select one of the following:
- All recordings: All your meeting recordings.
- My recordings: Meetings you recorded.
- Shared with me: Meeting recordings shared with you.
- Click anywhere on the recording overview to open the recording detail window.
Viewing and managing recordings from the detail window
- View the meeting name, date, time, and ID number: This is the name created by the host when scheduling the meeting. Instant meetings or those without a unique name will appear as AT&T Office@Hand Video meeting.
NOTE: A meeting’s name can’t be changed after the meeting starts.
- Check the length of the full recording.
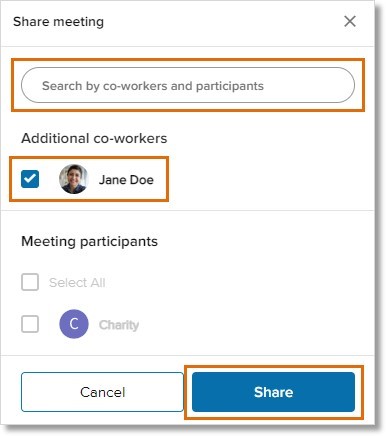
- Share the recording with coworkers:
- Click Share at the top right.
NOTE: This will only appear for recordings of meetings you host or instant meetings you initiate.

- Select coworkers by doing any of the following:
- To share with meeting participants:
- Check the box to the right of a person’s name to share with individual participants.
- Check Select all to share with all participants.
- To share with coworkers who weren’t in the meeting:
- Begin entering a coworker’s name in the search bar. Click the name when it appears below.
NOTE: If the Share button isn’t clickable, you’ve already shared the recording with the selected coworker(s).
- Click Share.
- The recording is automatically added to the coworker’s list of recordings, accessible by clicking Video in the navigation bar, then Recordings at the top of the page.
- Download the recording, meeting summary and highlights, or transcript:
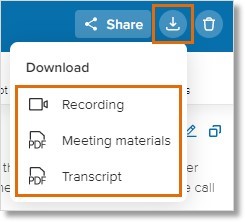
- Click the Download icon at the top right.
- Select what you want to download:
- Recording: An MP4 (video) file of your recording.
- Meeting materials: A PDF file containing an AI-generated summary, highlights, and meeting keywords.
- Transcript: A PDF file containing a complete, AI-generated transcript of the meeting.
- Look in your downloads folder or wherever your downloads usually appear.
NOTE: Downloading a recording allows you to share recordings that were shared with you or share recordings with people outside your organization. Simply send the MP4 file as an attachment using email or any messaging app.
- Delete the recording:
- Watch and manage the full recording. Click the Recording tab to do the following:
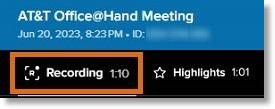
- Watch the full recording: Click the Play button at the bottom left of the playback area.
- Mute, unmute, and adjust the volume:
- To mute or unmute: Click the Mute/Unmute icon at the bottom left of the playback area.
- To adjust the volume: Hover over the Mute/Unmute icon, then click and drag the slider that appears.
- Share a link to the recording: Click the Share link icon at the bottom right of the playback area. Under Share link, select either of the following:
- Copy the replay link: Copies a link to the beginning of the recording.
- Copy the link at M:SS: Copies a link to a specific time in the recording. After copying, paste the link into an email or text message to share with a coworker.
NOTE: A coworker can only access the recording using a shared link after you have first shared the recording directly using a Share button (see 3. Share the recording with coworkers above).
- Adjust the playback speed: Click the Settings icon at the bottom right of the playback area, then select your desired speed.
- Enter and exit full screen mode: To enter, click the Full screen icon at the bottom right of the playback area. To exit, click the Exit full screen icon at the bottom right.
- Jump to, or edit, AI-generated chapters of the recording (for recordings longer than five minutes):
- To jump to a chapter: Click the chapter name below the playback area, next to Chapters. You can also click the arrows to move forward or backward through the chapters.
- To edit chapter names: Hover over the chapter name, then click the Edit icon.
- To share a link to a chapter: Hover over the chapter name, then click the Copy chapter link icon. Paste the link in an email or text message to share with a coworker.
NOTE: A coworker can only access the recording using a shared link after you have first shared the recording directly using a Share button (see 3. Share the recording with coworkers above).
- View a list of participants and select whose talk times are displayed: Click Participants, then check the desired boxes.
- Select how participants are organized: Click the Sort by arrow then select By talk time or By name.
- View each participant’s talk time: See Total speaking time on the left and % of all speaking time on the right.
- Watch only the segments in which a particular participant is talking: Hover over the profile picture to the left of the participant’s name, then click the Play button that appears.
- Watch and manage the AI-edited video highlights version of your recording: Click the Highlights tab to use the same functions described in step 6 above, but to watch and manage the video highlights version of the recording.

Viewing and managing meeting materials from the right side of the recording detail window
The right side of the recording detail window lets you view and manage AT&T Office@Hand Video meeting insights and other materials.
Meeting insights are generated using AI technology. They include a summary of the meeting, keywords, a transcript of the full recording, and video highlights with their associated transcripts. Other materials include the whiteboard and notes created by participants during the meeting.
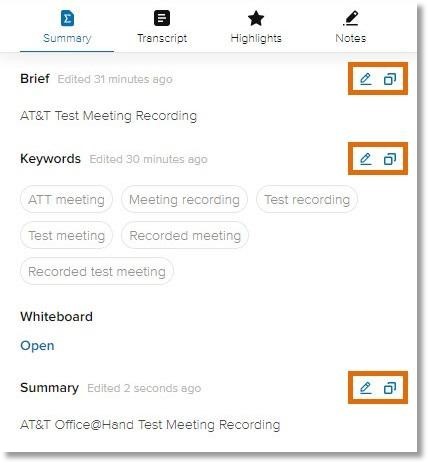
- View and manage the AI-generated summaries and keywords: Click the Summary tab at the top right to do the following:
- Edit the summary, brief summary, or keywords: Click the Edit icon at the right of Brief, Keywords, or Summary. In the popup window, click in the main field to edit, then click Done.
NOTE: You can enter up to 200 characters for the brief summary, up to 10,000 characters for the summary, and up to 15 keywords.
- Copy the summary, brief summary, or keywords: Click the Copy icon at the right of Brief, Keywords, or Summary.
NOTES:
- Any coworkers whom the recording has been shared with can copy the summaries and keywords. Only meeting participants can edit them.
- Edits to the summaries or keywords appear for all coworkers the recording has been shared with.
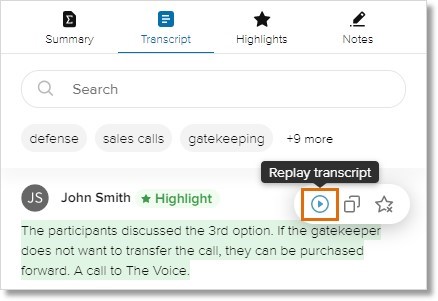
- View and manage the AI-generated transcript of the full recording: Click the Transcript tab at the top right to do the following:
- Search the transcript: Click the search bar at the top, then enter a word or phrase. Click the arrows that appear below the search bar to move forward or backward through the transcript highlighting each mention.
- Watch the recording along with the transcript starting at any point: Hover over the transcript where you’d like to begin watching the recording. Click the Play button that appears at the right of that section.
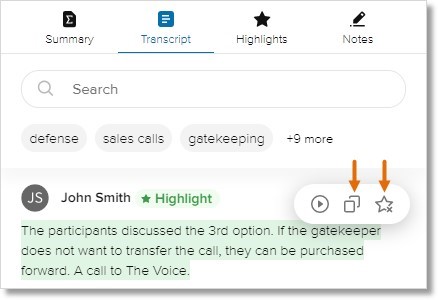
- Add or remove text highlights from the transcript:
- To add text highlights: Use your cursor to select text. Click the Create highlight icon that appears.
- To remove text highlights: Select only the currently highlighted text. Click the Delete highlight icon that appears, then click Delete in the popup window.
- Copy from the transcript: Use your cursor to select the text, then click the Copy icon that appears.
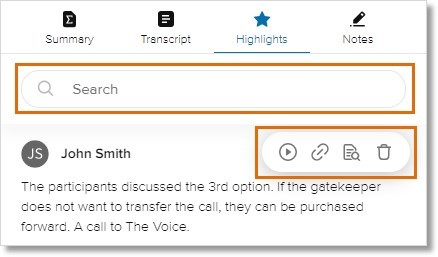
- View and manage AI-generated video highlights, and associated transcripts, from your recording: Click the Highlights tab at the top right to do the following:
- Search the transcript of video highlights: Click the search bar at the top, then enter a word or phrase. Click the arrows that appear below the search bar to move forward or backward through the transcript highlighting each mention.
- Watch video highlights: Hover over the video highlight you’d like to watch. Click the Replay highlight icon that appears to the right.
- Share links to video highlights: Hover over the video highlight you’d like to share. Click the Copy highlight link icon that appears at the right of it, then paste the link in an email or text to share it.
NOTE: A coworker can only access the recording using a shared link once you have first shared the recording directly using a Share button (see 3. Share the recording with coworkers under Viewing and managing recordings from the detail above).
- Find a video highlight within the full transcript: Hover over the video highlight you’d like to find. Click the Find in transcript icon that appears at the right of it.
- Delete a video highlight: Hover over the video highlight you’d like to delete. Click the Delete highlight icon that appears at the right of it. Click Delete in the popup window to confirm.
- View and manage the notes from the meeting: Click the Notes tab at the top to do the following:
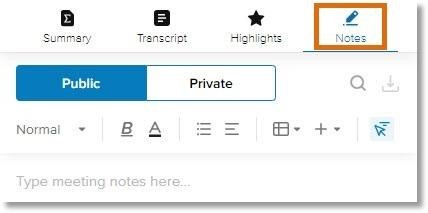
- Select public or private notes: Click Public to view and manage meeting notes visible to all participants. Click Private for your personal meeting notes visible only to you.
- Search the notes: Click the Search icon above the notes area, then enter a word or phrase.
The searched words are highlighted.
- Download the notes: Click the Download icon above the notes area. This downloads a PDF file containing all notes taken during the meeting.
- Edit the notes: Click anywhere within the notes.
- Use formatting tools: Use your cursor to select the text to format. Then, hover over any icon in the toolbar to display the tool’s name and click to apply it.
- View and manage the whiteboard from the meeting: Click the Summary tab at the top, then click Open under Whiteboard. Use the tools and shortcuts to add text or sticky notes, erase, share the whiteboard, and more.
NOTE: Edits made to the public notes or whiteboard appear for all coworkers the recording has been shared with.
Managing notification settings for meeting recordings
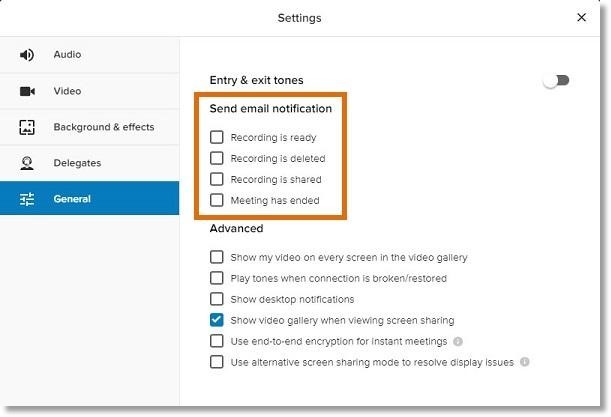
You can choose whether to receive email notifications when a recording is ready to view, has been deleted or shared, or when a meeting has ended.
- In the navigation bar, click Settings.
- Click Video in the left panel.
- Click Edit.
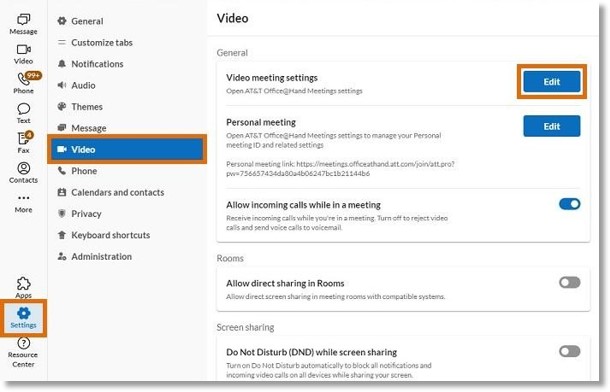
- Click General in the popup window.
- Under Send email notification, check the box(es) next to the events you want to be notified about:
Recording is ready, Recording is deleted, Recording is shared, Meeting has ended.
Key Words: AT&T Office@Hand Video, AT&T Office@Hand Web, AT&T Office@Hand Desktop, share meeting recording, meeting recording, view meeting recordings, manage meeting recordings, 71209
Was this page helpful? Yes No


