Viewing and managing licenses in your AT&T Office@Hand account
Admins with permissions can view, upgrade, downgrade, download, and delete licenses in the AT&T Office@Hand Admin Portal.
In the Admin Portal, go to Billing then click on Licenses & Inventory. In this page you can do the following:
You can click the Users tab to view licenses currently assigned to users, and update them individually or in bulk.
Viewing purchased licenses
To review licenses in your account:
- Sign in to the AT&T Office@Hand Admin Portal.
- Click Billing> Licenses & Inventory.
- You can review all licenses in the Licenses & Inventory tab. This tab shows the total number of licenses by type, as well as how many are in use or still available.
- To view licenses that are only available to users, turn on the toggle for Show only user level licenses.
Note: Certain licenses will be displayed only after you purchase them. Learn more about purchasing licenses, devices, and services for your AT&T Office@Hand account.
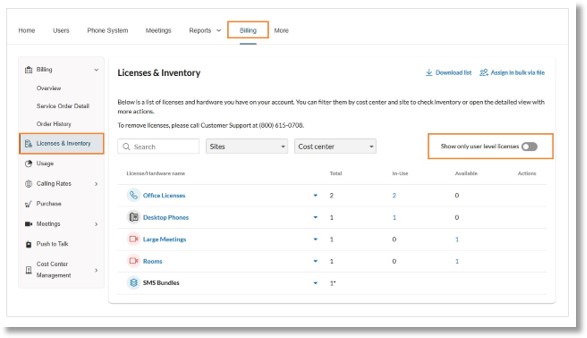
Click any license or hardware name to open the detailed view. Here, you can view your licenses in more detail and manage license inventory and assignments.
Downloading licenses
You can download a list that includes information about all of your licenses, including the name, number, email address, site, and cost center each license is assigned to, and whether it’s in use.
- Sign in to the AT&T Office@Hand Admin Portal.
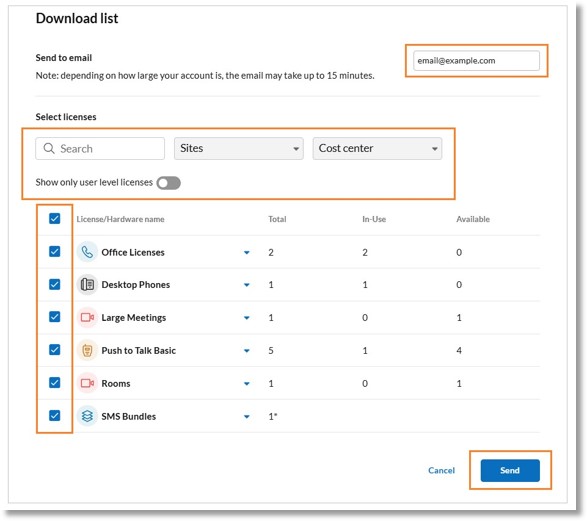
- Go to Billing> Licenses & Inventory and click Download list at the right.
- In the popup window, enter the email address that will receive the download.
- Use the search bar or dropdowns to filter licenses by Site or Cost Center, or click the toggle to Show only user level licenses. You can also click the checkboxes to select licenses manually.
- Click Send. Depending on the size of the list, you will receive an email with the list attached within 15 minutes.
Deleting additional local or toll-free numbers
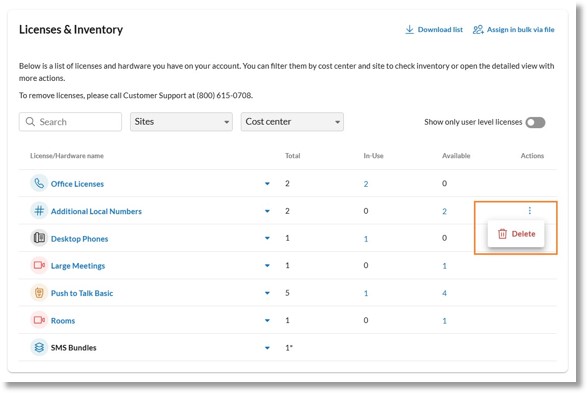
On the Licenses & Inventory page, you can delete additional local or toll-free numbers by clicking the three-dot More icon to the right and clicking Delete.
Assigning and reassigning add-on licenses individually and in bulk
Admins with Users permissions can assign and reassign licenses for the following add-ons:
- Large Meetings
- Live Reports
- Push To Talk
Assigning add-on licenses individually
- Sign in to the AT&T Office@Hand Admin Portal.
- Go to Billing > Licenses & Inventory.
- Click the add-on license name or the number of available licenses to the right.
- Under Actions, click Assign.
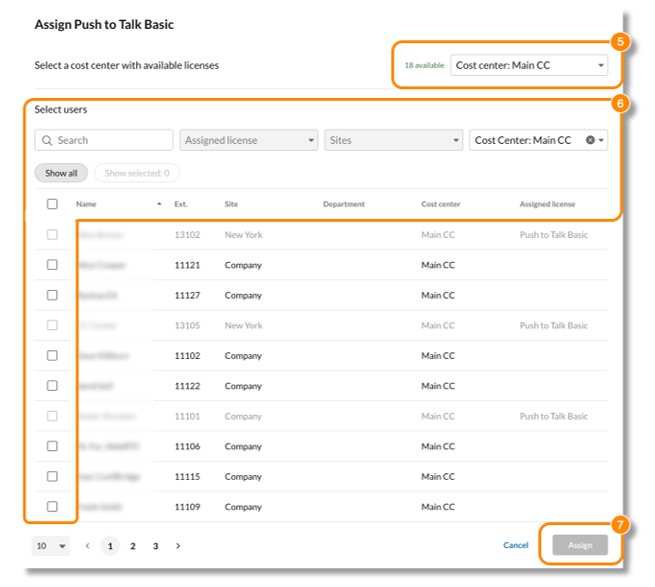
- If you have multiple cost centers, select a cost center with available licenses from the dropdown.
- Under Select users, use the search bar, dropdowns, or column titles to sort and filter the list, and the checkboxes to select the individual users the license will be assigned to.
- If you don’t have Cost Center Management permissions, select a user from the same cost center as the available license.
- If you do have Cost Center Management permission, use the Cost Center dropdown to find users in other cost centers. If you select users from a different cost center, assigning the licenses will change the cost center of the licenses to match the users’ cost centers.
- Click Assign.
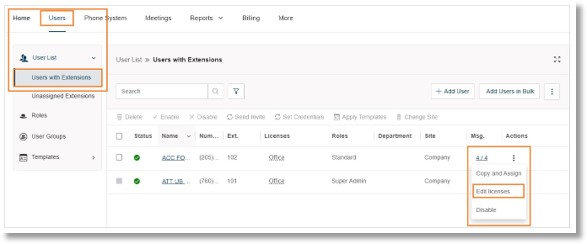
You can also assign a license to an individual user in the Users tab.
- Sign in to the AT&T Office@Hand Admin Portal.
- Go to Users > User List > Users with Extensions.
- Click the three-dot More icon to the right of the user, and click Edit licenses.
- In the popup, choose the user licenses or add-on licenses you want to assign, and click Update.
Assigning add-on licenses in bulk
- Sign in to the AT&T Office@Hand Admin Portal.
- Go to Billing> Licenses & Inventory.
- Click the add-on license name or the number of available licenses to the right.
- Click the three-dot More icon or More actions, and then click Assign in bulk via file.
- In the window that pops up, select the available licenses you want to assign and click Next.
- Prepare a file with the assignment data:
- Check the box for Include user list then click Download template.
- Open the template file in a spreadsheet program.
- In the Assign Licenses tab, add the user’s Mailbox ID next to the license. You can find the user’s Mailbox ID in the Reference User List tab.
- Follow these rules for the successful assignment of licenses:
- The Mailbox ID must match an existing user on the account.
- The user and the license must belong to the same cost center.
- The same type of license can’t be assigned to the same user more than once.
- Save the template file, then drag and drop it into the window or click + to upload it from your computer.
- Enter the email address that will receive the processing report about the license assignment.
- Click Assign. Depending on the number of licenses, assignments may take some time. You’ll receive an email once the process is completed.
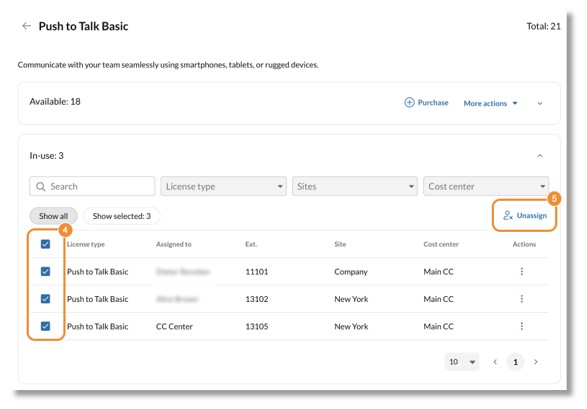
Unassigning add-on licenses in bulk
- Sign in to the AT&T Office@Hand Admin Portal.
- Go to Billing > Licenses & Inventory.
- Click the add-on license name or the number of in-use licenses to the right.
- Click the checkbox at the top left to select all in-use licenses
- At the top right, click Unassign. In the popup window, click Confirm. Selected users will lose access to add-on services. The licenses will become available to assign later.
Unassigning and reassigning add-on licenses individually
- Sign in to the AT&T Office@Hand Admin Portal.
- Go to Billing > Licenses & Inventory.
- Click the add-on license name or the number of in-use licenses to the right.
- Click the three-dot More icon to the right and select from the following:
- Unassign: Click to remove the license from the user and make it available to assign at a later time. Click Confirm in the popup window.
- Reassign: Click to open the Reassign window, where you can search or filter the list of users you want to reassign the license to. Select the new user and click Reassign.

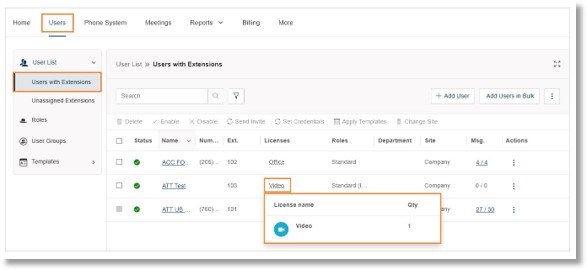
Viewing licenses assigned to users
- Sign in to the AT&T Office@Hand Admin Portal.
- Go to Users > Users with Extensions.
- Next to the user you want to manage, select the license under the Licenses column.
- This will open the license details, including the License name and quantity assigned to that user.
Updating user licenses individually
- Sign in to the AT&T Office@Hand Admin Portal.
- Go to Users > Users with Extensions.
- Click the three-dot More icon to the right of the user you want to manage.
- Click Edit licenses.
- Select the license you want to update for the user, along with any appropriate add-on licenses. Note: You can only upgrade a user to a license in your inventory. If you don’t have any available licenses, you must purchase one first.
- Click Update.
Note: The license of a downgraded user will return to the license inventory for future use.
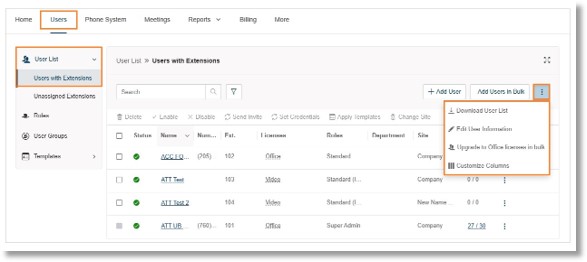
Upgrading Video users to Office License in bulk
You can upgrade multiple users from Video Pro licenses to Office licenses at the same time:
- Sign in to the AT&T Office@Hand Admin Portal.
- Go to Users > Users with Extensions.
- Click the three-dot More icon at the top right and choose Upgrade to Office licenses in bulk from the dropdown.
- Click Download template. Open the bulk upgrade template file, enter the required information, and save.
- Click Upload file to upload the template you’ve filled out.
- Enter your email address to receive a processing report when the upload finishes.
- Click Submit.
Was this page helpful? Yes No