Using a Whiteboard During an AT&T Office@Hand Video Meeting
Article #96417
This article discusses how to use the whiteboard feature tools during an AT&T Office@Hand Video meeting.
All participants in an AT&T Office@Hand Video meeting can use a whiteboard to illustrate ideas and collaborate with colleagues.
Sharing a whiteboard
While in a meeting, click the arrow next to the Share button, then select Share whiteboard.

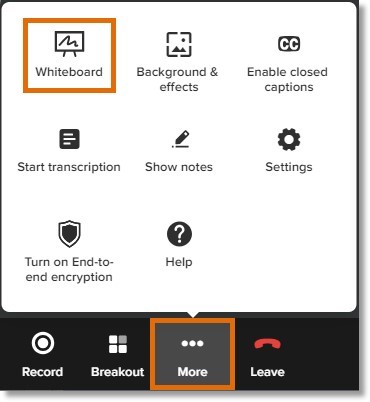
You can also share the whiteboard by clicking More > Whiteboard.

You can stop sharing at any time by clicking Stop share at the bottom of the screen. Clicking Stop share won’t erase your whiteboard contents; you can reshare any time.
NOTE: Before using a whiteboard, make sure your device meets AT&T Office@Hand Video’s system requirements.
Navigating the whiteboard
Using the minimap
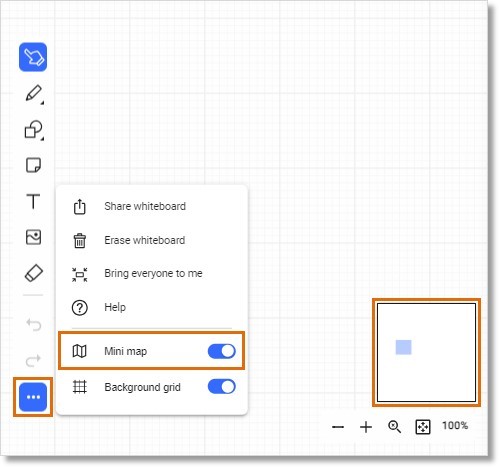
The minimap tool lets you see and move around the entire whiteboard canvas. You can find the minimap by clicking More > Minimap in the left toolbar.
When you select the minimap, a thumbnail of the whiteboard canvas appears in the lower right corner.

The light purple box in the thumbnail shows the whiteboard area displayed on your screen. You can move the light purple box to see other areas of the whiteboard or click and drag a corner to change the area size.
Zooming in and out
Use the tools in the lower right corner to see a different part of your whiteboard canvas.

Zoom out: Click the minus sign.
Zoom in: Click the plus sign.
Fit content: Display all whiteboard objects.
Zoom reset: Reset the whiteboard scale to 100%.
Using whiteboard tools and keyboard shortcuts
While sharing a whiteboard during an AT&T Office@Hand Video meeting, participants and you can use several convenient tools and keyboard shortcuts.
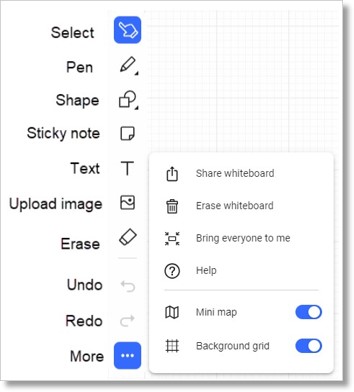
All whiteboard drawing tools appear in the whiteboard’s left toolbar. Hover over any icon to display the tool’s name, then click to activate the tool.

- Select: Click an existing object on the whiteboard to select it. Click, hold, and drag the pointer to select all objects inside an area.
- Pen: Click and hold to add freehand drawings using a pen tool.
- Shape: Select a shape in the window, then click anywhere on the canvas to add it to the whiteboard.
- Sticky note: Click anywhere on the canvas to place a sticky note, then double-click it to add text.
- Text: Click anywhere on the whiteboard to place a text box.
- Upload image: Choose an image file to place on your whiteboard. By default, images will be in the center of the whiteboard. You can move and adjust the image.
- Erase: Click an object to erase it.
- Undo/redo: You can undo or redo your last action. You can undo or redo up to 10 actions.
- More: Click to expand the toolbar to view all the tools.
- Share whiteboard: The current whiteboard will be saved as an image.
- Erase whiteboard: Click the icon, then click Confirm to erase all objects from the whiteboard.
- Bring everyone to me: All participants will gather in one whiteboard section.
- Help: A relevant help article will open in a browser window.
- Minimap: A thumbnail of the whiteboard appears in the lower right corner. The light purple box shows what’s currently displayed on your screen. You can move the light purple box to see other areas of the whiteboard or click and drag a corner of the light purple box to change the size of the displayed area.
- Background grid: The grid on the canvas will switch from on to off or vice versa.
You can adjust the tool you’ve selected using the bottom toolbar on the whiteboard. Depending on the tool, you can adjust properties, such as text or stroke color, font size, line thickness, and more.
All tools also have these options:
- Duplicate: Click to create a copy of the selected object.
- Sort: Change the position of the selected object on the whiteboard:
- Send to front
- Bring forward
- Send backward
- Send to back
- Delete: Delete the selected object.
Keyboard shortcuts
Use keyboard shortcuts to make your use of the whiteboard more efficient. You can perform many common actions by tapping individual keys or key combinations.
Drawing tools
| Action |
Shortcut |
| Switch to the select tool |
V |
| Add a shape |
S |
| Add a circle |
O |
| Add a sticky note |
N |
| Add a text box |
T |
| Add a line |
L |
| Use the pencil |
P |
| Add an arrow |
A |
| Use the vanishing pen |
H |
| Upload an image |
I |
| Erase the whiteboard |
E |
| Grid on/off |
G |
General
| Action |
Windows |
Mac |
| Cancel the addition of a selected object then return to pointer tool |
Esc |
Esc |
| Select a group of objects |
Shift + click on objects |
Shift + click on objects |
| Copy selection |
Ctrl + C |
Cmd + C |
| Paste from clipboard |
Ctrl + V |
Cmd + V |
| Duplicate an object |
Ctrl + D |
Cmd + D |
| Delete an object |
Delete/backspace |
Delete/backspace |
| Download whiteboard as PNG |
Ctrl + Shift + S |
Cmd + Shift + S |
Navigation
| Action |
Windows |
Mac |
| View the minimap |
M |
M |
| Drag the canvas |
Alt + click |
Option + click |
| Move horizontally along the whiteboard |
Shift + mouse wheel |
Shift + mouse wheel |
| Move vertically along the whiteboard |
mouse wheel |
mouse wheel |
| Zoom in/out |
Ctrl + mouse wheel |
Cmd + mouse wheel |
| Bring everyone to me |
Shift + B |
Shift + B |
Additional information
- Whiteboards can’t be shared in breakout rooms.
- Meeting recordings won’t capture whiteboards, but you can save the whiteboard as an image before your meeting ends.
- You can’t use whiteboards in end-to-end encrypted meetings (E2EE). You’ll need to stop sharing the whiteboard to use E2EE.
- Whiteboards can have up to 1,000 objects, and you can select up to 100 objects at the same time.
- Up to 30 users can draw on the whiteboard simultaneously.
- You can view and edit the whiteboard even after the meeting when you open the recording detail window.
Key Words: AT&T Office@Hand, Whiteboard, Video meeting
Was this page helpful? Yes No


