Turning On the Forward All Calls Feature in the AT&T Office@Hand Admin Portal, Mobile, and Desktop and Web
Article #96383
This article provides information on how to forward all calls in the AT&T Office@Hand Mobile, Online Account, and Desktop and Web.
The Forward all calls feature in the AT&T Office@Hand App and Admin Portal lets you forward your incoming calls when you can’t answer. You can forward incoming calls to a voicemail, coworker, external number, call queue, announcement, IVR menu, or other locations. You can also create a schedule for when your calls will be forwarded.
NOTES:
- To use the Forward all calls feature, the call handling permission is required. For more information, go to the List of user permissions.
- When Forward all calls and Do not disturb are both turned on, calls will be forwarded according to your Forward all calls settings.
Turning on your own Forward all calls feature
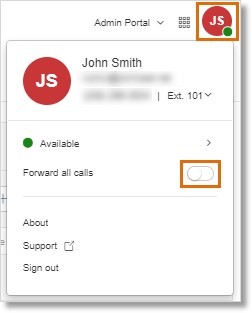
- Go to the Admin Portal and sign in.
- Click your profile picture at the top right.
- Turn on Forward all calls.
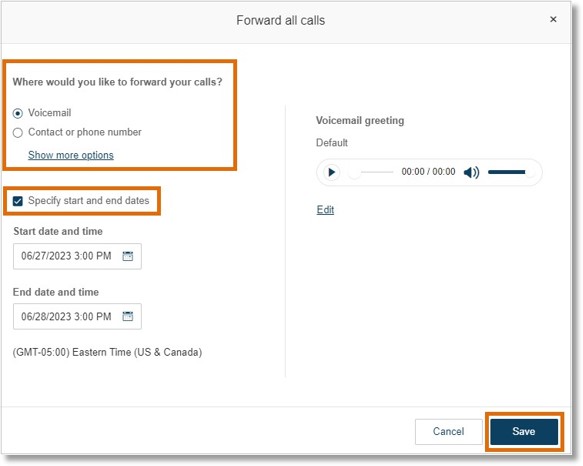
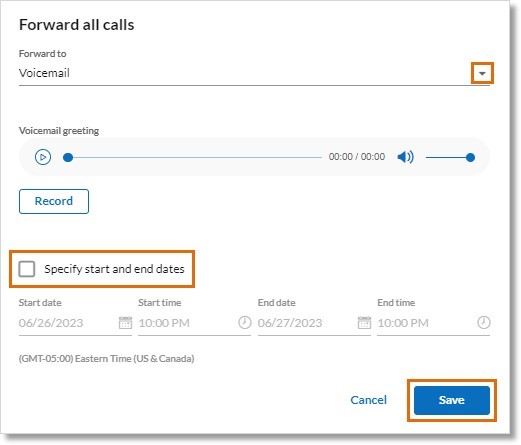
- Select an option under Where would you like to forward your calls? Click Show more options to see the complete list.
- Voicemail: Select to forward calls to your voicemail. Click Edit and follow the prompts to record a custom greeting.
- Contact or phone number: Select to forward calls to a coworker or outside number, such as an answering service. Enter a name or phone number in the search box, then click the desired option.
- Announcement: Select to play an announcement. You can use the default announcement or click Edit and follow the prompts to record a custom greeting.
- Call queue: Select to forward calls to a call queue. Click Select extension, then enter the call queue name or extension number in the search box. Click the desired call queue. You can further narrow your search by clicking the down arrow next to Sites and selecting your desired sites from the dropdown.
- Delegated line: Select to forward calls to a delegated line. Click Select extension, then enter the delegated line name or extension number in the search box. Click the desired delegated line. You can further narrow your search
by clicking the down arrow next to Sites and selecting your desired sites from the dropdown.
- Shared line: Select to forward calls to a shared line. Click Select extension, then enter the shared line name or extension number in the search box. Click the desired shared line. You can further narrow your search by clicking the down arrow next to Sites and selecting your desired sites from the dropdown.
- IVR menu: Select to forward calls to an IVR menu. Click Select menu, then enter the IVR menu name or extension number in the search box. Click the desired IVR menu. You can further narrow your search by clicking the down arrow next to Sites and selecting your desired sites from the dropdown.
- Check the box for Specify start and end dates to set dates and times for Call forwarding, then select your desired dates and times. This is useful for forwarding calls when you take a break or go on vacation.
- Click Save.
A banner at the top of the Admin Portal will remind you when your calls are being forwarded. You can click Edit to change your Call forwarding settings or click Turn off to stop forwarding your calls.
Turning on the Forward all calls feature for someone else
Admins can turn on the Forward all calls feature for a user.
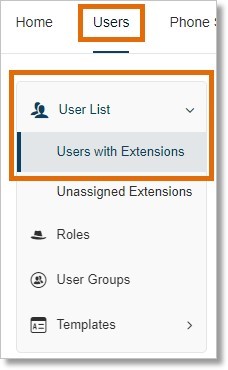
- Go to the Admin Portal and sign in.
- Go to Users > User List > Users with Extensions, then select the user.
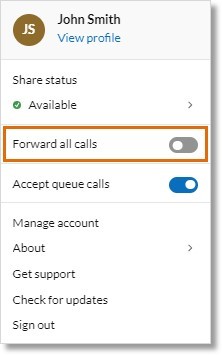
- Click Call Handling.
- Turn on Forward all calls.

- Select one of the options under Where would you like to forward your calls?. Click Show more options to see the complete list.
- Voicemail: Select to forward the user’s calls to their voicemail. Click Edit and follow the prompts to record a custom greeting.
- Contact or phone number: Select to forward the user’s calls to a coworker or outside number, such as an answering service. Enter a name or phone number in the search box, then click the desired option.
- Announcement: Select to play an announcement. You can use the default announcement or click Edit and follow the prompts to record a custom greeting.
- Call queue: Select to forward the user’s calls to a call queue. Click Select extension, then enter the call queue name or extension number in the search box. Click the desired call queue. You can further narrow your search by clicking the down arrow next to Sites and selecting your desired sites from the dropdown.
- Delegated line: Select to forward the user’s calls to a delegated line. Click Select extension, then enter the delegated line name or extension number in the search box. Click the desired delegated line. You can further narrow your search by clicking the down arrow next to Sites and selecting your desired sites from the dropdown.
- Shared line: Select to forward the user’s calls to a shared line. Click Select extension, then enter the shared line name or extension number in the search box. Click the desired shared line. You can further narrow your search by clicking the down arrow next to Sites and selecting your desired sites from the dropdown.
- IVR menu: Select to forward the user’s calls to an IVR menu. Click Select extension, then enter the IVR menu name or extension number in the search box. Click the desired IVR menu. You can further narrow your search by clicking the down arrow next to Sites and selecting your desired sites from the dropdown.
- Check the box for Specify start and end dates to set dates and times for Call forwarding, then select the desired dates and times. This is useful for forwarding calls when a user is on a break or goes on vacation.
- Click Save.

Admins will see a banner in the Call Handling section for the selected user when Forward all calls is turned on.
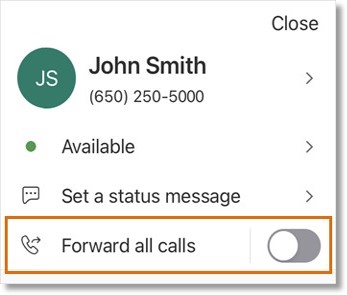
- Click your profile picture in the top bar.
- Turn on Forward all calls.
- In the popup window, click the Forward to dropdown and select where you want to forward your calls. Click Show more options to see the complete list. The available options will vary depending on your permissions.
- Voicemail: Select to forward calls to a voicemail box. Click Add new voicemail box, then enter the Voicemail box name, Extension number, and Email address. Follow the prompts to record a custom greeting.
- Contact or phone number: Select to forward calls to a coworker or outside number, such as an answering service. Enter a name or phone number in the search box, then click the desired option.
- Announcement: Select to play an announcement. You can use the default announcement or follow the prompts to record a custom greeting.
- Call queue: Select to forward calls to a call queue. Enter the call queue name or extension number in the search box, then click the desired call queue.
- Delegated line: Select to forward calls to a delegated line. Enter the delegated line name or extension number in the search box, then click the desired delegated line.
- Shared line: Select to forward calls to a shared line. Enter the shared line name or extension number in the search box, then click the desired shared line.
- IVR menu: Select to forward calls to an IVR menu. Enter the IVR menu name or extension number in the search box, then click the IVR menu.
- Check the box for Specify start and end dates to set dates and times for Call forwarding, then enter your desired dates and times. This is useful for forwarding calls when you take a break or go on vacation.
- Click Save.
A banner at the top of the AT&T Office@Hand App will remind you when your calls are being forwarded. You can click Edit to change your Call forwarding settings or click Turn off to stop forwarding your calls.
- Tap your profile picture at the top left.
- Turn on Forward all calls.
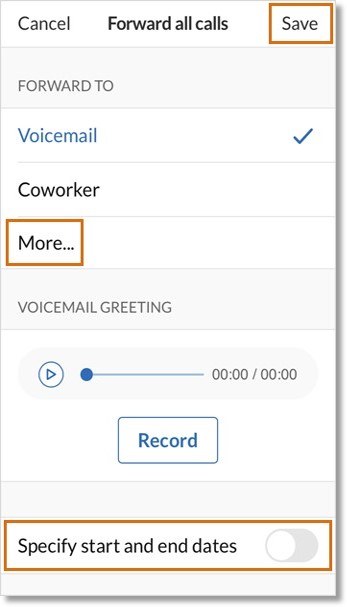
- Under Forward to select where you want to forward your calls. Tap More… to see the complete list.
- Voicemail: Select to forward calls to your voicemail. Tap Record to create your custom voicemail greeting.
- Contact or phone number: Select to forward calls to a coworker or outside number, such as an answering service. Enter a name or phone number in the search box, then tap the desired option.
- Announcement: Select to play an announcement. You can use the default announcement or tap Record to create a custom greeting.
- Call queue: Select to forward calls to a call queue. Tap Select, then enter the call queue name or extension number in the search box. Tap the desired call queue.
- Delegated line: Select to forward calls to a delegated line. Enter the delegated line name or extension number in the search box, then tap the desired delegated line.
- Shared line: Select to forward calls to a shared line. Tap Select, then enter the shared line name or extension number in the search box. Tap the desired shared line.
- IVR menu: Select to forward calls to an IVR menu. Tap Select, then enter the IVR menu name or extension number in the search box. Tap the desired IVR menu.
- Tap the toggle switch for Specify start and end dates to set dates and times for Call forwarding, then select your desired dates and times. This is useful for forwarding calls when you take a break or go on vacation.
- Tap Save at the top right.
A banner at the top of the AT& Office@Hand Mobile will remind you when your calls are being forwarded. You can tap the banner, then tap Edit to change your Call forwarding settings, or tap Turn off to stop forwarding your calls.
Key Words: AT&T Office@Hand, Online Account, Admin Portal, forward all calls, set up forward all calls, forward all calls settings, 95800, 96383, 96382, AT&T Office@Hand App, AT&T Office@Hand Desktop, AT&T Office@Hand Web, ATT Office@Hand Mobile, mobile app
Was this page helpful? Yes No