The New AT&T Office@Hand App Layout #96689
The AT&T Office@Hand App now has a unified inbox, an improved phone layout, and more options for customization and multitasking. You can now pop out windows and shrink the main app window down to a compact size without losing access to any of your features.
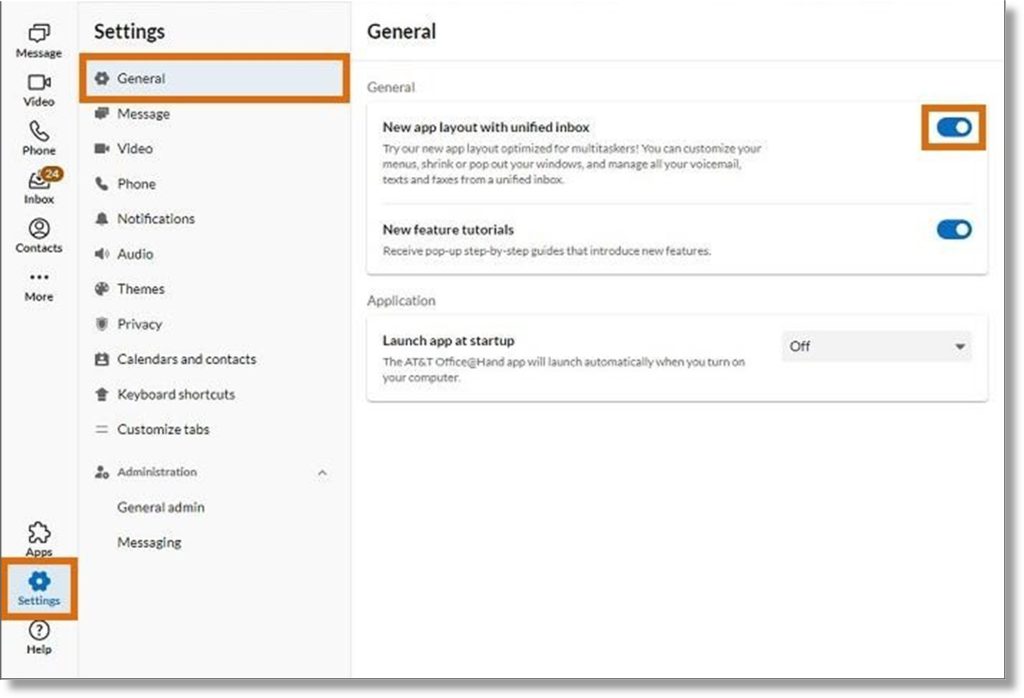
Turning on the new app layout
You can turn on the new app layout using the toggle on your top menu bar. The new layout is turned on when the toggle is to the right.

You can also turn on the new layout in your settings:
- In the left navigation bar, click Settings.
- Under General, turn on New app layout and consolidated Inbox.
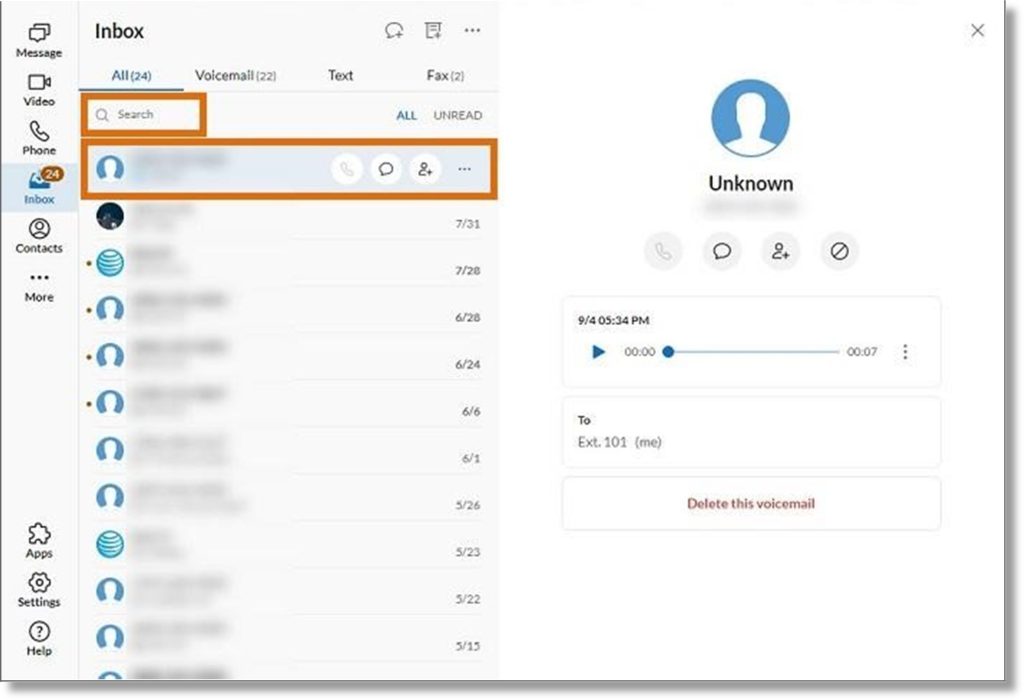
Unified inbox
The new unified inbox is one central place to view your voicemails, text messages, and faxes.
Click the All tab to view your voicemails, text messages, and faxes together. Click the Voicemail, Text, or Fax tab to see that specific type of message.
- You can use the filter to show messages from a specific person or number, or click on the right side of the header to show all or only unread messages.
- Hover over a message for options to contact the sender, add them as a contact, delete the message from the log, or block the sender. The options will vary based on the sender and message type (voicemail, text, or fax).
- Click any message to open the detailed view in the main window.
NOTE: Text messages now have previews, so you can get a glimpse of the contents of your messages without having to click on each one.
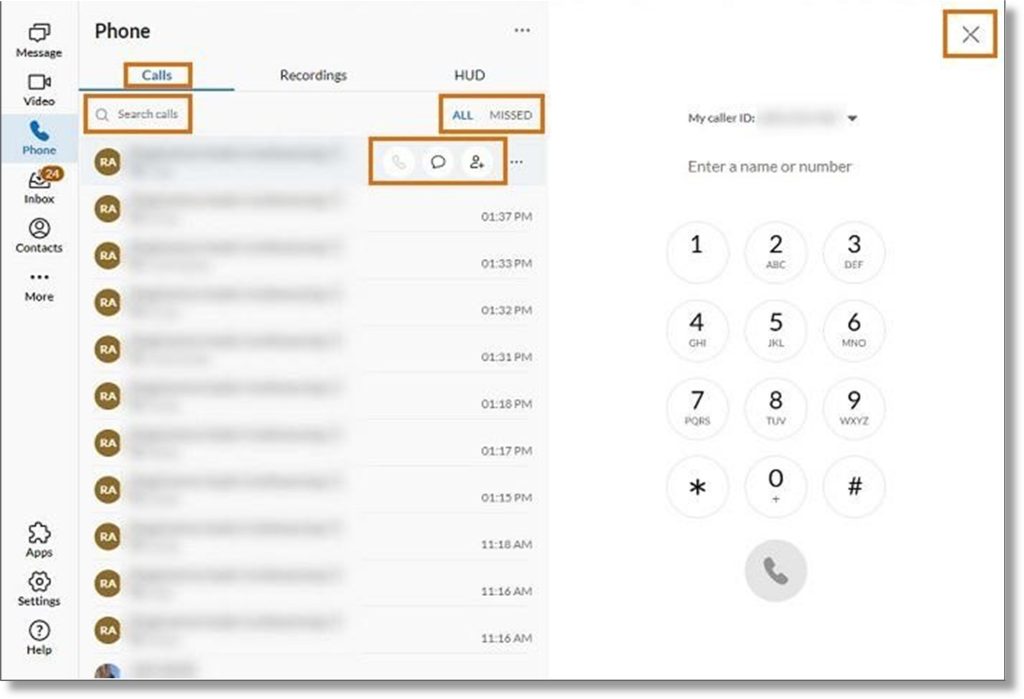
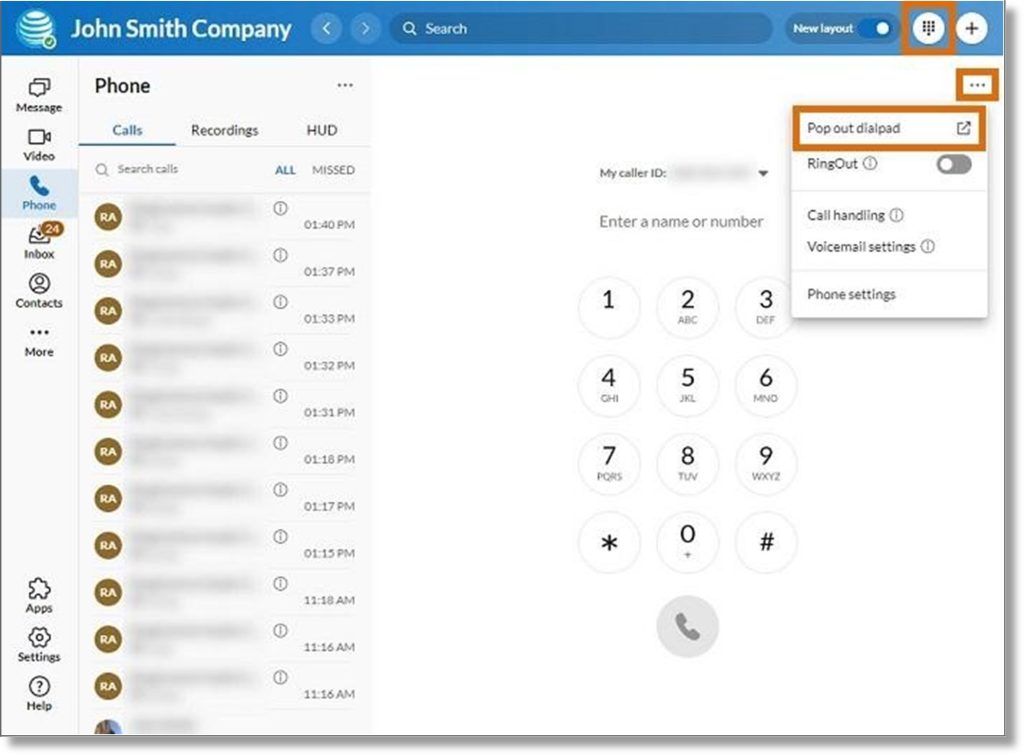
Improved phone layout
The new phone tab provides quick access to the dialpad, your calls and recordings, and the HUD, all in one place.
- Click Calls to see your call history. The dialpad will display in the main window.
- You can use the filter to show calls from a specific person or number, or click on the right side of the header to show all or only missed calls.
- Hover over a call in the log for options to contact the caller, add them as a contact, delete the call from the log, or block the caller. The options will vary based on the caller.
- Click any call in the log to open the details in the main window, with options to contact the caller or delete the call.
- To close a call entry and return to the dialpad, click the X Close icon in the upper right corner.
- Click Recordings to see your call recordings.
- You can use the filter to show recordings of calls from a specific person or number.
- Hover over a recording for options to contact the caller, add them as a contact, delete the recording from the log, or block the caller. The options will vary based on the caller.
- Click any recording in the log to open the details in the main window, with options to contact the caller or delete the recording.
- To close a recording and return to the dialpad, click the X Close icon in the upper right corner.
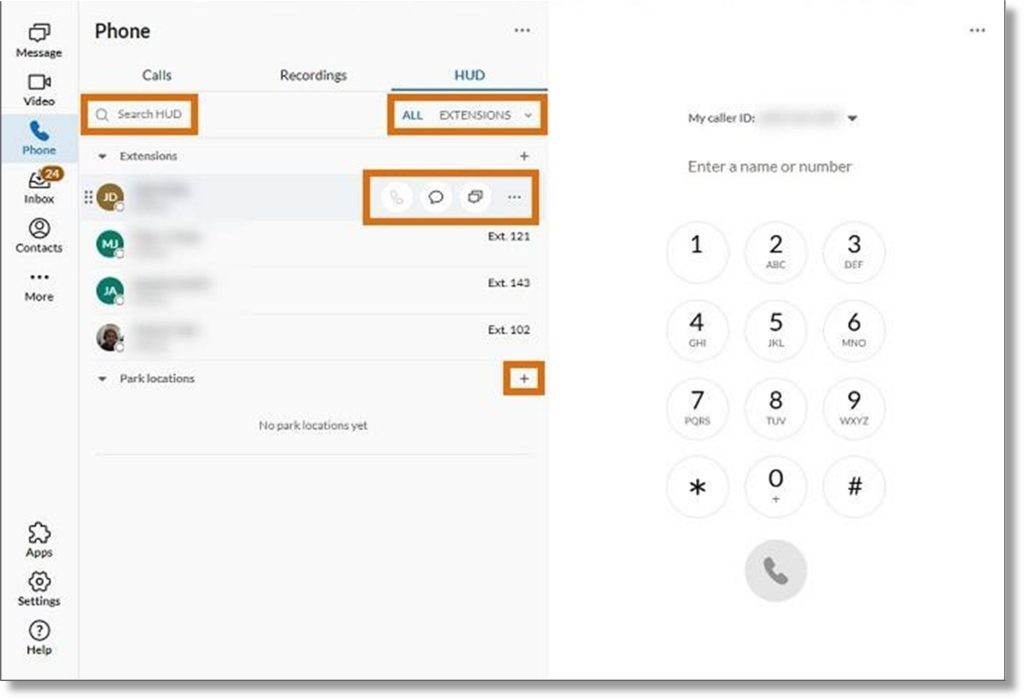
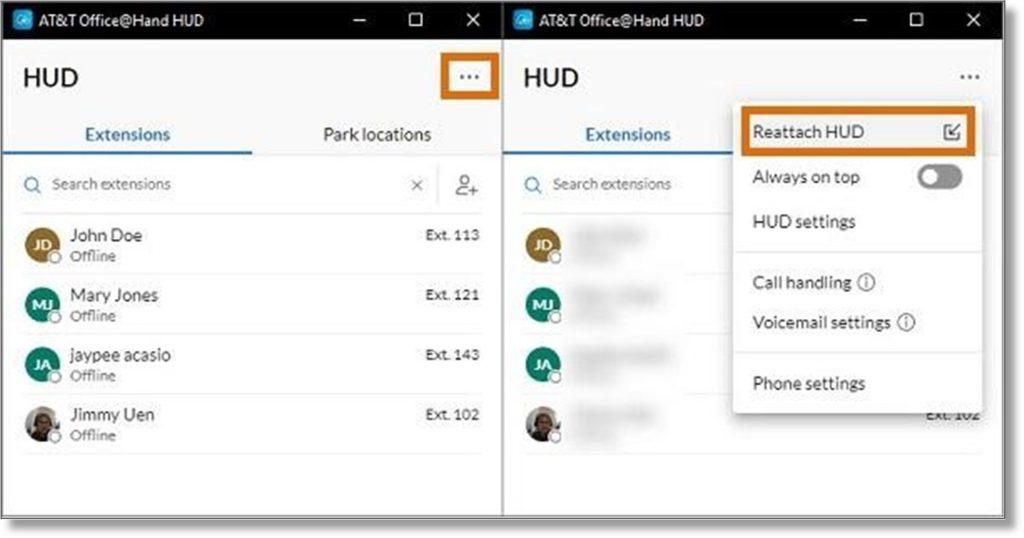
- Click HUD to use the Heads-up display.
- You can filter your HUD to a specific person or number, or click All on the right side of the header to show only your extensions, park locations, or call queue pickup.
- Hover over any extension for options to contact or remove the extension from the HUD. Hover over any park location for options to remove the location from the HUD.
- Click the New action + icon to the right of Extensions or Park location to add another one.
Improved flexibility for multitasking
Compact mode
- You can now shrink the main app window down to a compact size without losing access to any of your features, making it easier to multitask.
- When the app is full size, your navigation bar will still appear on the left side. When you shrink the app into Compact mode, the navigation bar will appear on the bottom.
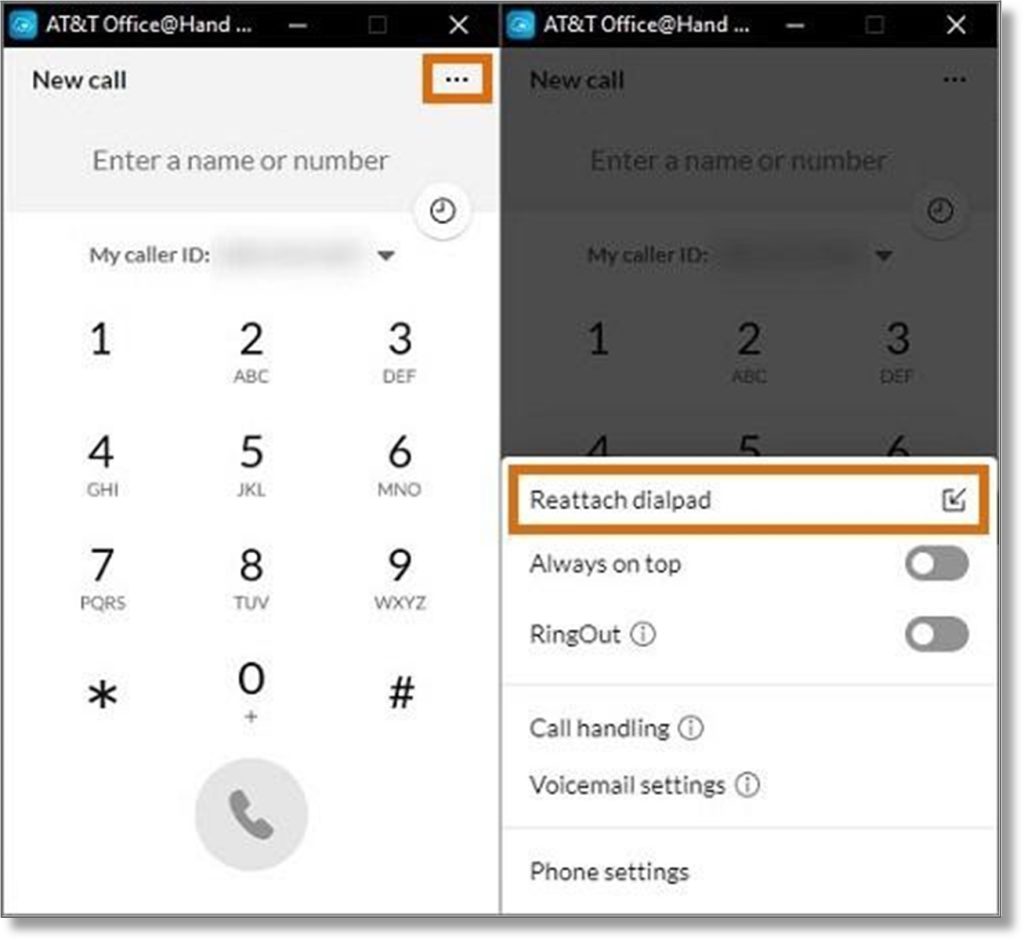
Pop-out dialpad and HUD
- You can pop the dialpad out of the main window by clicking the More icon above the dialpad, and then Pop-out dialpad.
- When the dialpad is popped out and hidden behind other apps, you can click the dialpad icon in the top menu bar to bring it to the front.
- To dock the dialpad back in the main window, click the More icon and select Reattach dialpad.
- You can pop the HUD out of the main window by clicking the More icon and then Pop-out HUD. To dock the HUD back in the main window, click the More icon and select Reattach HUD.
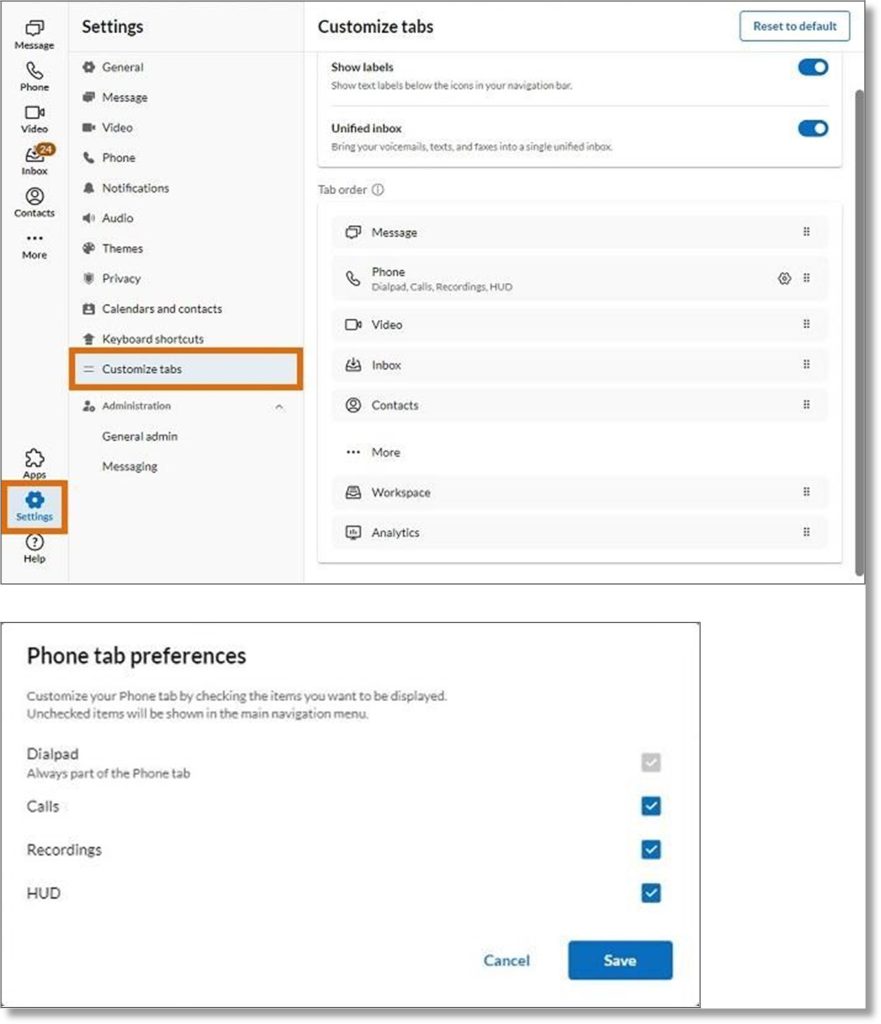
Customizable navigation bar
To customize your navigation bar:
- Click Settings.
- Click Customize tabs.
- Under Display preferences, you can choose to show or hide text labels in your navigation bar.
- You can turn off the Unified inbox to have separate tabs in your navigation bar for voicemails, texts, and faxes.
- Under Tab order, click the six-dot drag handle and drag and drop tabs to change their order in your navigation bar.
- To access any of the Phone tabs separately in the navigation bar, click the Settings gear icon next to Phone.
- Uncheck any of the items you would like to move out of the Phone tab and into the main navigation bar.
- Click Save.
Key Words: AT&T Office@Hand App, AT&T Office@Hand Desktop, AT&T Office@Hand Web, app layout, new app layout, 96689
Was this page helpful? Yes No