Swapping Device with Another Phone on Your Account | AT&T Office@Hand
Article #74385
This article provides instructions on how to swap your desk phone with another one without changing its assigned number.
Before swapping out a device with another phone on your account, make sure to note the serial number of the phone that you want to swap with your current device. Go to Serial Number Location on Deskphones for more information.
If you already have a desktop IP phone purchased from AT&T Office@Hand but is not currently in use, you can swap out a device with that phone without changing the phone number already assigned. Alternatively, you can also choose to swap a desktop IP phone currently assigned to another user.
NOTE: This also applies to a newly received phone or first-time install. You can swap or change a phone with an Unassigned Phone from your inventory.
Changing a user’s phone with an unassigned phone
- Go to the Admin Portal and sign in.
- Go to Users > User with Extensions.
- Select the user you want to configure, and go to Phones & Numbers under the Extension tab.
- Alternatively, you can go to Phone System > Phones & Devices > User Phones.
- Click the More icon at the far right of the device you want to replace.
NOTE: The phone needs to be plugged in to see it on the list.
- Select Change Phone from the dropdown.

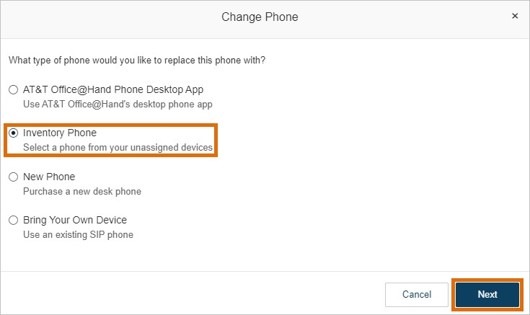
- Select Inventory Phone and click Next
- You will be provided with a list of phones available for swapping. Select the phone with the correct serial number, then click Next.
- Confirm the change by clicking the Swap button.
- A confirmation page will be shown. Click OK.
- You will be redirected to the phone details screen. You can update the Name and the Emergency Response Location, then click Save.
Alternate method
If you encounter any difficulties or errors when trying to swap devices, change both phones to the AT&T Office@Hand Phone app first before swapping them, as outlined in the steps below.
- Click the more icon at the far right of the device you want to replace.
- Select Change Phone from the dropdown.
- Select AT&T Office@Hand Phone, then click Next.
- Click the acknowledgment box, then click Next.
- Select the Emergency Response Location from the dropdown list of existing emergency addresses, then click Next. If none is listed, click New to create one. Select a Location type, enter a Nickname, and click Edit to add your Emergency Address.
Fill in the address details, then click Done.
- Click Add, then click Next.
- Confirm the information shown, and then click Done.
- Repeat steps 1-7 for the device you want to replace the phone with.
- Go back to Phone System > Phones & Devices > User Phones. Select the phone you initially wanted to change.
NOTE:
- The device name will be shown as the AT&T Office@Hand Phone app.
- If multiple AT&T Office@Hand Phone app devices are shown in the list, you can identify the intended device via its indicated extension name and phone number.
- Select Inventory Phone.
- Select the phone with the correct serial number, then click Next.
- Confirm the change by clicking the Swap button.
- A confirmation page will be shown. Click OK.
In either method mentioned above, the phone(s) must be rebooted for the changes to take effect. If the phone does not reboot automatically, unplug the phone and then plug it back in to reboot.
Keywords: AT&T Office@Hand, swap phones, switch phones
Was this page helpful? Yes No
