Setting up your Caller ID in the AT&T Office@Hand Admin
Article# 96606
This article explains how to set up a caller ID using the Admin portal as an admin or user.
Admins or users with the necessary permissions can set the caller ID that’s displayed for their own or someone else’s outgoing calls.
Setting your own caller ID
- Sign in to the Admin Portal.
- Go to Settings in the top menu.
- Go to Outbound calls/faxes > Caller ID.
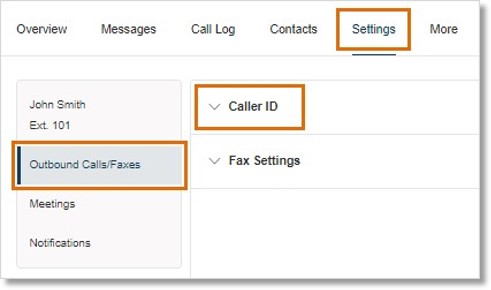
- Click Edit below each feature to select the phone number you’d like to display as your caller ID. This will only change the caller ID for that feature.
NOTE: The availability of these features depends on your AT&T Office@Hand plan and permissions.
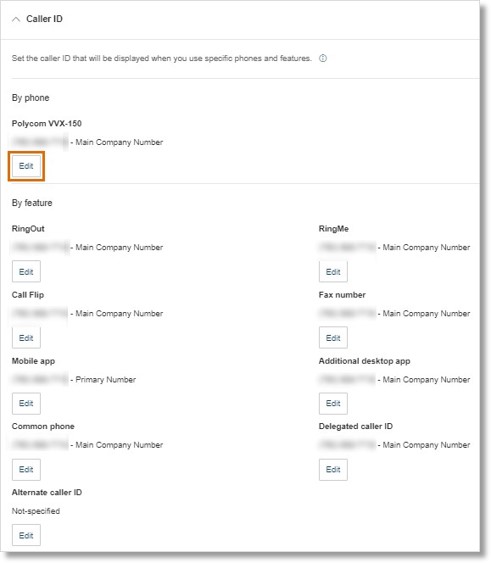
- Click Save.
Setting someone else’s caller ID
- Sign in to the Admin Portal.
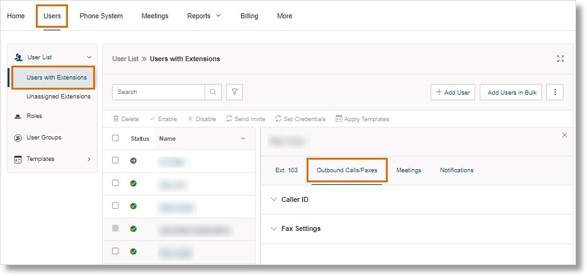
- Go to Users in the top menu.
- In Users with Extensions, select a name from the list.
- Go to Outbound calls/faxes > Caller ID.
- Click Edit below each feature to select the phone number you’d like to display as that user’s caller ID.
This will only change the caller ID for that feature.
NOTE: If you want all users to have the same caller ID, such as your main company number, make sure that number is assigned to the Auto-receptionist.
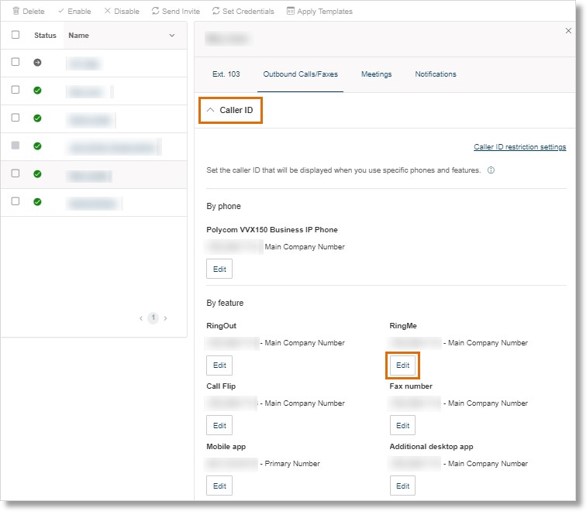
- Click Done.
- Click Save.
Managing caller ID restrictions
Admins can restrict caller IDs based on categories. This feature only supports company and direct numbers.
- Sign in to the Admin Portal.
- Go to Users in the top menu.
- Click User List > Users with Extensions.
- Select a name from the list, then click the Outbound Calls/Faxes tab.
- Click Caller ID.
- Click Caller ID restriction settings.
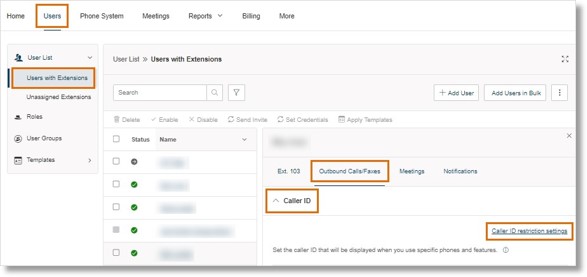
- In the popup, click the toggle off next to the caller IDs you don’t want to allow.
- Allow direct numbers as caller ID
- Allow company numbers as caller ID
- Allow company fax number as caller ID
- Click Save.

You can also manage caller ID restrictions for multiple users by editing the user settings template.
- 1. Sign in to the Admin Portal.
- Go to Users in the top menu.
- Click Templates > User Settings.
- Click an existing template, then click the Outbound tab.
- Click Caller ID.
- Click Caller ID restriction settings.
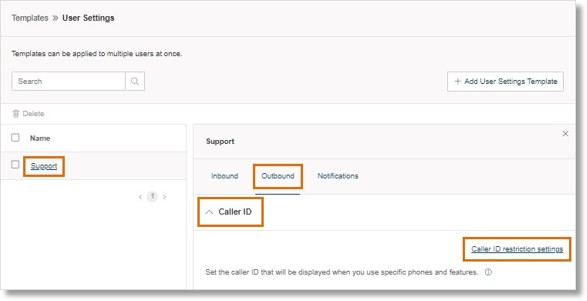
- Click the toggle off next to the caller IDs you don’t want to allow.
- Allow direct numbers as caller ID
- Allow company numbers as caller ID
- Allow company fax number as caller ID
- Click Save.

Once saved, the change will apply to all user settings you created with the template originally.
Key Words: AT&T Office@Hand Online Account, Admin Portal, Caller ID, set up caller ID, set up own caller ID, set up other extension’s caller ID
Was this page helpful? Yes No


