This article provides instructions on how to set up the user extension call handling and forwarding settings for business hours.
Admins and users can configure where to receive incoming calls during or after active user hours in the AT&T Office@Hand online account.
Configuring call forwarding settings
- Log in to your AT&T Office@Hand online account.
- Follow the navigation path below depending on your access profile:
- Admins: On the Quick Access page in the Admin Portal, navigate to Users > Manage Users, select the extension to configure, then click Call Forwarding and Voicemail.
- Users: Navigate to Settings > Call Forwarding and Voicemail.
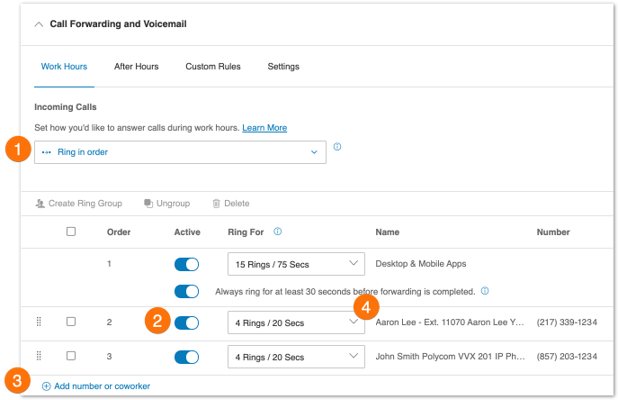
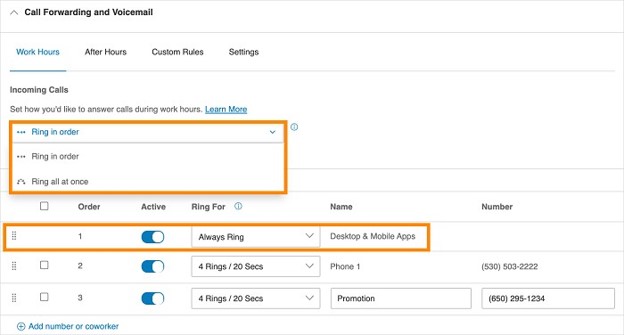
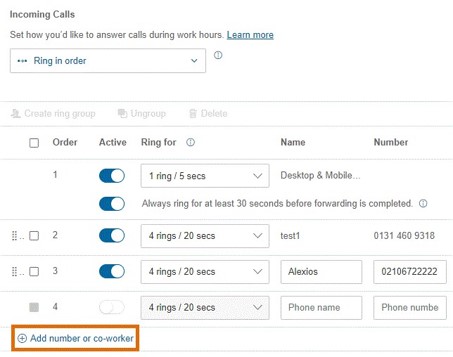
- Under Work Hours, set how you’d like to answer calls during work hours for Incoming calls. Choose the ring order.
- Ring in order: Rings the call forwarding numbers in preferred order. To arrange the numbers’ order, click and hold the drag icon, then move it to your preferred order location.
- Ring at once: Rings all of the enabled call forwarding numbers at the same time. There may be some delays in ringing devices, such as mobile phones, due to the different carrier networks.
NOTE: You can add up to 10 phones to your forward when your ringing sequence is set to sequential or simultaneous.
By default, the desktop and mobile apps option is enabled and is set to ring first before your other forwarding numbers. You can toggle the slider to disable it, or drag and drop Desktop & Mobile apps to change the order.
- Choose where you want calls to be forwarded. You can choose one or more of the following:
- Desktop & Mobile apps
- Deskphone
- Third-party numbers
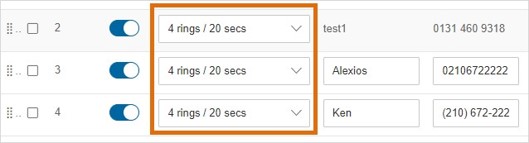
- Set the number of rings for each phone and/or forwarding number on the list. One ring is equal to about 5 seconds.
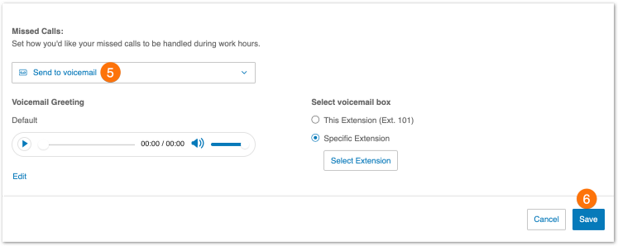
- Set how you’d like your missed calls to be handled during work hours under Missed calls. Choose from the drop-down menu.
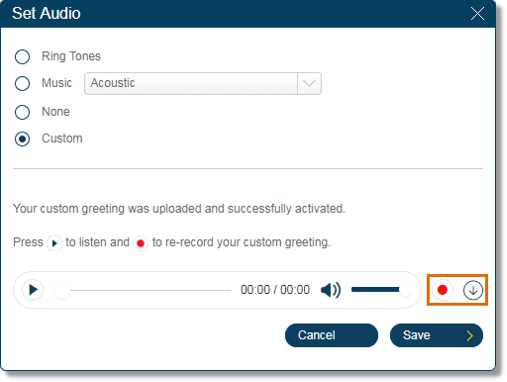
- Send to voicemail: Send callers to voicemail. Set the voicemail greeting and choose the voicemail box of the current extension or a different extension.
- Play message and disconnect: Play an Unavailable Greeting to the caller. You can use the default unavailable greeting or record a custom unavailable greeting.
- Forward to extension: Forward the call to the selected extension.
- Forward to external number: Forward the call to the specified phone number.
- Click Save.
Call forwarding devices
Calls forwarded to the user extension can be answered from different devices.
Desktop and mobile apps
You can answer forwarded calls using the RingCentral desktop or mobile app if you have the apps installed and are logged in.
- Enable Desktop & Mobile apps.

- Click Save.
Deskphone
If your phone system administrator ordered a deskphone for you, you have the option to receive incoming calls to your deskphone.
Click the toggle switch to enable your deskphone.

Third-party numbers
You can add up to 10 forwarding numbers for each extension assigned to you and set calls to ring sequentially or simultaneously.
- Select additional devices (if any) you would like to ring when you receive an incoming call to your business number.
- If you need to add more numbers, click Add number or co-worker.
- Choose whether you’re adding a Number or a Coworker.
- Enter the phone number and a corresponding custom label for it on the space provided.

- Click Save.
Issue when the AT&T Office@Hand app is added as a coworker call forwarding phone
The AT&T Office@Hand app (desktop/mobile/web) and web integrations can be set as forwarding numbers but will not ring. For example, User A wants to ring their coworker User B, who uses the AT&T Office@Hand app, while they are on vacation. Another example is a department with a front desk extension that should ring the other users in the department.
Desk phones and AT&T Office@Hand Phone desktop and mobile apps register using a static ID that allows ringing those devices when configured as a coworker phone. However, the AT&T Office@Hand app currently registers using a dynamic ID that doesn’t support this use case.
If you have virtual extension configurations that upgraded from AT&T Office@Hand Phone app to AT&T Office@Hand app, you may likely report that your call forwarding has stopped working.
Recommendations when AT&T Office@Hand app doesn’t ring when added as a coworker call forwarding phone
These are the likely scenarios where you need the ability to ring a coworker who uses AT&T Office@Hand app.
| Use case |
Description |
Recommendation |
| Front Desk |
Virtual extension configured to ring one or more AT&T Office@Hand app users |
Call Queue and Call Queue Pickup
Admins should add users who are offered the call first as call queue agents, while secondary users are added as call queue pickup members.
Set the pickup alert timer based on the desired call notification delay between agents and pickup members.
|
| Missed call |
AT&T Office@Hand app User A needs to forward unanswered calls to AT&T Office@Hand app User B instead of sending the call to voicemail for User A. |
Group Call Pickup
Admins should add users who need to answer each other’s calls to a group call pickup. Set the pickup timer alert based on the desired call notification delay between the original called user and pickup members.
|
Back to top