Setting up and Managing ATAs and other Multi-User Devices | AT&T Office@Hand
Article # 97403
This article provides information on how to configure ATAs and other Multi-user devices in the AT&T Office@Hand Online Account.
Analog telephone adaptors (ATAs) are multi-user devices used to connect standard analog telephones to a digital telephone system. They can be set up with multiple DigitalLines. As an admin, you can set up multiple users with a single ATA, allowing you to quickly and efficiently provision your workforce.
NOTE: Make sure you have the appropriate licenses in your license inventory to proceed.
AT&T Office@Hand supports a collection of high-density ATAs from Audiocodes, including MediaPack 504, MediaPack 508, and MediaPack 124.
Limitations
- To receive support from AT&T Office@Hand, you must set up your ATA using assisted setup.
- Only voice calls and fax are supported.
- Only analog phones are supported. VoIP phones are not supported.
- Supported countries include Canada, Puerto Rico, the United Kingdom, and the United States.
- Limited Extensions are not supported.
Adding a multi-user device
Before you can set up your device to work with AT&T Office@Hand, you’ll need to add it to AT&T Office@Hand’s Admin Portal.
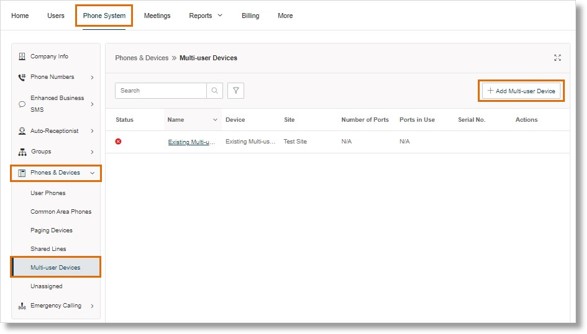
- Sign in to the Admin Portal.
- Click the Phone System tab.
- In the left-hand navigation bar, click Phones & Devices.
- Select Multi-user Devices.
- You’ll see a list of your existing multi-user devices. Click Add Multi–user Device.

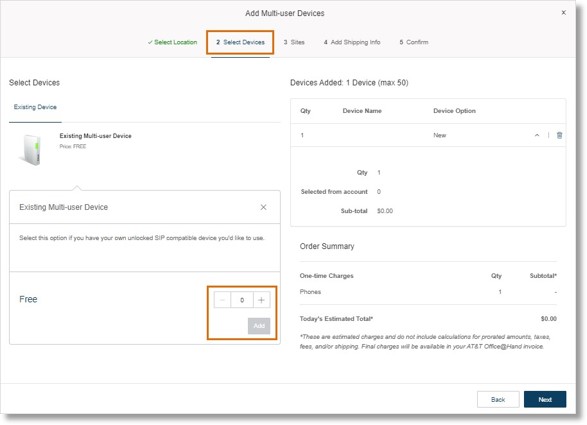
- In the Select Location tab, select your country.
- Click the Select Devices tab. Under Existing Multi-user Devices, enter the number of devices you want to add.

- In the Sites tab, choose the site you want to assign the device to from the dropdown.
- Click Next. Your device will now appear in the list of multi-user devices.
Setting up a multi-user device
After you’ve added your multi-user device, configure it to work with AT&T Office@Hand.
- In the Admin Portal, click the device you just added in the Phone System tab.
- Click Set Up and Provision.
- In the Select Device tab, start typing your model and select it from the list. Click Next.
- In the Provisioning tab, you’ll see instructions for the device itself, and for locating your device’s MAC address. Scroll down to enter your MAC address, and click Next.
NOTE: For instructions on setting up an Audiocodes ATA, go to Setting up Audiocodes analog telephone adapters (ATAs).
Assigning a multi-user device to users
Follow these steps to assign a multi-user device to users.
- In the Admin Portal, go to the Overview tab.
- At the bottom of the page, click Set Up and Assign.
- In the Select Assignees tab, select the users.
- In the Configure Phone tab, give the phone a nickname, if desired.
- In the Select Number tab, choose a number from the Number Inventory or select New Number.
- In the Add Emergency Response Location tab, add a location for the device. It will be the default emergency location for all the assigned ports.
- In the Confirm tab, check the price is correct, then click Done. In the Ports tab that appears in the left-hand panel, you can adjust bandwidth settings.
Reassigning users to other ports
Follow these steps to reassign users to other ports in your multi-user device:
- Sign in to the Admin Portal.
- Click the Phone System tab.
- In the left-hand navigation bar, click Phones & Devices.
- Select Multi-user Devices.
- Select the multi-user device you want to reassign from the list.
- Go to the Ports tab on the left-hand menu. You’ll see a list of users and their assigned port numbers.
- Drag and drop the user you want to reassign to another port.
NOTE: The Port Name will still register as the original port number (for example, Device Name – port 6) when you move it from Port 6 to another port.
- Click Save.
Alternatively, follow these steps to reassign the device from the Users menu:
- Sign in to the Admin Portal.
- Under the Users tab, click Users with Extensions.
- Select the user you want to reassign, then click Devices & Numbers.
- Select the phone associated with the multi-user device (for example, WilsonCo MP508 port 2).
- Under Actions, click the three-dot More icon.
- Click Change Port.
- Locate the user you want to reassign, then drag and drop the user to another port.
NOTE: The Port Name will still register as the original port number (for example, Device Name – port 6”) when you move it from Port 6 to another port.
- Click Save.
Removing users from a multi-user device
Follow these steps to unassign users from your multi-user device:
- Sign in to the Admin Portal.
- Click the Phone System tab.
- In the left-hand navigation bar, click Phones & Devices.
- Select Multi-user Devices.
- Select the multi-user device you want to remove from the list.
- Go to the Ports tab on the left-hand menu. You’ll see a list of users and their assigned port numbers.
- Locate the user you wish to unassign. Under Actions, click the three-dot More icon.
- Click Unassign. The user will be removed from your account and the license will be placed back into your inventory for future use.
- Follow the instructions in the Delete Line window.
- Click Confirm.
Deleting a multi-user device
Follow these steps to delete a multi-user device:
- Sign in to the Admin Portal.
- Click the Phone System tab.
- In the left-hand navigation bar, click Phones & Devices.
- Select Multi-user Devices.
- Select the multi-user device you want to delete from the list.
- Click Delete.
NOTE: All the users assigned to this device must be removed before the device can be deleted.
Adding emergency addresses to ports
Follow these steps to assign user-based emergency addresses for the users in your multi-user device:
- Sign in to the Admin Portal.
- Click the Phone System tab.
- In the left-hand navigation bar, click Phones & Devices.
- Select Multi-user Devices, then click the multi-user device.
- Go to the Ports tab on the left-hand menu. You’ll see a list of users and their assigned port numbers.
- Check the boxes next to the users you want to update.
- Click Change Emergency Address.
- From the dropdown, select the Emergency Response Location for the selected users.
NOTE: To add a new Emergency Response Location, click New.
- Click Apply.
Key Words: AT&T Office@Hand, ATA, Multi-user devices, Digitalline, manage ATAs, manage Multi-user devices, add Multi-user device, set up Multi-user device, assign Multi-user device, reassign user, ports, emergency response location, add emergency response location, change port, remove user from Multi-user device, delete Multi-user device, add emergency address to ports
Was this page helpful? Yes No

