Set up AT&T Office@Hand for Learning Tools Interoperability (LTI)
Introduction
A for LTI provides seamless integration between your Learning Management System (LMS) and AT&T Office@Hand Video to schedule, host or join a meeting easily without navigating away from your LMS interface.
This article provides information on how to setup AT&T Office@Hand for LTI using the configuration wizard. Click on the following links for step-by-step instructions of setting up AT&T Office@Hand for LTI integration with your Learning Management System using the LTI 1.3 standard
Refer the following section for an overview of the AT&T Office@Hand for LTI configuration wizard using the LTI 1.3 standard.
Login
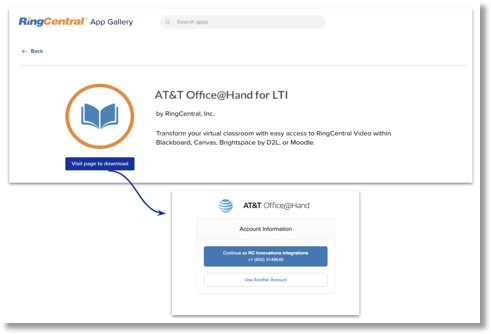
A university LMS administrator will be able to find the integration from the RC app gallery listing. When clicked on Get it now, he/she will be navigated to a stand-alone webpage to login with their RC credentials and go through the setup of integrating RCV with their Blackboard account.
Add Configuration
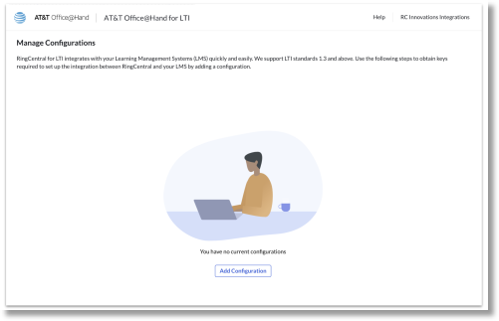
Once logged in, admins can click on ‘Add configuration’ to start integrating their Learning Management System (LMS) with AT&T Office@Hand.
Each configuration will begin with a step-by-step wizard where keys are exchanged between the two systems and will hold information such as the keys, LMS type and date added.
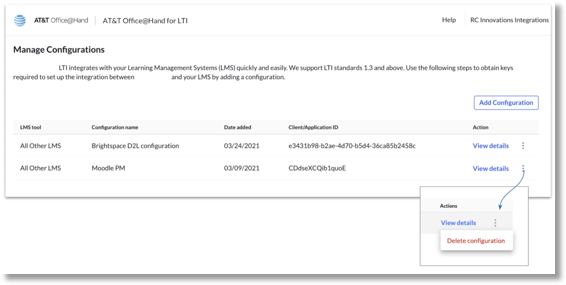
Manage Configurations
Each configuration will begin with a step-by-step wizard where keys are exchanged between the two systems and will hold information such as the keys, LMS type and date added. Configuration details can be viewed or deleted if required.
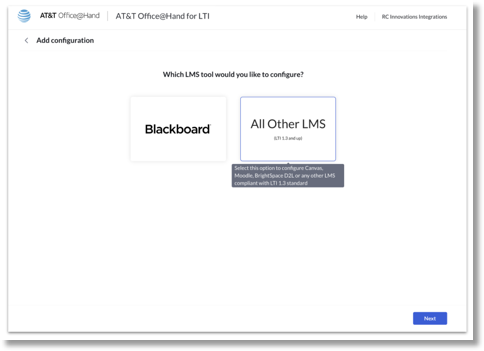
LMS Tool Selection
Before proceeding to the step-by-step wizard, the admins are required to select the LMS tool.
For Canvas, Moodle and Brightspace D2L administrators, choose “All Other LMS”.
Note: Any LMS that supports LTI 1.3 standard and above can be configured by clicking the “All Other LMS” button.
Configuration wizard
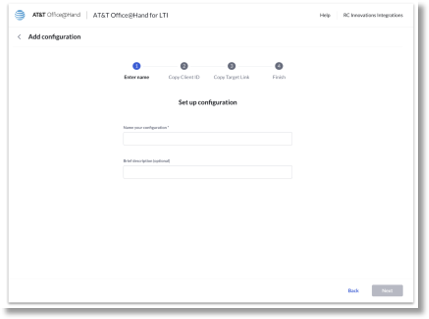
Step 1: Set up configuration
Admins can add a configuration name and a brief description.
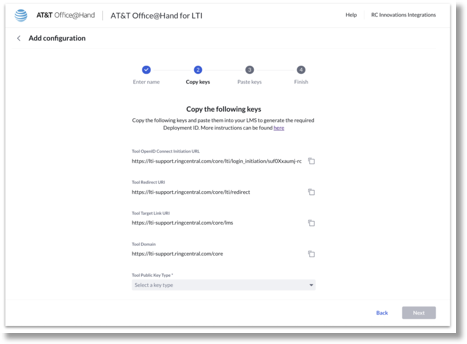
Step 2: Copy keys
In this step, admin will need to copy the displayed keys to paste in their LMS interface.
Note: Depending on the LMS, the public key type and value can be selected.
Available values are – KeySet URI, Public Key (JWK format), Public key (PEM format).
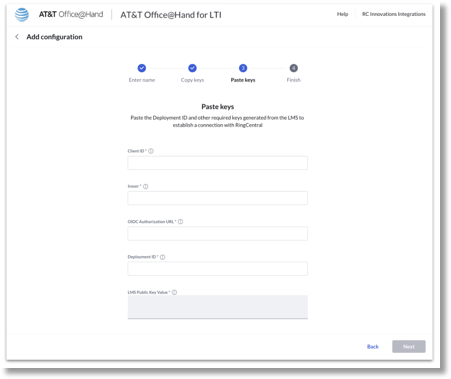
Step 3: Paste keys
Navigate to the AT&T Office@Hand configuration wizard and click Next to go to the Paste keys step.
Paste the displayed fields obtained from your LMS, such as Client ID, Deployment ID, Issuer URL, OIDC Authorization URL and LMS public key value.
Step 4: Finish
Next, an instruction page for the admin to verify the configuration in their LMS interface and double-check on adding AT&T Office@Hand as an external tool in the course management so end users (instructors/students) can access it.
Click on the Finish button when done.
Confirmation screen
A green toast will appear as such and the admin’s LMS configuration is added in the ‘Manage configurations’ page once a configuration has been successfully added.

Was this page helpful? Yes No