Requesting Message Data Export for Desktop and Web in Glip for AT&T Office@Hand App
Article #67859
The purpose of this article is to provide information on how Administrators can request data exports of their company’s message history in the RingCentral Glip for AT&T Office@Hand App.
Message data exports is a feature specifically built for companies and regulated industries, such as financial services, with compliance requirements for using electronic communication in the workplace. This feature can also help preserve business communications for legal discovery or internal review.
The message data export feature in the Glip for AT&T Office@Hand brings over all of the compliance export’s features like chats, events, files, guests, members, and posts, but allows you to request message histories of only a selection of teams or users. Admins can export the history of their entire account or the history of a team or user.
Enabling message data export
- Navigate to Settings via the left-hand navigation bar.
- Click the Administration tab in the left pane.
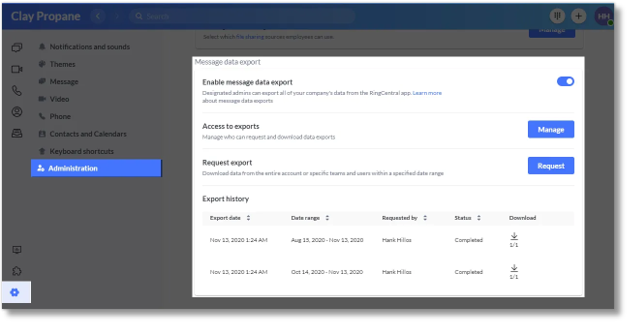
- Under Message data export, ensure the Enable message data export toggle is set to on.

Managing access to exports
Current export admins can manage the list of export admins who can request exports within the app.
Existing AT&T Office@Hand app admins can be upgraded to become an export admin by using this tool. To do this, follow these steps:
- Navigate to Settings via the left-hand navigation bar.
- Click the Administration tab in the left pane.
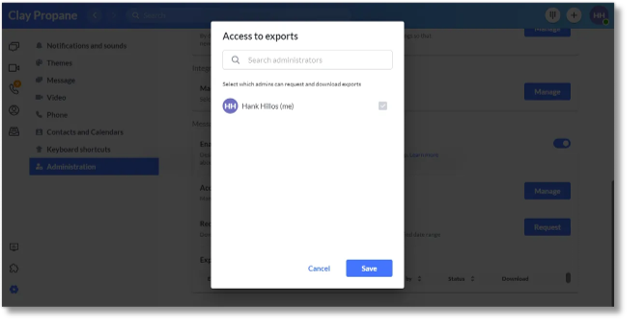
- Under Message data export, click Manage at the far right of Access to exports.
- In the Access to exports modal window, select the users who can request and download exports.
- Click Save.

Requesting export
To download data from the entire account or specific teams and users within a specified date range, follow these steps:
- Navigate to Settings via the left-hand navigation bar.
- Click the Administration tab in the left pane.
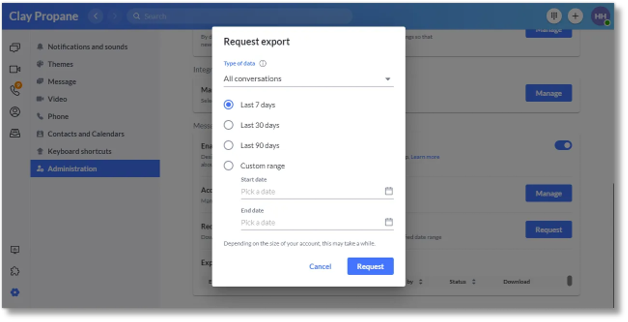
- Under Message data export, click Request at the far right of Request export.
- In the Request export modal window, select the type of data you want to export: All conversations, Selected users, or Selected teams.
- If you chose Selected users, begin typing the name/s of the user/s and select from the suggested names.
- If you chose Selected teams, begin typing the name/s of the team/s and select from the suggested teams. You can add up to 10 users or teams.
- Select a time-frame of the data you’d like to export: Last 7 days, Last 30 days, Last 90 days, or Custom range.
- If you chose Custom range from the previous step, select the Start date and End date. You can request for a maximum of up to 999 days’ worth of data for the account.
- Click Request.

Types of export data
- All conversations: Export all data, including messages, events, tasks, and notes within the account during a specified time range
- Selected users: Export data, including sent messages, events, tasks, and notes from up to 10 users during a specified time range
- Selected teams: Export data, including messages, events, tasks, and notes from up to 10 teams during a specified time range
Downloading export
Once an export has been completed, you can download the export output.
- Navigate to Settings via the left-hand navigation bar.
- Click Administration on the left pane.
- Under Export history on Message data export, click the down arrows under Download to download the data you’ve requested.
Each export is delivered as a compressed .zip file. When you open this file, you’ll see that the top-level folder contains seven sub-folders.
- Chats: List of teams, groups, and direct messages
- Events: Export of all events from teams, groups, and direct messages
- Guests: List of guest users in the account
- Members: List of employees in the account
- Notes: Export of all notes from teams, groups, and direct messages
- Posts: Export of all message histories from teams, groups, and direct messages
- Tasks: Export of all tasks from teams, groups, and direct messages
NOTE: If you have difficulties in viewing the .json file, you can go to these sites to convert it to a .csv file. You can use the resources below:
https://konklone.io/json/
https://json-csv.com/
Message data export settings
Under Message data export in the Administration page, you will find the following settings:
- Enable message data export: Allow exporting all your company’s data from the Glip for AT&T Office@Hand app.
- Access to exports: Manage who can request and download data exports.
- Request export: Download data from the entire account or specific teams and users within a specified date range.
- Export history: Displays the export history of your AT&T Office@Hand account. This section contains the following info:
- Export date: Date when the message data export was requested
- Date range: The time-frame of the data exported
- Requested by: The name of the admin who requested export
- Status: Displays if the request has been completed
- Download: Download the requested data export file
Was this page helpful? Yes No


