TOP

AT&T Business Messaging

Learn how to use your AT&T Business Messaging service. Receive tips on how to log in to the AT&T Business Notification Center website to build lists and send messages, or integrate with notification applications. Use our step by step walk-throughs to learn how to create, edit, import, and export both contacts and groups.

Back to Product Page
Use the dropdown to get support, or purchase this product

Organization Settings of the Enterprise Administrator for AT&T Business Messaging

These are tasks performed by the Enterprise Administrator.

Organization Settings

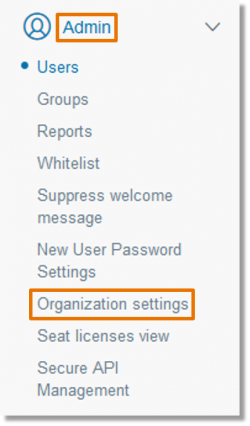
Click Admin and then Organization Settings


PIN Access for secure client users using iOS or Android devices+

Enterprise Administrators can enable PIN access at the enterprise level for all secure users. If the PIN access is enabled, all secure users in the enterprise will have PIN access. The default setting for PIN access for secure users is ON.

Note: Enterprise Administrators cannot enforce a PIN policy for non-secure users. Non-secure users can enable a PIN specific to their own mobile device. The PIN should be a four-digit number.

  1. Enable the PIN option by clicking the radio button to the left of ON.
  2. Select the PIN timeout time.
    Note: The default timeout time is 5 minutes. This duration will require that a user enters a PIN to unlock the mobile application after the selected period of time has passed since they last used it.
  3. Select the PIN frequency required for a user to change their PIN This policy determines the frequency with which all secure users in the enterprise must change their PIN for the application. Users will be prompted to enter a new 4-digit PIN when they launch the mobile application..
    Note: The default setting for PIN change frequency is 90 days.

    PIN Access for secure client users using iOS or Android devices


Messaging options for secure users+

Enterprise Administrators can enable non-secure messaging at the enterprise level for all secure users. If initiation of non-secure messaging is enabled, all secure users in the enterprise can initiate non-secure conversations, messaging options “Message Expiration” and “Delete on Read” will be greyed out if the enterprise admin set the messaging policies.

By default, secure users can send and receive secure messages, initiate non-secure conversations, receive non-secure messages, and reply to existing non-secure messages.

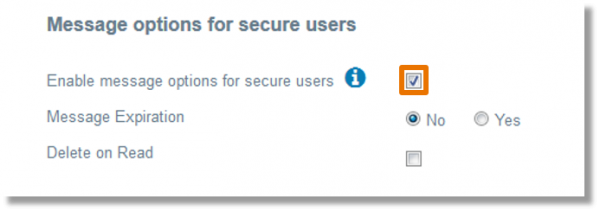
  1. From the Organization Settings screen, select the checkbox to the right of “Enable message options for secure users”.

    From the Organization Settings screen, select the checkbox to the right of "Enable message options for secure users".

  2. Click the radio button directly to the left of “Yes” to set enable message expiration and then set a desired time for the message to expire.
  3. The option is also available for the message to be deleted once it’s read. Click the checkbox to the right of “Delete on Read”.

    Click the radio button directly to the left of "Yes" to set enable message expiration and then set a desired time for the message to expire.


Secure client users sending, receiving, and replying to messages+

Click the checkbox in this section if you would like the capability enabled for secure client users to initiate new non-secure conversations.

Click the checkbox in this section if you would like the capability enabled for secure client users to initiate new non-secure conversations.


Messaging only within the enterprise+

Click the checkbox in this area to enable messaging only within the enterprise.
Note: Default state is un-checked, that will allow users to send messages to anyone.

Click the checkbox in this area to enable messaging only within the enterprise.


Password Policy+

Enterprise Administrators can enable a required password change frequency at the enterprise level for all users. This policy determines the frequency with which all users in the enterprise must change their password for the Business Messaging application.

The default setting for password change frequency is “Never expires”.

Enterprise Administrators can enable a required password change frequency at the enterprise level for all users.


Corporate Directory Address Book+

 Corporate Directory Address Book

  • The checkbox will be selected by default.
  • If the checkbox is not selected, then no users will be populated in users address book.
  • If the checkbox is selected, then un-checked, all the users in this scenario will be removed from the users address book.
  • If the checkbox is selected and the Enterprise Admin unchecks it, there will be a pop up shown to the Admin:
    “ This action will remove all entries from users’ corporate address book. You will not be able to select this option again for next 24 hours.”
  • Similarly, if the checkbox was not selected and the Enterprise Admin checks it, there will be a pop up shown to the Enterprise Admin:
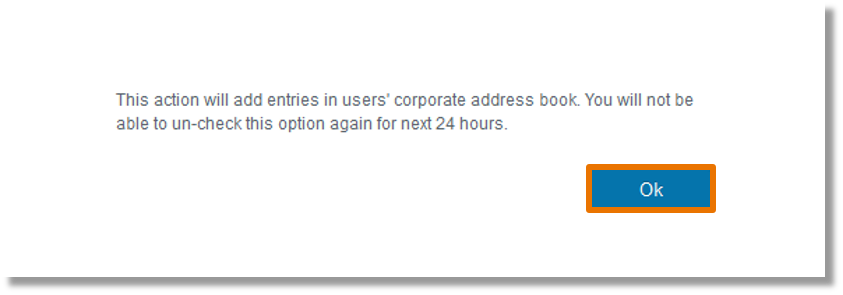
    “ This action will add entries in users’ corporate address book. You will not be able to un-check this option again for next 24 hours.”

    Similarly, if the checkbox was not selected and the Enterprise Admin checks it, there will be a pop up shown to the Enterprise Admin:


Enterprise Single Sign On+

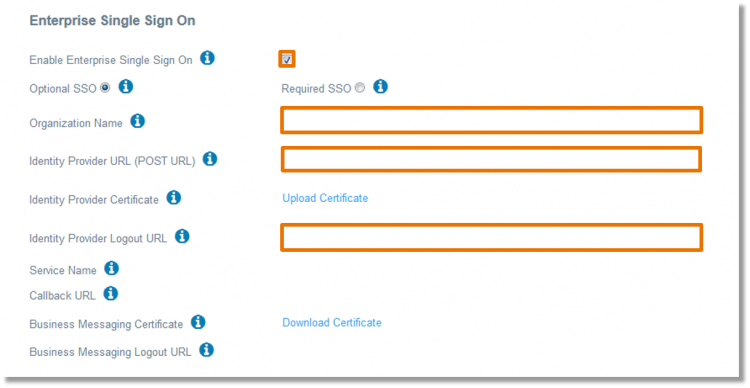
Enterprise Single Sign On


Field Description
Enable Enterprise Single Sign On Selecting this option will allow the users to login into Business
Messaging application with their wireless numbers or corporate user
IDs.
Optional SSO an Required SSO radio buttons Selecting Optional SSO will allow the users to login with their wireless numbers or their corporate user IDs. Selecting Required SSO will allow the users to login with their corporate user IDs only.
Enter Organization Name Enter an organization name here. New users will receive organization name in their welcome messages. The users will enter the same organization name on the Business Messaging login screen when they select Corporate Login.
Enter Identity Provider URL (Post URL) Enter the URL where Business Messaging will post the SAML request during the login process.
Identity Provider Certificate Upload your Identity Provider certificate to validate the Authentication SAML Response and Assertion.
Identity Provider Logout URL Business Messaging will post single SAML Logout Request to Identity Provider Logout URL.
Service Name Business Messaging will send Service Name as an Issuer field in the SAML Request to IDP.
Callback URL Identity Provider will call back this URL in the SAML Response.
Service Provider Certificate Download the Service Provider Certificate and provision in your Identity Provider to enable SAML request and SAML logout.
Service Provider Logout URL Identity Provider will post a single Logout SAML Request to this URL.


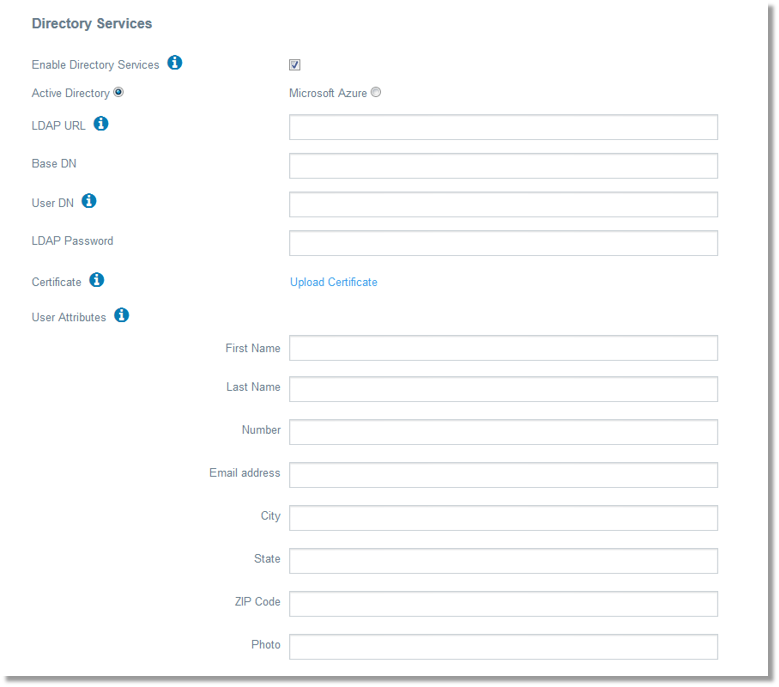
Directory Services+

Directory Services


Field Description
Enable Directory Services Selecting this option will allow Seat License Admins to search users in
your Directory Service and provision them directly via this interface.
LDAP URL The URL must begin with ldaps:// when connecting to the LDAP server through a secure tunnel.
Base DN Base DN of the LDAP node.
User DN The distinguished name (DN) of the LDAP user who is allowed to search the LDAP directory. Anonymous access is not supported.
LDAP Password Enter user DN password.
Certificate Upload a valid certificate to enable secure connection with your LDAP.
User Attributes Map the user attributes from your directory service. For example, if the Distinguished Name (DN) for Last Name is lastname, enter last name in the Last Name field.


Controlled Welcome Message+

The controlled welcome message option allows the Enterprise Admins to send a welcome message at their convenience.

  1. Click the Send button.

    Click the Send button.

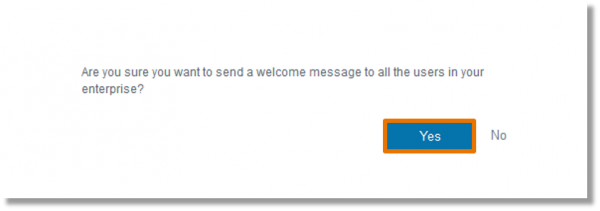
  2. A message populates to confirm that the Enterprise Admin wants to send a welcome message to all the users in your enterprise. Click Yes.

    A message populates to confirm that the Enterprise Admin wants to send a welcome message to all the users in your enterprise. Click Yes.

  3. The welcome message is immediately sent to all users in the enterprise.