Managing your Contacts in the AT&T Office@Hand Desktop and Web
Article# 99592
This article provides information on how to manage your contacts in the AT&T Office@Hand Desktop and Web.
In the AT&T Office@Hand desktop, web, and mobile apps, you can search and filter your list of contacts. You can send messages, make calls, organize, and access other features directly from your contacts list. Your company can also upload a list of external contacts in the Admin Portal.
What’s new here: You can now see external contacts listed in the Contacts tab in the AT&T Office@Hand apps.
Accessing your contacts in the AT&T Office@Hand Desktop and Web
To access your contacts, click Contacts in the navigation bar.
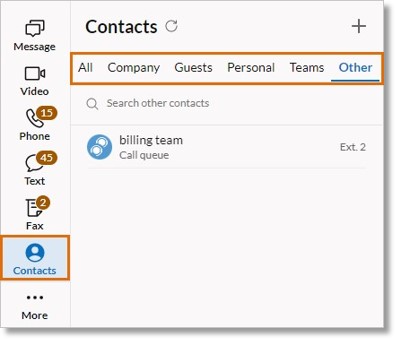
At the top of the left panel, there are tabs to sort your contacts. You may need to click the down arrow or expand the panel to view them all.
- All: The complete list of your AT&T Office@Hand account contacts. Your quick contacts appear at the top of the list. To add a new Quick contact, click the Add quick contacts (+) icon.
- Company: Contacts in your company directory, and the External Shared Contacts Directory.
- Guests: Contacts you’ve invited to create an AT&T Office@Hand account, or who don’t work at your company but were invited to collaborate in a team conversation.
- Personal: Your personal contacts, including those you’ve added manually to your AT&T Office@Hand App, and contacts you’ve connected from your Microsoft and Google accounts.
- Teams: All public teams in your company. Click My teams to view only teams you’re a part of, or click the down arrow to view Archived teams.
- Other: The list of group extensions, including call queues, announcement-only extensions, message-only extensions, and shared lines.
NOTE: If you’re a user with a free guest account, you’ll only be able to view:
- Other users in the account in which you’re a guest.
- Users from other companies who are in a team conversation with you.
Viewing contact type
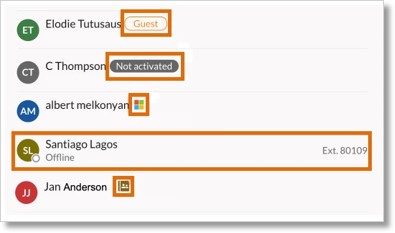
Status badges next to contacts’ names indicate if they’re company contacts, personal contacts, guests, or inactive.
- Guest contacts have a Guest status badge.
- Users with inactive or deactivated accounts, and users who haven’t accepted account invitations, will have Not activated status badges.
- Personal contacts have status badges that indicate whether they have an AT&T Office@Hand, Google, or Microsoft Office 365 account.
- Company contacts don’t have status badges next to their names.
- External contacts from the External Shared Contacts Directory have a Shared directory badge.
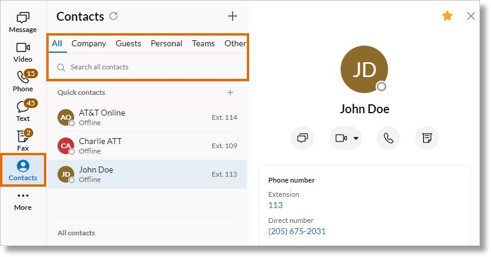
Searching contacts
- Click Contacts in the navigation bar.
- At the top of the panel, click the All, Company, Guests, Personal, Teams, or Other tab, then enter a name, extension, email, or phone number in the search field.
Managing your contacts
In the Contacts tab of the AT&T Office@Hand App, you can contact people and groups directly, sort through your lists, add contacts, and invite guests.
NOTE: Depending on your company’s permissions and the type of contact, you may see different management options for different contacts.
- Click Contacts in the navigation bar.
- At the top of the left panel, click any tab: All, Company, Guests, Personal, Teams, or Other.
- Hover over a contact to see action icons at the right. You may need to click the three-dot
More
icon to see all available actions.
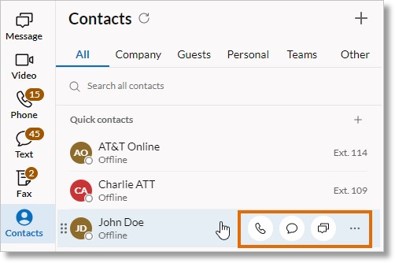
Click any of these icons:
- Message: Send a direct message.
- Video: Start a video call, screen share, or schedule a video meeting.
- Phone: Call the contact.
- Text: Send a text message.
- Fax: Send a fax.
- Invite by text: Send a text message to invite the contact to create an AT&T
Office@Hand account. This option is available only if your company has text messaging turned on at the account level.
- Block: Block the contact. You can’t block users in your company directory.
- Delete: Delete the contact. You can delete contacts only from your Personal contacts list.
- If you’re an admin, you can delete contacts from your Guests contacts list. Doing so will remove the guest’s access to any conversations started by members of your company. The guest will still be able to sign in to their AT&T Office@Hand apps.
- If you’re an admin, you can delete contacts from the External Shared Contacts Directory by updating the template in the Admin Portal.
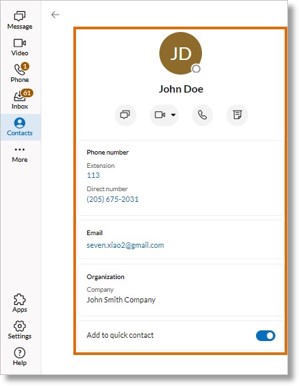
Click a contact’s name to view their profile details in the right panel. From their profile, click any available icon to contact them. If they’re a Personal contact, you can click the Edit (pencil) icon at the top right to edit their profile.
Resending an invite to an inactive user
- Click Contacts in the navigation bar.
- Hover over a contact that has a Not activated status badge.
- Click Resend invite. Doing so will send an invitation that prompts them to sign up for an AT&T Office@Hand account.

Applying company directory settings
Company directory settings let admins prevent users and phone numbers from appearing in the AT&T Office@Hand apps and Admin Portal. If you’re an admin, contact Customer Support to turn on company directory controls for your account.
Key Words: AT&T Office@Hand Desktop, AT&T Office@Hand Web, manage contacts, access contacts, view contacts, contacts directory, company directory, company directory settings, contact type, search contacts
Was this page helpful? Yes No