Managing Events in the AT&T Office@Hand App Desktop and Web
Article #71235
This article provides instructions on how to manage events, including editing and deleting an event in the AT&T Office@Hand app desktop and web.
Once you’ve created an event in a conversation or via the Tasks and more menu, be that for a direct message, group, or team, you can manage those events such as making changes or deleting that event at any time within the conversation.
Editing an event in conversation
- Navigate to Message via the left-hand navigation bar.
- Select a conversation from the conversation list.
- Locate and click on the Events tab via the conversation details pane at the far right.
NOTE: You may need to locate this tab by selecting the More icon at the far right.
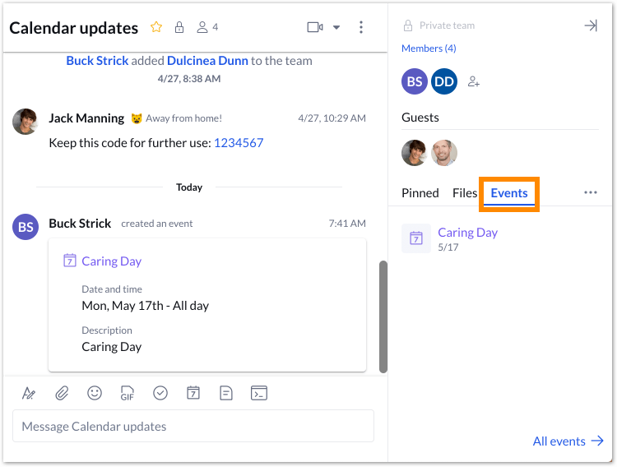
- Hover your mouse over the event you’d like to change and select the More icon.
- Click on the Edit event option from the drop-down menu.
- Make any necessary changes to the event.
- Click Save.
Click on any event to open details for that event, and select the Edit event pencil icon at top right of the Event detail modal window. You can also edit an event by selecting the event in the message thread as well.
Editing an event in the Workspace menu
- Navigate to Workspace via the left-hand navigation bar.
- Select All events from the left pane if you want to edit any events.
OR
Select My created events from the left pane if you want to edit events you created.
- Locate the event you’d like to edit by scrolling through the list or by using the search bar at the upper right.
- Hover your mouse over the event and click the Edit pencil icon that appears at the far right.
- Make changes to any of the event details in the Edit event window.
- Click Save.
Moving an event in conversation
- Navigate to Message via the left-hand navigation bar.
- Select a conversation from the conversation list.
- Locate your event via the message thread or by clicking on the Events tab in the conversation details panel.
- Click Edit event from the dropdown menu.
- Under Team, edit where you want to move the event.
- Click Save.
Moving an event in Calendar
- Navigate to Workspace via the left-hand navigation bar.
- Select Only events or All tasks and events tab under Calendar and locate the event you’d like to edit.
- Drag and drop the event to the preferred date.
Moving an event in the Workspace menu
- Navigate to Workspace via the left-hand navigation bar.
- Locate the event you’d like to edit by scrolling through the list or by using the search bar at the upper right.
- Hover your mouse over the event and click the Edit pencil icon that appears at the far right.
- Under Team, edit where you want to move the event.
- Click Save.
NOTE: Replies made to the event will remain in the conversation it is originally posted. Assignee(s) on an event will be removed if you move the event to another group or team where the assignee(s) is not a member.
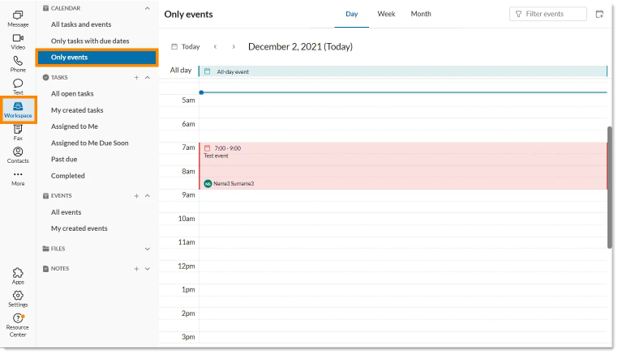
Viewing events in Calendar
- Navigate to Workspace via the left-hand navigation bar
- Under Calendar, select Only events or All tasks and events. You can view your calendar by:
- Day
- Week
- Month
Deleting an event in conversation details
- Select a conversation from the conversation list.
- Locate and click on the Events tab via the conversation details pane at the far right.
- Hover your mouse over the event you’d like to delete and select the More icon.
- Click on the Delete event option from the drop-down menu.
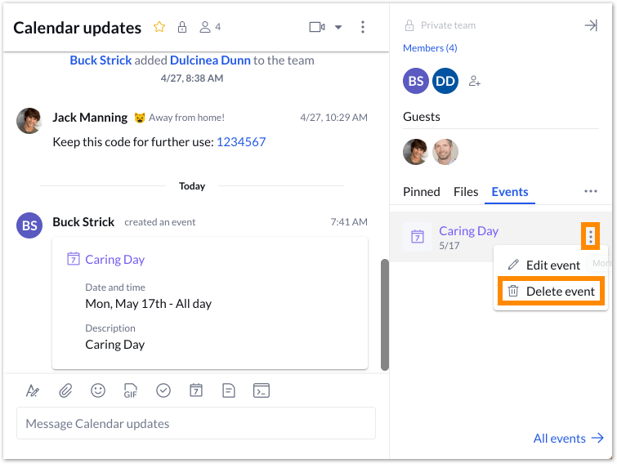
- Click Delete to confirm deleting the event.
NOTE: Either the creator of the event or the team administrator can delete an event.
Deleting an event in the Workspace menu
- Navigate to Workspace via the left-hand navigation bar.
- Select All events or My created events.
- Scroll through the list of events or find the event using the search bar at the upper right.
- Hover your mouse over the event and click the Delete trash can icon that appears at the far right.
- Click Delete to finalize your changes.
Key Words: AT&T Office@Hand app, AT&T Office@Hand app web, AT&T Office@Hand desktop, manage events, completing a task, edit event, move event, view event, delete event
Was this page helpful? Yes No