Managing Audio Settings in AT&T Office@Hand Video
Article #97398
This article provides the steps on how to configure the audio settings for AT&T Office@Hand Video.
In the AT&T Office@Hand Desktop and Web, you can select and test your microphone and speakers, mute your audio, and manage other related settings for AT&T Office@Hand Video meetings.
Managing audio settings outside of AT&T Office@Hand Video meeting
Selecting your microphone and speakers
- In the navigation bar, click Settings.
- Click Video. Then, to the right of Video meeting settings, click Edit.
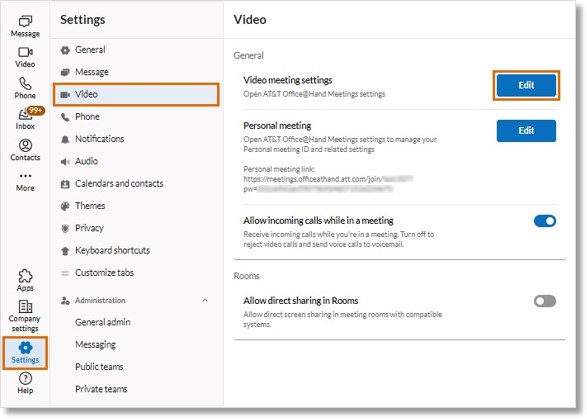
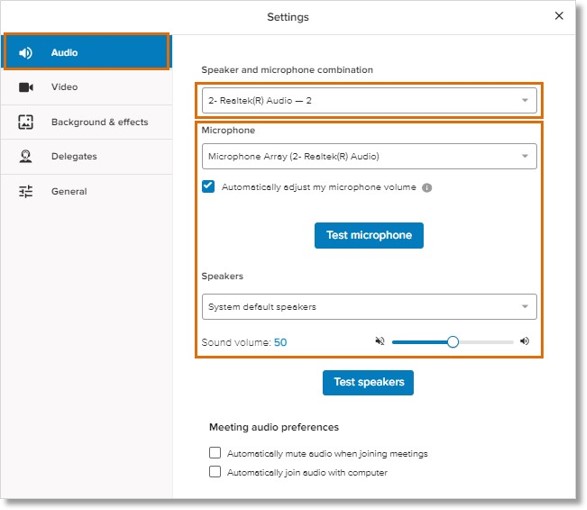
- Click Audio, then you can do either of the following:
- Click the Speaker and microphone combination dropdown to select a single device to use as your speakers and microphone.
- Click the Microphone and Speakers dropdowns to select your devices individually.
NOTE: If the audio source for your microphone is different from your speaker, you may experience audio issues. You’ll see a prompt when your audio sources aren’t in sync.
NOTE: When you select your microphone and speakers for video calls in the AT&T Office@Hand Desktop and Web, those preferences automatically apply to your audio-only calls, and vice versa, by default. Syncing audio device preferences ensures consistent call quality and prevents you from having to swap devices for different types of calls.
To turn off audio sync:
- Click Settings > Audio.
- Under Advanced, click the toggle for Apply mic and speaker settings to both phone calls and video meetings.
Testing your microphone
- Go to Settings > Video in the navigation bar.
- To the right of Video meeting settings, click Edit. If it’s not already selected, click Audio in the left column of the Settings panel.
- In the Microphone dropdown, select the name of the microphone you want to test.
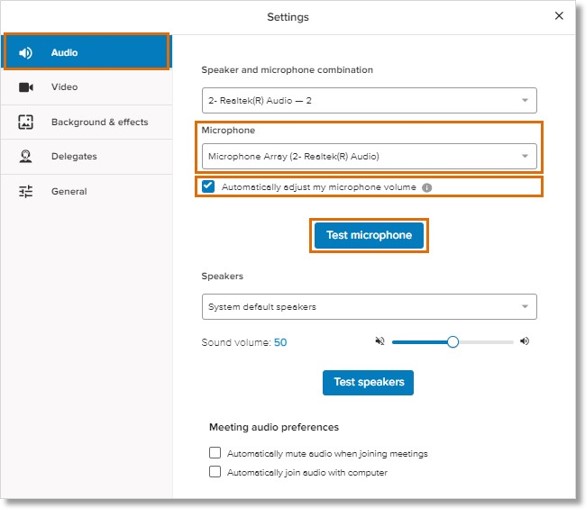
- Click Test microphone, then speak to confirm that the audio meter registers your voice. Click Stop recording after a few seconds. The system will play the recording back so you can check the audio quality. Click Stop test to stop the playback. If the audio quality is poor, switch to another microphone.
- Check the Automatically adjust my microphone volume box to match your microphone’s volume to those of the other participants in a meeting. This setting is turned on by default.
NOTE: Turning on the Automatically adjust my mic level feature can sometimes cause your microphone to mute automatically. If this happens:
- Go to Settings > Audio in the navigation bar.
- Click the toggle to turn off Automatically adjust my mic level.
Testing your speakers
- Go to Settings > Video in the left navigation bar.
- To the right of Video meeting settings, click Edit. If it’s not already selected, click Audio in the left column of the Settings panel.
- In the Speakers dropdown, select the name of the speakers you want to test.
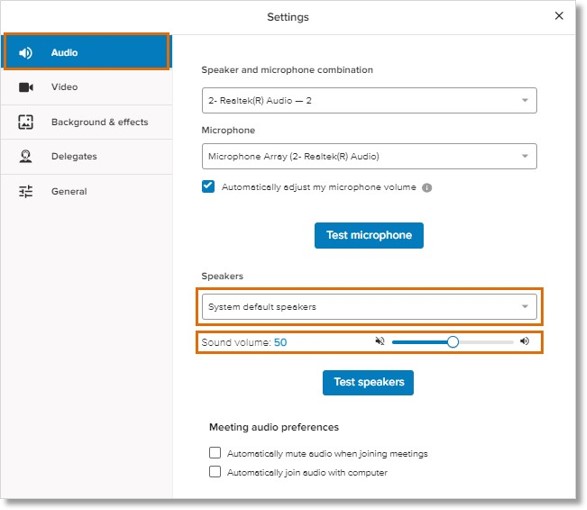
- Click Test speakers to play an audio sample. Click Stop test to stop playing the sample. If the audio quality is poor, try other speakers.
- Use the slider to adjust the speaker volume.
Automatically mute audio when joining meetings
- Go to Settings > Video in the left navigation bar.
- To the right of Video meeting settings, click Edit. If it’s not already selected, click Audio in the Settings window.
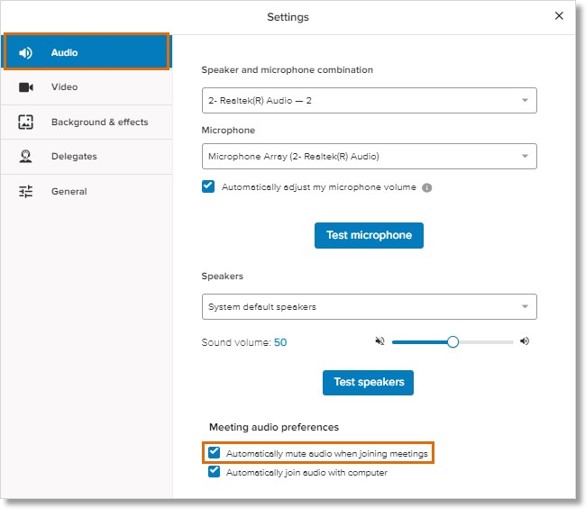
- In the Meeting audio preferences section, check the Automatically mute audio when joining meetings box if you’d like to enter AT&T Office@Hand Video meetings with your microphone turned off. Uncheck the box to enter meetings with a live microphone.
Automatically join audio with computer
- Go to Settings > Video in the left navigation bar.
- To the right of Video meeting settings, click Edit. If it’s not already selected, click Audio in the Settings window.
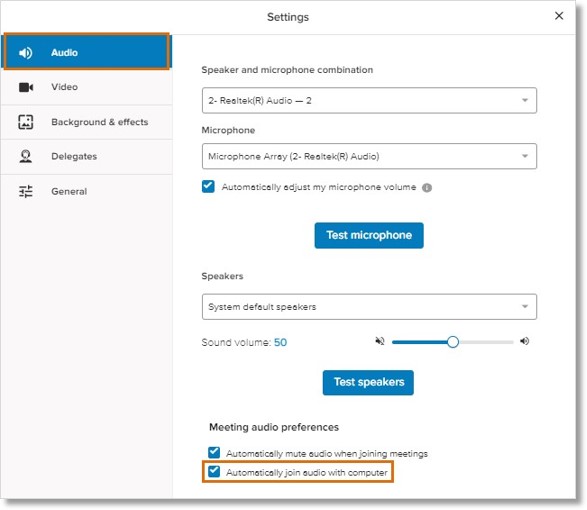
- In the Meeting audio preferences section, check the Automatically join audio with computer if you want to use your computer’s audio settings every time you join an AT&T Office@Hand Video meeting.
Uncheck the box to be prompted every time you join a meeting for how you want to connect your audio.
Managing audio settings during an AT&T Office@Hand Video meeting
Selecting your microphone and speakers
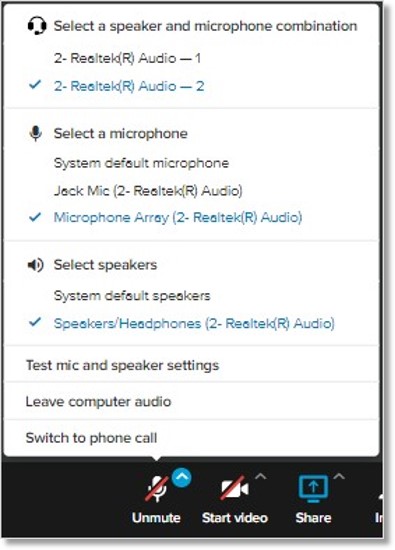
- During a video meeting, click the arrow at the top right of the Mute/Unmute icon.
- You can do either of the following:
- Under Speaker and microphone combination, select a single device to use as your speakers and microphone.
- Choose your devices individually under Select a microphone and Select speakers.
Testing your microphone
- During a video meeting, click the arrow at the top right of the Mute/Unmute icon.
- Select Test mic and speaker settings.
- Click Test microphone, then speak to confirm that the audio meter registers your voice. Click Stop recording after a few seconds. The system will play the recording back so you can check the audio quality. Click Stop test to stop the playback. If the audio quality is poor, switch to another microphone.
- Check the Automatically adjust my microphone volume box to match your microphone’s volume to those of the other participants in a meeting. This setting is turned on by default.
NOTE: Turning on the Automatically adjust my mic level feature can sometimes cause your microphone to mute automatically. If this happens:
- Go to Settings > Audio in the navigation bar of the desktop or web app.
- Click to set the Automatically adjust my mic level toggle to off.
Testing your speakers
- During a video meeting, click the arrow at the top right of the Mute/Unmute icon.
- Select Test mic and speaker settings.
- Click Test speakers to play an audio sample. Click Stop test to stop playing the sample. If the audio quality is poor, try other speakers.
- Use the slider to adjust the speaker volume.
Automatically mute audio when joining meetings
- During a video meeting, click the arrow at the top right of the Mute/Unmute icon.
- Select Test mic and speaker settings.
- In the Meeting audio preferences section, check the Automatically mute audio when joining meetings box if you’d like to enter AT&T Office@Hand Video meetings with your microphone turned off. Uncheck the box to enter meetings with a live microphone.
Automatically join audio with computer
- During a video meeting, click the arrow at the top right of the Mute/Unmute icon.
- Select Test mic and speaker settings.
- In the Meeting audio preferences section, check the Automatically join audio with computer if you want to use your computer’s audio settings every time you join a AT&T Office@Hand Video meeting.
Key Words: AT&T Office@Hand Video, AT&T Office@Hand Desktop, AT&T Office@Hand Web, manage audio settings, audio settings, video meeting, join audio with computer, mute audio, test speakers, test microphone
Was this page helpful? Yes No


