Manage Administration Settings in AT&T Collaborate Enhanced Mobile
As an administrator for the AT&T Collaborate™ service, you can manage administrative settings for users, including their announcements, call and device policies, and privacy settings.
Getting started
Add an announcement
Block caller ID
Manage caller ID
Set concurrent call limits
Manage privacy settings
Getting started
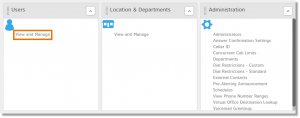
- On the AT&T Collaborate homepage, in the Users widget, click View and Manage. The View Users page appears.
- Locate the user whose device you want to manage, and then click the Edit icon (
 ) to the right. The Manage User page appears.

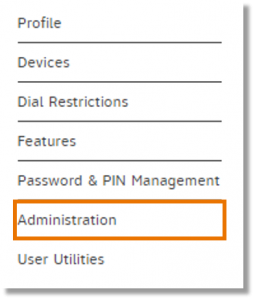
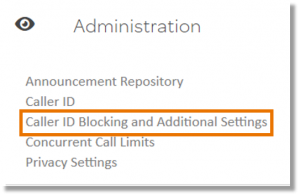
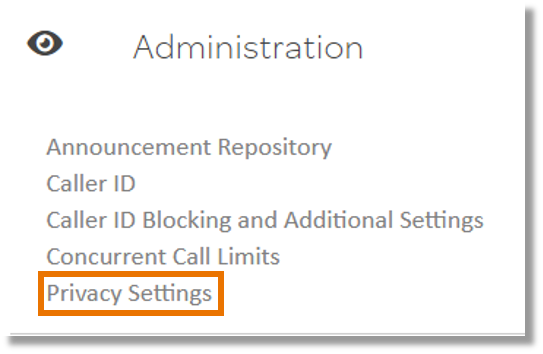
- On the left menu, click Administration. The Administration section appears at the top of the page.
- For the features you want to manage, follow the steps in the following corresponding procedures.
Add an announcement
You can add user-level announcements or greetings. The user can then choose an announcement that will be played to callers when the announcement is set up as part of particular feature, such as voicemail.
- Follow the steps in Getting started.
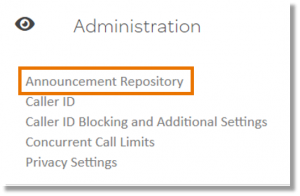
- Click Announcement Repository.
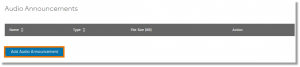
Click Add Audio Announcement.
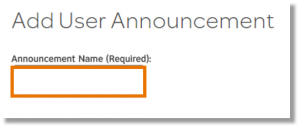
The Add User Announcement page appears.
- Enter a name for the announcement.
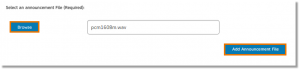
- Click Browse, locate, and select an announcement file.
Note: Announcement files must be in WAV format and smaller than 5MB.
- Click Add Announcement File.
- To return to the User Announcement Repository page, click Cancel.

Block caller ID
You can block caller ID for a user’s outgoing calls. You can also specify how to block caller ID for outgoing calls transferred to a user by another person or through another service, such as auto attendants or hunt groups.
- Follow the steps in Getting started.
- Click Caller ID Blocking.
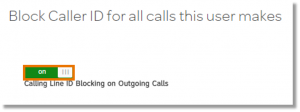
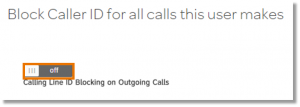
- To turn on calling line ID blocking, slide the Calling Line ID Blocking on Outgoing Calls switch to the right (on).
– When Block Caller ID for all calls this user makes is turned on, the user’s caller ID is hidden. The user can show caller ID for a single call by entering *82 followed by the phone number.
– When Block Caller ID for all calls this user makes is turned off, the user can block caller ID for a single outgoing call by entering *67 followed by the phone number. The Policy for Redirected Call setting affects calls transferred to a user by another person or through another service, such as auto attendants or hunt groups. These settings control the number that appears on the caller’s device when the user answers the call. To manage caller ID for redirected calls:
– Under Caller ID Blocking for Redirected Calls, select an option.
– Phone Number Displayed for Redirected Calls is the phone number that appears on the caller’s device before the call was redirected. You can show the number that was originally called, or you can show the redirected number. To show the redirected number, specify whether you want only the redirected number to appear if the call is redirected outside the company, or if you want the redirected number to appear for all redirected calls.
- Click Save.

Manage caller ID
You can choose the user’s caller ID settings or the location’s caller ID settings. Location settings apply to all users at the location. If you choose the user’s caller ID settings, you can edit those settings on this page.
- Follow the steps in Getting started.
- Click Caller ID.
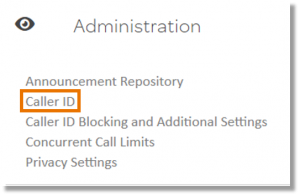
The Caller ID page appears.
- Select which caller ID settings to apply to the user:
– Use location Caller ID settings
– Use user’s Caller ID settings
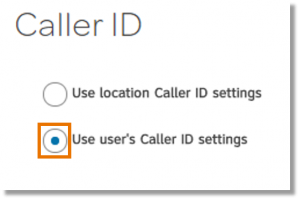
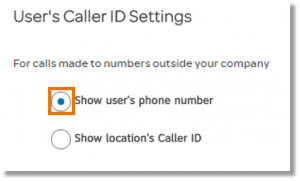
- If you chose Use user’s Caller ID settings, under For calls made to numbers outside your company, select one of these options:
– Show user’s phone number
– Show location’s Caller ID
Note: The location caller ID number and name appear at the bottom of this page. For more information about location-level caller ID settings, see Manage Caller ID.
- Click Save.
Set concurrent call limits
Concurrent call limits determine the maximum number of voice or video calls allowed at one time. Calls aren’t limited by default, but if you experience call quality issues, these settings can help improve call quality.
Manage concurrent call limits at the user level or at the location level. If you activate the user’s concurrent call settings, you can manage user concurrent call settings on this page.
- Follow the steps in Getting started.
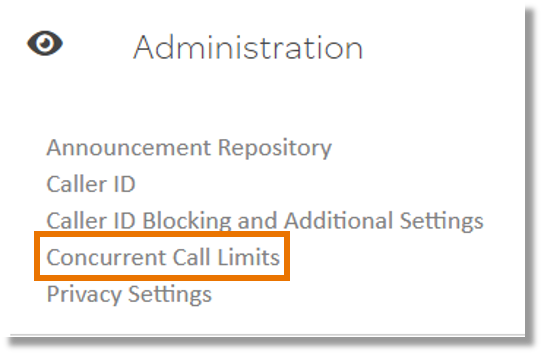
- Click Concurrent Call Limits. The Concurrent Call Limits page appears.
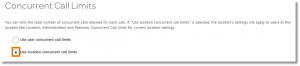
- Select the concurrent call limit settings to apply to this user:
– Use user concurrent call limits
– Use location concurrent call limits
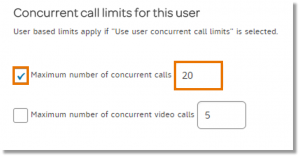
- If you select Use user concurrent call limits, check the box and specify the maximum number of audio calls for this user. To remove the limit, uncheck the box.
- To limit the number of concurrent video calls, check the box and specify the maximum number of calls. To remove the limit, uncheck the box.
- Click Save.
Manage meet me conference
To manage meet me conference, see Manage Meet Me Conferences for a User.
Manage privacy settings
- Follow the steps in Getting started.
- Click Privacy Settings. The Privacy Settings page appears.
- Set the user’s privacy settings:
– Don’t show this user’s caller ID in the company directory—Excludes the user’s information from the company directory.
– Don’t allow this user to be found with Auto Attendant extension dialing—Excludes the user’s extension from the extension dialing search.
– Don’t allow this user to be found with Auto Attendant name dialing—Excludes the user’s name from the name dialing search.
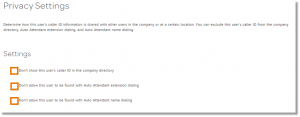
- Click Save.