Historical Reports – Create & Generate Reports | AT&T Office@Hand
Article #11129
Create Scheduled Reports
Generate Call Detail Report
Generate Queue Activity Report
Generate Phone Number Report
Generate Summary Report
Generate User Activity Report
Create Scheduled Reports
Scheduled Reports aids managers by presenting historical usage data and trending metrics in an easy-to-read graphical format. Scheduled Reports are sent to indicated email addresses on a set schedule.
Scheduled Reports aids managers in optimizing the advantages of the AT&T Office@Hand phone system by presenting historical usage data and trending metrics in an easy-to-read graphical format. Scheduled Reports are sent to indicated email addresses on a set schedule. Five reports can be selected, such as Summary, Queue Activity, User Activity, Phone Number, and Call Detail, depending on the user’s needs.
Click on links below to learn more.
Using Scheduled Reporting
View how Account Administrators can access Scheduled Reports using the Online account, and how the settings can be configured.
Frequently Asked Questions
Check the answers to commonly asked questions about Scheduled Reporting.
Using Scheduled Reporting
Account Administrators can access and/or configure Scheduled Reports settings by following the steps below:
- Log in to your AT&T Office@Hand Account.
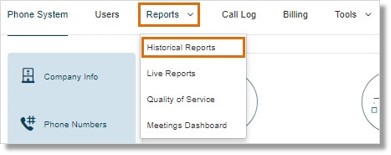
- Go to Reports > Historical Reports.
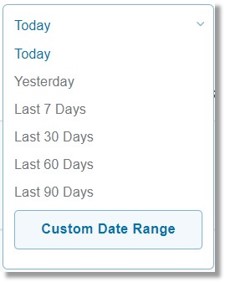
- Select the preferred date range.
- Click the Subscribe icon.

- Enter the Subscription information, then click SAVE.
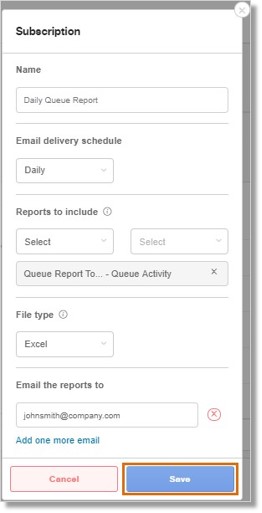
The table below lists the information that you need to provide or select on the Subscription window.
| SUBSCRIPTION INFORMATION |
DESCRIPTION |
 |
Enter the name of your report (required). |
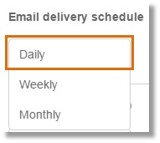 |
Select when you prefer to receive your report: Daily, Weekly, or Monthly. |
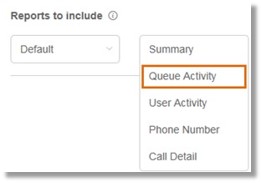 |
Choose from up to 5 reports you can include in your subscription: Summary, Queue Activity, User Activity, Phone Number, and Call Detail. |
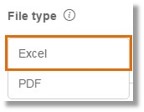 |
Select a PDF or an Excel report format.
Note: Limited data will be delivered via PDF. Select Excel if you want to see more.
|
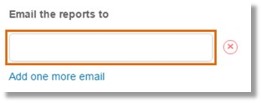 |
Enter the email address/es where the reports will be delivered to.
Note: A report can be sent to up to 10 recipients. Non-AT&T Office@Hand users can be added.
|
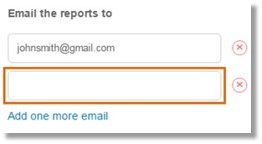 |
Click this option to add email address recipient/s.
Click Add one more email, then type the email address in the text box.
|
- Click OK to confirm your subscription.

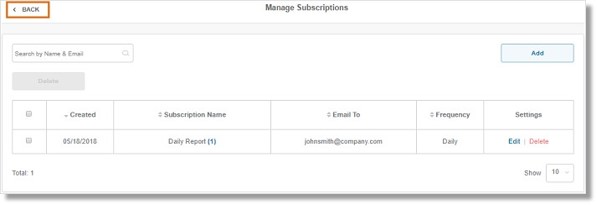
- Click the Subscribe icon to view your subscriptions.

- Manage your subscriptions from this page. You can add more report subscriptions, search, modify, or delete a subscription.
Click BACK to exit this view.
Frequently Asked Questions
- How many reports can I include in a single subscription?
You may select up to 5 reports.
- How many email addresses can I send a single report to?
You can send a report to up to 10 email addresses.
- Do the recipients have to be AT&T Office@Hand users?
No, non-AT&T Office@Hand users can also receive reports. Simply add the email address by typing it under Email the reports to or by clicking Add one more email, then click Save.
- What formats are supported?
PDF and Excel are supported at this time.
- Are there any data restrictions for delivery?
Yes, Excel reports with more than 250,000 records will be truncated. Users will need to log in to their AT&T Office@Hand Online accounts in order to view more data. PDF reports will show limited data as a snapshot.
Generate Call Detail Report
Reports are graphical representations of your account’s call activities that can be generated by Account administrators and Group Managers. The Call Detail Report (not available on the Mobile app) provides call log information, including caller ID, destination, call duration, and call results, to allow you to understand and control the usage of the company’s phone system.
- Log in to your AT&T Office@Hand Account.
- Go to Reports > Historical Reports.
- Click CALL DETAIL.
- Select your preferred date range. — Click the Date Filter box which displays Last 7 days by default. Click GO to proceed.
Note: Data loading may take a while.
- Click EXPAND to view filtering options.
- Click the Select Extensions.
- Click the box before the User/IVR Menu/Group name, then click Done.
TIPS:
- Use the Search box to easily find a User/IVR Menu/Group.
- Use the Filter drop-down right next to the Search box to further filter the list.
- Switch between views by clicking Show All or Show Selected.
- Use the Show drop-down box to view 10, 25, 50, or 100 names on one page.
- Use the page navigator right next to the Show drop-down box to jump to a different page.
- Click Apply All.
Note: The page will refresh and display a Report based on a User’s Call Details.
- Save and Export a Historical Report | AT&T Office@Hand.
Note: This step is optional. You may save Reports if you regularly generate the same data.
Generate Queue Activity Report
Reports are graphical representations of your account’s call activities that can be generated by Account administrators and Group Managers. The Queue Activity Report summarizes call queue activity and volume for historical activity. This Report presents data regarding the ratio of calls answered versus missed calls, call wait times, and average talk time on a call.
- Log in to your AT&T Office@Hand Account.
- Go to Reports > Historical Reports.
- Click QUEUE ACTIVITY.
- Select your preferred date range. — Click the Date Filter box which displays Last 7 days by default. Click GO to proceed.
Note: Data loading may take a while.
- Click EXPAND to view filtering options.
- Click Select Queues.
Note: Click Clear All to reset the filters.
- Click the box before the Queue name, then click Done.
TIPS:
- Use the Search box to easily find a Call queue group.
- Use the Filter drop-down right next to the Search box to further filter the list.
- Switch between views by clicking Show All or Show Selected.
- Use the Show drop-down box to view 10, 25, 50, or 100 names on one page.
- Use the page navigator right next to the Show drop-down box to jump to a different page.
- Click Apply All. The page will refresh and display a Report based on Queue activity.
- Save and Export a Historical Report.
Note: This step is optional. You may save Reports if you regularly generate the same data.
Generate Phone Number Report
Reports are graphical representations of your account’s call activities that can be generated by Account Administrators and Group Managers. The Phone Number Report summarizes the call activities of each purchased phone number over a selected date range, so you can understand which numbers receive the most calls, which numbers result in the highest placement results, and which calls are answered. This article shows how you can generate a report for all Phone Numbers and for a specific Phone Number.
- Log in to your AT&T Office@Hand Account.
- Go to Reports > Historical Reports.
- Click PHONE NUMBER.
- Select your preferred date range. — Click the Date Filter box which displays Last 7 days by default. Click GO to proceed.
Note: Data loading may take a while.
- Click EXPAND to view filtering options.
- Click Select Numbers.
- Click the box before the Number/s, then click Done.
TIPS:
Use the Search box to easily find a Number.
Switch between views by clicking Show All or Show Selected.
Use the Show drop-down box to view 10, 25, 50, or 100 names on one page.
Use the page navigator right next to the Show drop-down box to jump to a different page.
- Click Apply All.
Note: The page will refresh and display a Report based on phone numbers dialed.
- Save and Export Historical Report.
Note: This step is optional. You may save Reports if you regularly generate the same data.
Generate Summary Report
Reports are graphical representations of your account’s call activities that can be generated by Account administrators and Group Managers. The Summary Report provides an at-a-glance, high-level usage overview of the entire phone system. Use the metrics to assess the volume of incoming and outgoing calls, or answered and missed calls, then review your business hours to ensure they’re consistent with caller patterns.
IMPORTANT: When generating a Report, some filters will display No data when it is not available for the said period or if there are no filters set. Some filters will display Loading while data is being generated, so just wait until it has finished loading the Report.
- Log in to your AT&T Office@Hand Account.
- Go to Reports > Historical Reports.
Once the Reports page has been loaded, the Summary page is automatically displayed.
- Click SUMMARY.
- Select your preferred date range. — Click the Date Filter box which displays Last 7 days by default.
- Click GO. The Summary Report will be displayed.
- Save and Export a Historical Report.
Note: This step is optional. You may save Reports if you regularly generate the same data.
Generate User Activity Report
Reports are graphical representations of your account’s call activities that can be generated by Account administrators and Group Managers. The User Activity Report summarizes inbound and outbound call volume and usage for selected users over a selected date range. Compare call volume metrics with a user’s job performance or workload to understand how to optimize the calls for best results. This section shows how you can generate a report for all Users and for specific Users.
- Log in to your AT&T Office@Hand Account.
- Go to Reports > Historical Reports.
- Click USER ACTIVITY.
- Select your preferred date range. — Click the Date Filter box which displays Last 7 days by default. Click GO to proceed.
- Click EXPAND to view filtering options.
- Click Select Extensions and filter your results for Call Type.
Note: Click Clear All to reset the filters.
- Click the box before the User/IVR Menu/Group name, then click Done.
TIPS:
- Use the Search box to easily find a User/IVR Menu/Group.
- Use the Filter drop-down right next to the Search box to further filter the list.
- Switch between views by clicking Show All or Show Selected.
- Use the Show drop-down box to view 10, 25, 50, or 100 names on one page.
- Use the page navigator right next to the Show drop-down box to jump to a different page.
- Click Apply All.
Note: The page will refresh and display a Report based on User activity.
- Save and Export a Historical Report.
Note: This step is optional. You may save Reports if you regularly generate the same data.
Keywords: historical, report, 11129, 11152, 11149, 11130, 11150, 11151
Was this page helpful? Yes No


