Customize a Call Queue | Wireless Integrated for AT&T Office@Hand
Article #8041
This article shows how you can customize a call queue using the AT&T Office@Hand Mobile Wireless Integrated app.
How do I customize a call queue using the AT&T Office@Hand Mobile app?
- Log in to the Wireless Integrated for Office@Hand.
- Tap on the Profile Picture.
- Tap Phone System.
- Tap Groups.
- Tap the Call Queue that needs to be customized. The following menus will be displayed — Call Queue Info, Greeting, Call Handling, and Messages & Notifications.
- Tap Call Queue Info.
- Modify the information that needs to be changed, then tap Save.
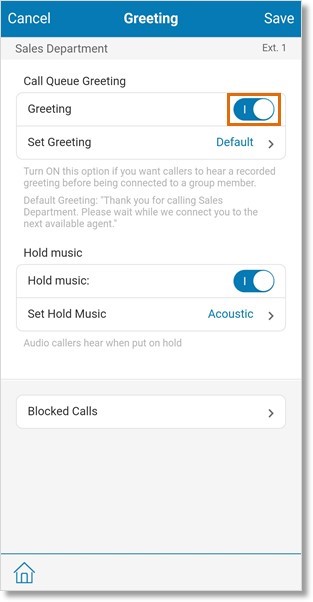
- Tap Greeting.
- Enable or disable the call queue’s Greeting. Go to Step 14 if you disabled the Greeting.

- To customize and record your own call queue greeting, tap Set Greeting. If you prefer to use the default greeting, go to Step 14.
- Tap Custom, then tap Record. Follow the directions on the screen.
- Tap Play to listen to your recording. When it is set, tap Done.
- Enable or disable the call queue’s hold music. Go to Step 17 if you disabled the hold music.
- To select a different hold music, tap Set Hold Music, then tap the preferred one from the list. If you prefer to use the current hold music, go to Step 17.
- Tap Play to listen to the hold music. You may tap Stop to stop the playback. Tap the “<” back button when done.
- Tap Blocked Calls to customize this setting. To skip customizing Blocked Calls, go to Step 19.
NOTE: Use block all calls if you only want to allow calls from a few specific area codes or numbers. If you block all calls, you can specify the exceptions of which calls you prefer to allow.
- Make the necessary changes to the following Blocked Calls settings. Tap Save.
- On the Greeting screen, tap Save.
- Tap Call Handling.
- Tap the corresponding tab for the call handling setting that needs to be changed — Queue Hours, After Hours, Advanced.
- On the Call Handling screen, tap Save.
- Tap Messages & Notifications.
- To customize and record your own voicemail greeting, tap Voicemail Greeting. If you prefer to use the default greeting, go to Step 27.
- Tap Custom, then tap Record. Follow the directions on the screen.
- Tap Play to listen to your recording. When it is set, tap Done.
- Tap Message Recipient to select the user extension who will receive the voicemail greeting. Go to Step 29 if the voicemail greeting is assigned to the correct user.
- Select the user from the list, then tap Save.
- Tap Notifications.
- Set the appropriate notifications for Voicemail, SMS, Email, Received Faxes, Missed Calls, and Received Text Messages.
- Tap Switch to Advanced or Switch to Basic located at the bottom of the screen.
- Check the email address where the notifications will be sent. Change it if needed. Otherwise, go to the next step.
- Tap Add Phone Number to add a mobile number where a notification will be sent via text messages.
- Tap Save.
- Back to the Messages & Notifications screen, tap the “<” back button.
Key Words: on hold, music, edit, custom, upload, call handling, group, call queue, setting, customize, 8041, mobile app. AT&T Office@Hand, 68458
Was this page helpful? Yes No
