Cost Center Management Feature on the AT&T Office@Hand Account
Article #52659
This article discusses the Cost Center Management feature on the AT&T Office@Hand account.
The Cost Center Management feature on AT&T Office@Hand allows Account Administrators to assign purchases to a department or individual based on Cost Center Codes. It associates accounts with a specific cost center, creates codes for groups of users, departments or locations, assigns transaction activities to a specific group for better budget control, creates or changes codes immediately to assign tax locations for localized taxation, and saves time with easy bulk upload with predefined codes.
For AT&T Office@Hand, localized taxation is the key use case for Cost Centers. Devices and Licenses can then be taxed based on the Tax Location. Each Cost Center can only have one Tax Location. A Tax Location can be assigned to multiple Cost Centers.
Note: For devices to be shipped to a different location than the company main address for the account, a Tax Location and a Cost Center associated with the Tax Location must be created first. After that, the device order can then be assigned to the Cost Center for taxes to be allocated correctly.
Access the Cost Center Management
- Log in to the AT&T Office@Hand account.
- Navigate to Admin Portal > Billing > Cost Center Management.
You can configure the following settings under the Cost Center Management:
Cost Centers
Billing Items
Tax Locations
Create Cost Centers with a different Tax Location
- Log in to the AT&T Office@Hand account.
- Navigate to Admin Portal > Billing > Cost Center Management > Tax Locations.
- Click Add Tax Location.
- Fill out the information, then click Save.
- Go to Cost Centers and click Add Cost Center.
- Enter a Cost Center name under Name.
- Uncheck the checkbox beside Use Parent Location to select other tax location.
Note: The checkbox beside Use Parent Location is checked by default to associate the cost center to the parent location. Click Add.
- Click the drop down under Select Tax Location.
- Click to select a tax location and click Add.
Cost Centers
Displays the Cost Centers information such as the Tax Location, users and total recurring charges. It also displays the cost center’s billing items based on whether they are Assigned, Unassigned, or Shared.
- Add Cost Center – this button allows you to add a cost center in your account. To set up an additional cost center, enter the Name and Billing Code and select a parent location. Click Add once done.
- More or the
 icon – allows you to Download Billing Items, Update Billing Items, Download Cost Centers, and Update Cost Centers
- Download Billing Items – Enter your email address to the space provided and click Send.
- Update Billing Items – Drag a file or click the Upload file button, then enter your email address on the space provided and click Preview Upload > Next. Under the Confirmation and Notification tab, check the information provided and click the checkbox to acknowledge and click Done.
Note: In uploading or dragging a file, make sure that the file type is in .xls file.
- Download Cost Centers – Enter your email address to the space provided and click Send.
- Update Cost Centers – Drag a file or click the Upload file button, then enter your email address on the space provided and click Preview Upload > Next. Under the Confirmation and Notification tab, check the information provided and click the checkbox to acknowledge and click Done.
Note: In uploading or dragging a file, make sure that the file type is in .xls file.
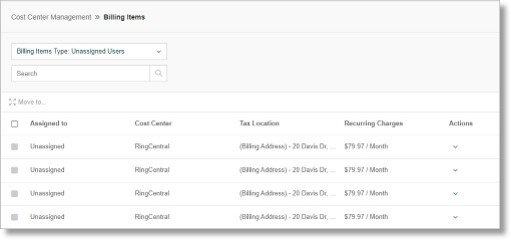
Billing Items
This tab displays the billing items depending on the billing item type you selected. It also shows the billing item’s cost centers, tax locations, recurring charges, and actions.
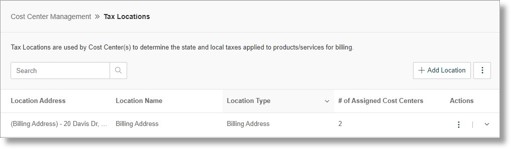
Tax Locations
Displays the tax locations which are used by Cost Center(s) to determine the state and local taxes applied to products/services for billing. It also allows you to add location by clicking on the Add Location button.
Key Words: Cost Center Management Feature on the AT&T Office@Hand Account, cost center management, at&t office@hand account
Was this page helpful? Yes No