Call Queue – Configurable Information Display | AT&T Office@Hand
Article #12683
This article discusses how configurable information display on call queue works. Call queues allow you to distribute calls to custom groups or departments you set up.
Call Queue – Configurable Information Display
Administrators can now assign text labels to incoming call queue phone numbers, and configure which call information is displayed on endpoints so queue members know how to greet callers.
Additionally, queue call information will now be uniformly displayed across all endpoints (hard phones and soft clients), which vastly improves the experience for users who use both endpoints together.
Features
Limitations
Use Cases
How to Add Direct Number and Configure Call Queue Display?
How to Configure IVR Menu Display?
How to Configure Call Queue Display Settings?
Features
- Each phone number name is limited to 15 characters.
- Default call queue fields which will be displayed are “CallerID Name – Queue Name”.
- Caller ID Number is always displayed when the call is connected.
- Information displayed is based on the last call queue settings.
- Call queue display names are reflected in “Call Log” and “Call History” of phones and soft clients. However, they are not applied to incoming SMS and incoming fax.
Limitations
- Call queue information is NOT displayed when call is forwarded using a custom advanced answering rule.
- When information is NOT configured, a blank space may be displayed.
E.g. If phone number name and queue name are selected as display fields, but the phone number name is not assigned, the member will see ” Queue Name”. To fix this issue, assign a name to the phone number.
- “Unknown” may be displayed, when Caller ID Name/Number is either blocked, anonymous, or not provided by the service provider.
Use Cases
Scenario 1: Multiple Numbers Assigned to a Call Queue
A Property Management company uses a common call queue “Sales” to answer incoming calls from two unique phone numbers, each representing a different rental property.
Members need to know how to greet callers, so the administrator opens the ‘Sales’ queue, assigns both phone numbers as direct numbers, and edits the phone settings to add a name. For example, 888 333-3333 is labeled “East Side Condos” & 800 444-4444 is labeled “West End Apts.” The administrator configures the phone number name & caller ID name fields to display when the call is offered to queue members.
When queue members answer a call, the phone number name is displayed so they know how to greet the caller. E.g. “Thanks for calling East Side Condos, how can I help Eddie?”
Click here for instructions on how to add a direct number, and configure the call queue display.
Scenario 2: Multiple Numbers Assigned to IVR which routes to Call Queue
A Property Management company uses a common IVR menu to answer incoming calls from two unique phone numbers, each representing a different rental property. When the call is answered by the IVR, Callers indicate their call type in response to an IVR prompt “Press 1 for Sales, 2 for Support”.
Members need to know how to greet callers, so the Administrator opens the desired IVR menu and assigns both phone numbers as Direct Numbers and edits the phone settings to add a name. For example, 888 333-3333 is labeled “East Side Condos” & 800 444-4444 is labeled “West End Apts.” The
Administrator then configures the Call Handling Display Settings for both the ‘Sales’ and ‘Support’ call queues to display the Phone Number Name & Queue Name fields.
When queue members answer a call, the “Phone Number Name” and “Queue Name” is displayed, so members know how to greet the caller. E.g. “Thanks for calling East Side Condos Support, how can I help?”
Click here for instructions on how to configure the IVR Menu Display.
Scenario 3: Call Queue with No Direct Number
A Property Management company uses a common call queue “Support” to answer incoming calls.
Members need to know how to greet callers, so the Administrator opens the ‘Support’ queue, and configures the call handling display settings to display caller ID name and queue name.
When queue members answer a call, the Caller ID Name and Queue Name are displayed so they know how to greet the caller. E.g. “Thanks for calling support, how can I help Eddie?”
Click here for instructions on how to configure the call queue display settings.
How to Add Direct Number and Configure Call Queue Display?
- Log in to your AT&T Office@Hand Account.
- Go to Phone System > Groups > Call Queue.
- On the group’s list, select the call queue group that you wish to modify.
- Click Direct Numbers, then click Edit button beside a direct number to assign a name.
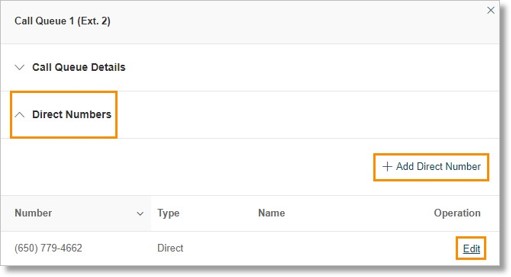
OPTIONAL: You can also add or assign a direct number. Click +Add Direct Number button and complete the information needed.
- Enter your preferred name.
NOTE: Name is limited to 15 characters.

- Click Save to apply changes.
How to Configure IVR Menu Display?
- Log in to your AT&T Office@Hand Account.
- Go to Phone System > Auto-Receptionist > IVR Menus.
- On the List, select the IVR menu that you wish to modify.
- Under Direct Number on Extension Info tab, click a direct number to assign a name.
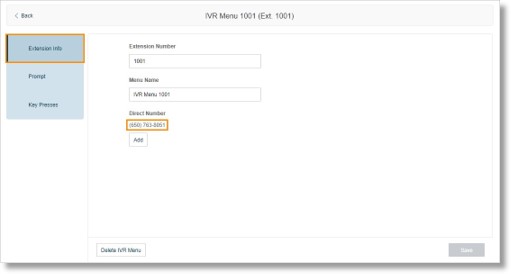
OPTIONAL: You can also add or assign a direct number. Click +Add Direct Number button and complete the information needed.
- Enter your preferred name.
NOTE: Name is limited to 15 characters.

- Click Save to apply changes.
How to Configure Call Queue Display Settings?
- Log in to your AT&T Office@Hand Account.
- Go to Phone System > Group > Call Queues.
- On the Group’s List, select the call queue group that you wish to modify.
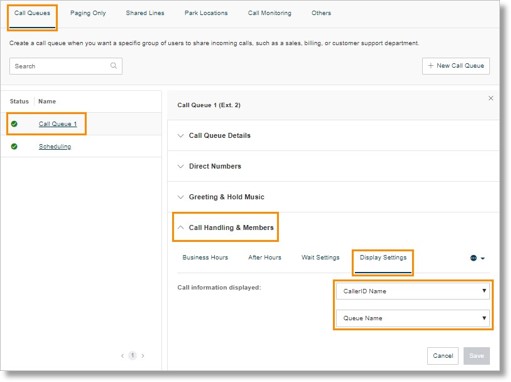
- Click Call Handling & Members, then click Display Settings.
- From the drop-down menu, select which information you wish to display.
- Click Save to apply your changes.
Was this page helpful? Yes No