AT&T Office@Hand Multi-Site Support – FAQ, Overview, and Settings
Article #11726
Overview
Setting up and Managing Site Codes
Creating New Sites
Moving Assets Across Sites
Set up Dial Zero
Configure Auto-Receptionist
Frequently Asked Questions (FAQ)
Overview
This section describes the Office@Hand Multi-Site Support experience when enabled for your account. Follow the steps below to enable Multi-Site for your account.
Key Feature and Benefits
Limitations
Availability
How do I enable Multi-Site Support?
Key Features and Benefits
- Allows management of all site assets in all locations within a single account.
- Individualized outbound caller ID name per site.
- Custom call handling rules per site.
- Localized management per site Configure Users assigned to Site, User Roles & Permissions, Company Info, and Auto-Receptionist per site.
Limitations
- Sites are created one by one but Site settings can be copied from existing sites. Upcoming updates will allow bulk site creation.
- Existing customers on Single-level IVR who opt into Multi-Site will have to reconfigure their IVR settings on new Multilevel IVR account– settings will NOT port over.
Note: IVR settings will remain accessible for existing customers on Multilevel IVR once they opt into Multi-Site support.
Availability and Requirements
- Multi-Site Support can be enabled by AT&T Office@Hand Premium and Enterprise accounts.
- Requires Multilevel IVR mode to be enabled. Single-level IVR settings need to be reconfigured to Multilevel IVR to enable multi-site.
How do I enable Multi-Site?
- Log in to your AT&T Office@Hand Account.
- Go to Tools > Multi-Site Settings.
- Click the slider button to enable account support for multiple sites.
Click Save.
- Your Online account will be updated with Site Filters and pages to create and configure multiple sites.
Note: You can start adding new Sites. Go to Phone System > Company Info > New Site.
[Back to Section Topics]
[Back to top]
New Site filters and buttons are now available on your account:
– Phone System > Phone Numbers > Company tab
– Sites filter
– Phone System > Auto-Receptionist > General Settings
– Sites filter
Note: Each Site is listed, click the Site to configure: Site Hours, IVR Settings, and Regional Settings.
– Phone System > Auto-Receptionist > IVR Menus
– Sites filter
– Phone System > Auto-Receptionist > Prompts Library
– Sites filter
– Phone System > Groups > Call Queues
– Sites filter, Change Site button
– Phone System > Groups > Shared Lines
– Sites filter, Change Site button
– Phone System > Phones & Devices > User Phones
– Sites filter
– Phone System > Phones & Devices > Shared Lines
– Site filter
– Phone System > Phones & Devices > Unassigned
– Sites filter, Change Site button
– Users > User list
– Sites filter, Change Site button
– Users > User list > User Details > Settings & Permissions
– Change the assigned Site for the User
[Back to Section Topics]
[Back to top]
Setting Up and Managing Site Codes
This section describes the steps on how to up and manage Site Codes after enabling Multi-Site Support.
After enabling Multi-site Support, you may configure Wireless Integrated for AT&T Office@Hand Multi-Site Codes. Multi-Site Codes allow you to define a dial plan for intra-site and inter-site calling. With Multi-Site site codes, Users within a site can call each other using short extension numbers, and use full extension numbers when connecting with users between sites.
Click on links below to learn more.
Limitations
Multi-Site Codes Nomenclature
Set Up Site Codes
Manage Site Codes
Multi-Site Codes Frequently Asked Questions
Limitations
- Special numbers like 911 are not allowed as a short extension number.
- Duplicate short extension numbers are not allowed within a single site. The Call
- Log and Caller ID will always use full extension numbers (there is no difference in how extensions are displayed with designation of site codes)
[Back to Section Topics]
[Back to top]
Multi-Site Codes Nomenclature
Use the following information as reference when setting up Site Codes.
| FEATURE ASSET |
DEFINITION |
| Site |
- A field available for accounts with multi-site support capability turned on.
- Used by organizations to designate specific sites within an account.
|
| Site Code |
- Site specific extension code designed to efficiently categorize and identify specific extensions between sites
|
| Full Extension Number |
Full Extension Number = [Site Code] + [Short Extension Number]
Example: A Site with the following Site Code and Short Extension Number will have the indicated Full Extension Number.
11 + 001 = 11001
[Site Code] + [Short Extension Number] = [Full Extension Number] |
| Intra-site Calls |
- For users belonging to the same site, they have the option to dial using the Short Extension Number or the Full Extension number. From the example above, user may dial 001 or 11001.
|
| Inter-site Calls |
- For users belonging to different sites, they must dial the Full Extension Number. From the example above, user must dial 11001.
|
[Back to Section Topics]
[Back to top]
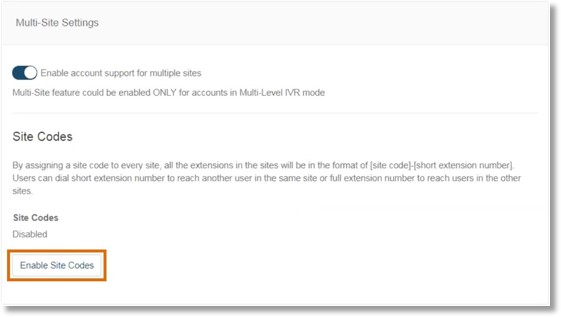
Set Up Site Codes
IMPORTANT: It is required to enable Multilevel IVR and Multi-site Support to enable and configure Site Codes.
- Enable Multi Site Support.
- Enable Multi-site Support functionality.
- On the Multi-Site Settings page, click Enable Site Codes.
- Extension Number Length
Configure the number of digits that will comprise the Site Code Length and the Short Extension Number Length. Click Next to proceed.
Note: The maximum Full Extension length is 5 digits. Maximum extension length of 6 digits is available on-demand for certain international cases.
- Provision Site Codes
Site Codes are automatically generated. Site Codes can be customized to any number that follows the Site Code Length. Click Next to proceed.
- Adjust Extension Numbers
New Short Extension Numbers are automatically generated. Short Extension Numbers can be customized to any number that follows the Short extension Number Length. Click Confirm to accept the New Full Extension Numbers.
IMPORTANT: Reserved numbers or short codes cannot be duplicated in the defined site. N11 numbers like 911 cannot be used as a short extension.
| List of Reserved Extension Numbers |
| All AT&T Office@Hand Accounts |
| 999 |
Emergency number for United Kingdom. |
| 933 |
Commonly used to get the information that would be delivered to the 911 operator when you call 911. |
| North America (United States and Canada) |
| 112 |
Forwards the call to 911. |
| 211 |
Commonly used for Community information & Referral services |
| 311 |
Commonly used for Non-emergency police & other governmental services |
| 411 |
Commonly used for Local directory assistance |
| 511 |
Commonly used for Traffic & transportation information |
| 611 |
Commonly used for Repair services
Note: AT&T Office@Hand provisioned phones, AT&T Office@Hand Desktop app and Mobile app can dial 611 to reach the AT&T Office@Hand Customer Support line. |
| 711 |
Commonly used for Telecommunications Relay Service |
| 811 |
Commonly used for Business office & auto number feedback |
| 911 |
Commonly used for Emergency service |
- Site Codes confirmation
All extensions are now updated with the new Site Code extensions. Click Finish to close the window. You will be returned to the Multi-Site Settings page.
Note: Click Edit under the Site Codes Settings to edit the Extension Number Length and Extension Numbers you have configured.
[Back to Section Topics]
[Back to top]
Manage Site Codes
Disable Site Codes
IMPORTANT: When Site Codes are disabled, the Full Extension Numbers remain the same , but any configured information about the disabled Site Code and its corresponding Short Extension Numbers are lost.
In order to re-enable Site Codes, you will need to go through the entire process of creating the Site Code, Short Extension Numbers, and resolve any conflicts with the extensions to finalize the dial plan.
Delete Sites
When a Site is deleted, the existing Site assets can be reassigned to another existing Site. The reassignment will require having some of the extension numbers to be reconfigured, considering different Site Codes or conflicts with Short Extension Number duplication. User Extensions need to be normalized once reassigned to a particular Site. Conflicts such as duplication of Short Extension Numbers or availability of numbers can be resolved by adjusting the Full Extension Number lengths or by creating new Site Codes.
[Back to Section Topics]
[Back to top]
Creating New Sites
AT&T Office@Hand Multi-Site Support allows you to configure and manage your different office locations under one account. Follow the steps below to create a new Site.
Requires: Multi-Site Support must be enabled to create new sites. Needs Administrator credentials
- Log in to your AT&T Office@Hand Account.
- On Phone System, click Company Info.
- Click New Site.
- Enter the Site Name and the Site Extension. Select the Site Address from the drop-down list, or click the New button to create or enter anew Site Address. Click Next.
Note: Click Select Site to use the Copy Settings from option to create the site that would copy the Business Hours and Regional Settings from one of the existing sites.
- Set the Time Zone, Home Country Code, Greetings Language, Time Format, User Language, Regional Format, and Business Hours. Click Next.
- Assign Numbers to the Site. You may assign your existing numbers or click the New Numbers tab to add or purchase a number for the site. Click Next.
You may skip this step and assign numbers to the site later.
Note: Numbers assigned to the site will not be able to send an outbound SMS. However, Users assigned to the site may send an outbound SMS using their assigned number.
- Enter the Outbound Caller ID Name, then click Next.
- Select an Existing IVR or create a New IVR. Click Next.
- If you use an existing IVR, it must not be assigned to another site. an IVR can only be assigned to one site at a time.
- If you create a new IVR, click the New IVR tab, then enter the Extension Number and Extension Name.
- The Cost Center Code page appears when the Cost Center Management option is enabled on your account. Select the site’s cost center codeor enter a new one, then click Next.
Note: Ignore this step if you do not have this option available.
- On the Summary page, you will be notified that the site is created successfully. Click Done. Site information can be viewed and edited later within Phone System > Company Info.
[Back to top]
Moving Assets Across Sites
How do I move assets to a different site?
The AT&T Office@Hand Multi-Site Support ‘Change Site’ button allows Administrators to assign selected Users, IVR Menus, and Call Queues from one site to another.
Use Case
A retail company’s Administrator uses the Change Site button to conveniently move Users, IVR Menus, and Call Queues from one site to another.
Click on links below to learn how you can move the following assets.
How to Move Users to another Site
How to Move IVR Menus to another Site
How to Move Call Queues to another Site
How to Move Shared Lines to another Site
How to Move Users to another Site
- Log in to your AT&T Office@Hand Account.
- Click Users.
- Select the Site where the User/s will be moved, then click Change Site.
- On the User list, select the User/s that need to be assigned to a different site. Click Change Site.
Note: You may check Adjust time and regional settings to the settings of the new site? to apply it to the moved User/s.
How to Move IVR Menus to another Site
- Log in to your AT&T Office@Hand Account.
- Click Auto-Receptionist.
- Click the IVR Menus tab.
- Select the Site where the IVR Menu/s will be moved, then click Change Site.
- Select the IVR Menu/s that need to be assigned to another site, then click Change Site.
How to Move Call Queues to another Site
- Log in to your AT&T Office@Hand Account.
- Click Groups.
- On the Call Queues tab, select the Call Queue/s that need to be assigned to a different site. Click Change Site.
- Select the Site where the Call Queue/s will be will be moved, then click Change Site.
Note: You may check Adjust time and regional settings to the settings of the new site? to apply it to the moved Call Queue/s.
How to Move Shared Lines to another Site
- Log in to your AT&T Office@Hand Account.
- Click Groups.
- Click the Shared Lines tab.
- On the Shared Lines tab, select the Shared Line/s that need to be assigned to a different site. Click Change Site.
- Select the Site where the Shared Line/s will be will be moved, then click Change Site.
Note: You may check Adjust time and regional settings to the settings of the new site? to apply it to the moved Shared Line/s.
[Back to Section Topics]
[Back to top]
Set up Dial Zero
Dial Zero Call Handling is a AT&T Office@Hand IVR settings feature that manages the flow of incoming calls when callers dial 0. Super Admins, User Admins and Users with User Admin access can configure this setting. This feature enables Multi-site locations to have several operators per location.
Dial Zero Call Handling is a AT&T Office@Hand feature under the IVR settings, that enables multisite customers to set different or several operators per location. Callers can dial “0” while listening to the Auto-Receptionist and can be routed to the operator of the specific site they need to connect to. The feature provides a flexible solution for multi-site customers, allowing multiple operators to be configured for each location.
Availability
Requirement
Who can configure
How to access the setting
Dial Zero options when Multi-Site is enabled
Availability
This feature is available to all AT&T Office@Hand Office customers.
Requirement
Multi-Site must be enabled and should have at least one site configured.
Who can configure
Only Super Admins, User Admins, and Users with User Admin access can configure the Dial Zero settings. See User Roles and Permissions for more information.
[Back to Section Topics]
[Back to Top]
How to access the setting
- Log in to your AT&T Office@Hand Account as an Administrator.
- Go to Phone System > Auto-Receptionist > General Settings.
- Click a site that needs to be configured, then click IVR Settings.
Zero Dialing is right below the General IVR Settings.
[Back to Section Topics]
[Back to Top]
Dial Zero options when Multi-Site is enabled
The Dial Zero feature acts as a top menu and is an optional setting that gets applied to all sites.
If Administrators prefer Users not to be able to move between their called site and the main site, then Dial Zero should be set to Do Nothing.
Note: These options are applicable for the whole account for all calls to company number, individual extension or group extensions (like Call Queues).
Connect to Top Level Menu
This is the default option that connects the caller back to the site greeting when “0” is pressed. You will need to configure the Top Level IVR Menu setting (below IVR Settings).
Connect to Company Greeting
This is the default option that connects the caller back to the Company Greeting when “0” is pressed.
Do Nothing
Selecting this option will make the system ignore the “0” dialed by the caller. The call continues without change, even if the caller presses “0” repeatedly.
Connect to Extension
This option allows the Administrator to route the call to either the Operator Extension or to the selected Extension when the caller dials “0”.
IMPORTANT: The callers will be connected to the Company Greeting when the destination extension is disabled.
If your company uses a Single-level IVR, this option lets you select to route the call to either the Operator extension or a selected extension.
How do I configure Auto-Receptionist when Multi-Site support is enabled?
AT&T Office@Hand Multi-Site Support – Configure Auto-Receptionist
Auto-Receptionist or “Auto Attendant” enables calls to be answered automatically with the default or a personalized recording (record your own). With RingCentral Multi-Site Support enabled, each site will use the Multilevel IVR and its own General Settings that can be managed from the AutoReceptionist view.
Click on links below to learn more.
How to access the General Settings of your Auto-Receptionist
Site Hours – Configuring the Office Hours of the Site.
IVR Settings – Configuring which menu should be connected if someone calls the direct number.
Regional Settings – Configuring the Site time zone, language preference.
How to access the Auto-Receptionist > General Settings?
- Log in to your AT&T Office@Hand Account
- On Phone System, click Auto-Receptionist.
- On the General Settings tab, select the Site that needs to be configured.
- There are 3 General Settings that can be configured.
Site Hours
IVR Settings
Regional Settings
Site Hours: Configuring the Office Hours of the Site
Select 24 hours / 7 days a week if you want incoming calls handled the same way all the time, every day. Select Custom Hours if you want incoming calls handled differently when your business is open and when it’s closed.
- Click Site Hours.
- Select 24 hours / 7 days a week or Custom Hours. If you selected 24 hours / 7 days a week, click Save.
- If you selected Custom Hours. Set the schedule for each day manually, then click Save.
You can also click Copy to Weekdays if you have the same hours of operation from Monday to Friday. Click Save.
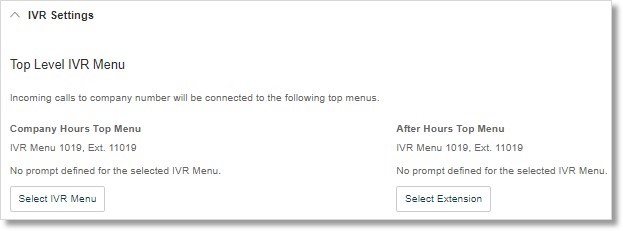
IVR Settings: Configure which menu should be connected if someone calls the direct number.
This section lets you configure the following settings:
- Top Level IVR Menu Incoming calls to site number will be connected to the following top menus.
Note: If the Site Hours is set to 24 hours / 7 days a week, you only need to configure the Site Hours Top Menu. If the Site Hours is set to Custom, you will need to configure both the Site Hours Top Menu and the After Hours Top Menu.
- Custom Answering Rules You can create custom rules for special routing during holidays, specific time of the day (e.g. lunch break) or for special callers.
- General IVR Settings Specify general navigation keys. All the menus will follow these settings unless you overwrite them on an individual menu level.
- Site Fax/SMS Recipient Select the extension below to receive all faxes and Business SMS when connecting incoming calls to site numbers to IVR menu with Multilevel IVR enabled.
Configuring the Top Level IVR Menu
-
- Click IVR Settings.
- Click Select IVR Menu.
- Select the top level IVR menu from the list, then click Done.
- Follow the step based on your configured site hours:
- If the Site Hours is set to 24 hours / 7 days a week configure the Regional Settings: Configuring the Site time zone, language preference.
- Click Regional Settings.
- Set the Time Zone, Home Country Code, Greetings Language, Time Format, User Language, and Regional Format.
- Click Save.
- If the Site Hours is set to Custom:
- Click Select Extension.
- Select the top level IVR menu or extension from the list, then click Done.
Configuring the Site Fax/SMS Recipient settings
- Click Select Extension.
- Select an extension from the list, then click Done.
- Click Save.
[Back to Section Topics]
[Back to Top]
Frequently Asked Questions (FAQ)
AT&T Office@Hand Multi-Site Support – Frequently Asked Questions
- What is AT&T Office@Hand Multi-Site support?
- How do I enable Multi-Site support?
- Can users in different locations be in the same queue?
- Can Multi-Site support be used to solve for localized windows as well?
- Will there be changes for customers who do not enable Multi-Site Support?
- Will separate cost centers need to be mapped per each site within an account?
- Will existing accounts be merged?
- Will there be unique dial-by-name directories per site?
- Can a site IVR be assigned to multiple sites?
- Will each site have the option to choose between Single-level or Multilevel IVR?
- Can a site manager without user management permissions still manage site assets?
- Will the system automatically assign new extensions for existing extensions that are already assigned to a site?
- Will the new extension assignments affect custom call handling rules?
- How does Multi-Site affect parking and retrieving parked calls?
- What is AT&T Office@Hand Multi-Site support?
AT&T Office@Hand Multi-Site support allows you to configure and manage your different office locations under one account.
- How do I enable Multi-Site support?
To enable Multi-Site Settings, go to Tools > Multi-Site Settings.
- Can users in different sites be in the same Call Queue?
Yes, you may add users from different sites to a single Call Queue.
- Can Multi-Site support be used to solve for localized windows for updates as well?
No, Multi-Site support cannot configure localized windows for updates.
- Will there be changes for customers who do not enable Multi-Site?
No. If a customer does not enable the Multi-Site feature, there will be no changes to their Online Account.
- Will separate cost centers need to be mapped per each site within an account?
No. There will be only be one invoice per account.
- Will there be merging of existing accounts?
No. However, linked accounts and existing customers who had previously split their account can contact support to merge accounts and use Multi-Site support.
- Will there be unique dial-by-name directories per site?
No, the dial-by-name directory will cover everyone in the account.
- Can a site IVR be assigned to multiple sites?
No. One site can have multiple assigned IVRs, but one IVR cannot exist in multiple sites.
- Will each site have the option to choose between Single-level or Multilevel IVR?
No, all Multi-Site accounts have to be in Multilevel IVR. If a customer tries to change to single-level IVR option, they will be prompted with an Error message.
- Can a Site Manager without user management permissions still manage site assets?
Yes, dependent on their assigned roles and permissions. Site Managers can manage other site assets which include Call Queues and IVRs.
- Will the system automatically assign new extensions for existing extensions that are already assigned to a site?
Yes. The system will automatically assign new extensions onto existing extensions.
- Will the new extension assignments affect custom call handling rules?
No. Advanced rules will get modified automatically and existing rules will not break.
- How does Multi-Site affect parking and retrieving parked calls?
Multi-Site does not change the options for users to park a call or retrieve a parked call. Parked calls are still available company wide and are not site specific.
[Back to Section Topics]
[Back to Top]
Keywords: 11725, 11726, 11727, 11728, 11729, 11730, 11731, 67891
Was this page helpful? Yes No