Quick Reference Guide
Index
Reports
Running On-Demand Reports
| Reports can be run manually for most features available in the application. There is no single collection of reports other than those for dashboards and emails. |
The best practice is to check along the top of the screen for an Options or View button. If these are present, it generally means there is a report that can be exported.
Options
Used to select the date range, vehicles/drivers, display archived vehicles, sub-periods.
Sort by
Used to sort the report by name, duration, count, group, etc.
View
Typically, List (interactive view in the database), Report (summary), and Advanced (detailed). Changing the view changes the level of detail and allows for the report to be downloaded as either a PDF or Excel document.
Top
Setting up Dashboard Reports
Assigns a report to be part of the Dashboard.
- Scroll down to “Administration” in the menu to the left.
- Click on Administration and then scroll down.
- Click on Reports Setup.
- Click on Report Views.
- Find the desired report by either scrolling through the reports list or clicking in the “Template name” field to search for one.
- Click on the name of the desired report.
- The report’s settings display.
- Click on the Dashboard tab.
- Click on the Yes button to the right of “Dashboard graphic options”.
- Click on the dropdown arrow to the right of “Group dashboard viewers:”.
- Select the desired group from the list.
- Click on the dropdown to the right of “Individual dashboard viewers” and select the desired individual.
- Scroll down.
- Click the Yes button to the right of “Include me as a dashboard viewer” to view the report on your dashboard.
- Scroll down.
- Click on the desired setting to the right of “Date range”.
- Click on the dropdown to the right of “Refresh period”.
- Select how often the data will refresh from the list and scroll down.
- Click in the field to the right of “Next run”.
- Use the calendar that populates to set the report’s desired start time and date.
- Click on the Done button.
- Click in the field or on the dropdown arrow to the right of “Belonging to”.
Note: The default is “Everything” which will provide data for all configured groups.
- Select the desired group.
Note: Additional settings may display based on the report chosen. Set the desired options and then scroll to the top of the page.
- Click the Save button at the top of the page.
Top
Setting up Emailed Reports
Configure reports to be sent via email.
- Scroll down to “Administration” in the menu on the left.
- Click on Administration and scroll down.
- Click on Report Setup….
- Click on Report Views.
- Select a report by either scrolling through the reports list or using the “Template name” field to search for one.
- Click on the name of the report.
- Click on the Email report tab.
- Click on the Yes button to the right of “Email options”.
- Click on the dropdown arrow to the right of “Group Recipients list”.
- Select the desired group.
- Click on the dropdown arrow to the right of “Individual recipients list”.
- Click on the desired recipients and scroll down.
- Click on either the Yes or No button to the right of “Email the report to me” to be included in the recipients of the report or not.
- Click on either the Yes or No button to the right of “Redirect report”.
Note: If you are a recipient, or you have selected other recipients, leave this turned off.
- Click on either the PDF or Excel buttons to the right of “Type of report” to set the report type.
- Click on the desired date range to the right of “Date range”.
- Scroll down
- Click in the field to the right of “Refresh period”.
- Select the desired timeframe.
- Click in the field to the right of “Next run”.
- Use the calendar that populates to select when the report should begin.
- Click on the Done button.
- Click on the dropdown arrow to the right of “Belonging to”.
- Select the desired group and scroll up.
- Click the Save button at the top of the page.
Top
Adding Custom Reports
Display reports and who has access.
- From the main menu, click on Administration in the column on the left.
- Click on Reports Setup… and then click on Report Views.
- Scroll to the desired built-in report.
- Click on Export to the right of the report’s name.
- A download dialogue populates.
- Click on the radio button to the left of “Save File” or “Open with”.
- Click the OK button.
- An XLS document downloads.
- Open the file and modify it as desired.
- Click on Report Setup… and then Report views in the menu to the left.
- Click the Create custom report button near the top of the page.
- Click on Drop your files here or click to browse your computer.
- Navigate to and click on your XLS file.
- Click the Open button.
- Click on the auto-generated title to enter a custom title for your report.
- Click on the field or the dropdown arrow to the right of “Select groups” to limit the report to a specific group.
- To allow the custom report to display in the system menus, click on the Yes button to the right of “Show report in dropdown list:”.
- Edit the additional settings as desired.
- To enable the report to be available on the dashboard, click on the Dashboard tab.
- Click on the Yes button to the right of “Dashboard graphic options:”.
- Edit the additional options as desired.
- To enable the report to be an emailed report, click on the Email report tab.
- Click on the Yes button to enable the report to be emailed.
- Edit the additional options as desired.
- Click on the Save button near the top of the page.
Top
Adding Default Reports
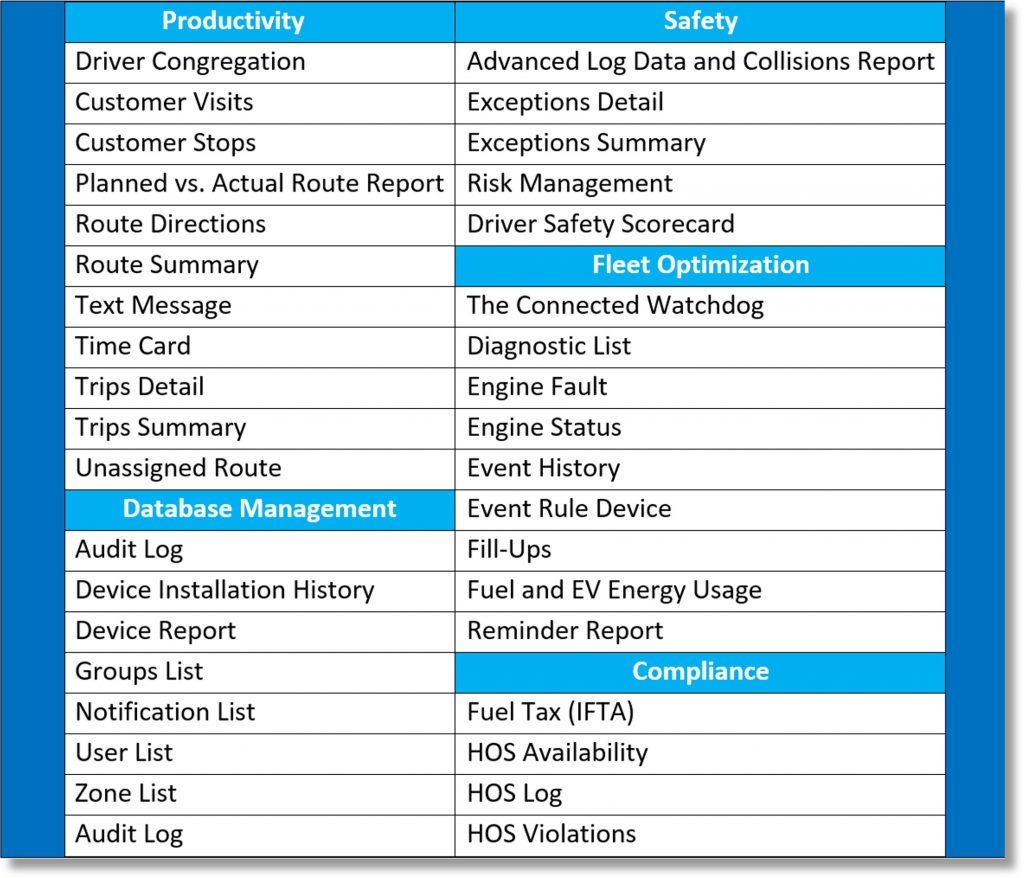
The AT&T Fleet Management for Enterprise/Government database offers a number of built-in reports, which can be run on-demand or automated. These reports can be divided into different categories:
Top
Maps
| Keeping track of vehicles on the map is important for any fleet. Knowing where vehicles are at any time is imperative to productivity in a day, and allows for a view of the overall fleet. |
Viewing Locations on the Map
Using the map.
- Click on Map in the menu on the left side of the database.
- To zoom into an area, click on the + sign, or use the scroll wheel on your mouse.
- To zoom out, click on the – sign, or scroll the mouse wheel in the opposite direction.
- To navigate to a specific location, vehicle, etc., click in the “Vehicle, VIN, Zone, Route, or address” field and enter the desired address.
Top
Tracking Vehicles
View a vehicle’s current position and status on a map.
- Click on Map in the menu on the left side of the database.
- Vehicle locations are automatically displayed on the map for fleets under 50 vehicles.
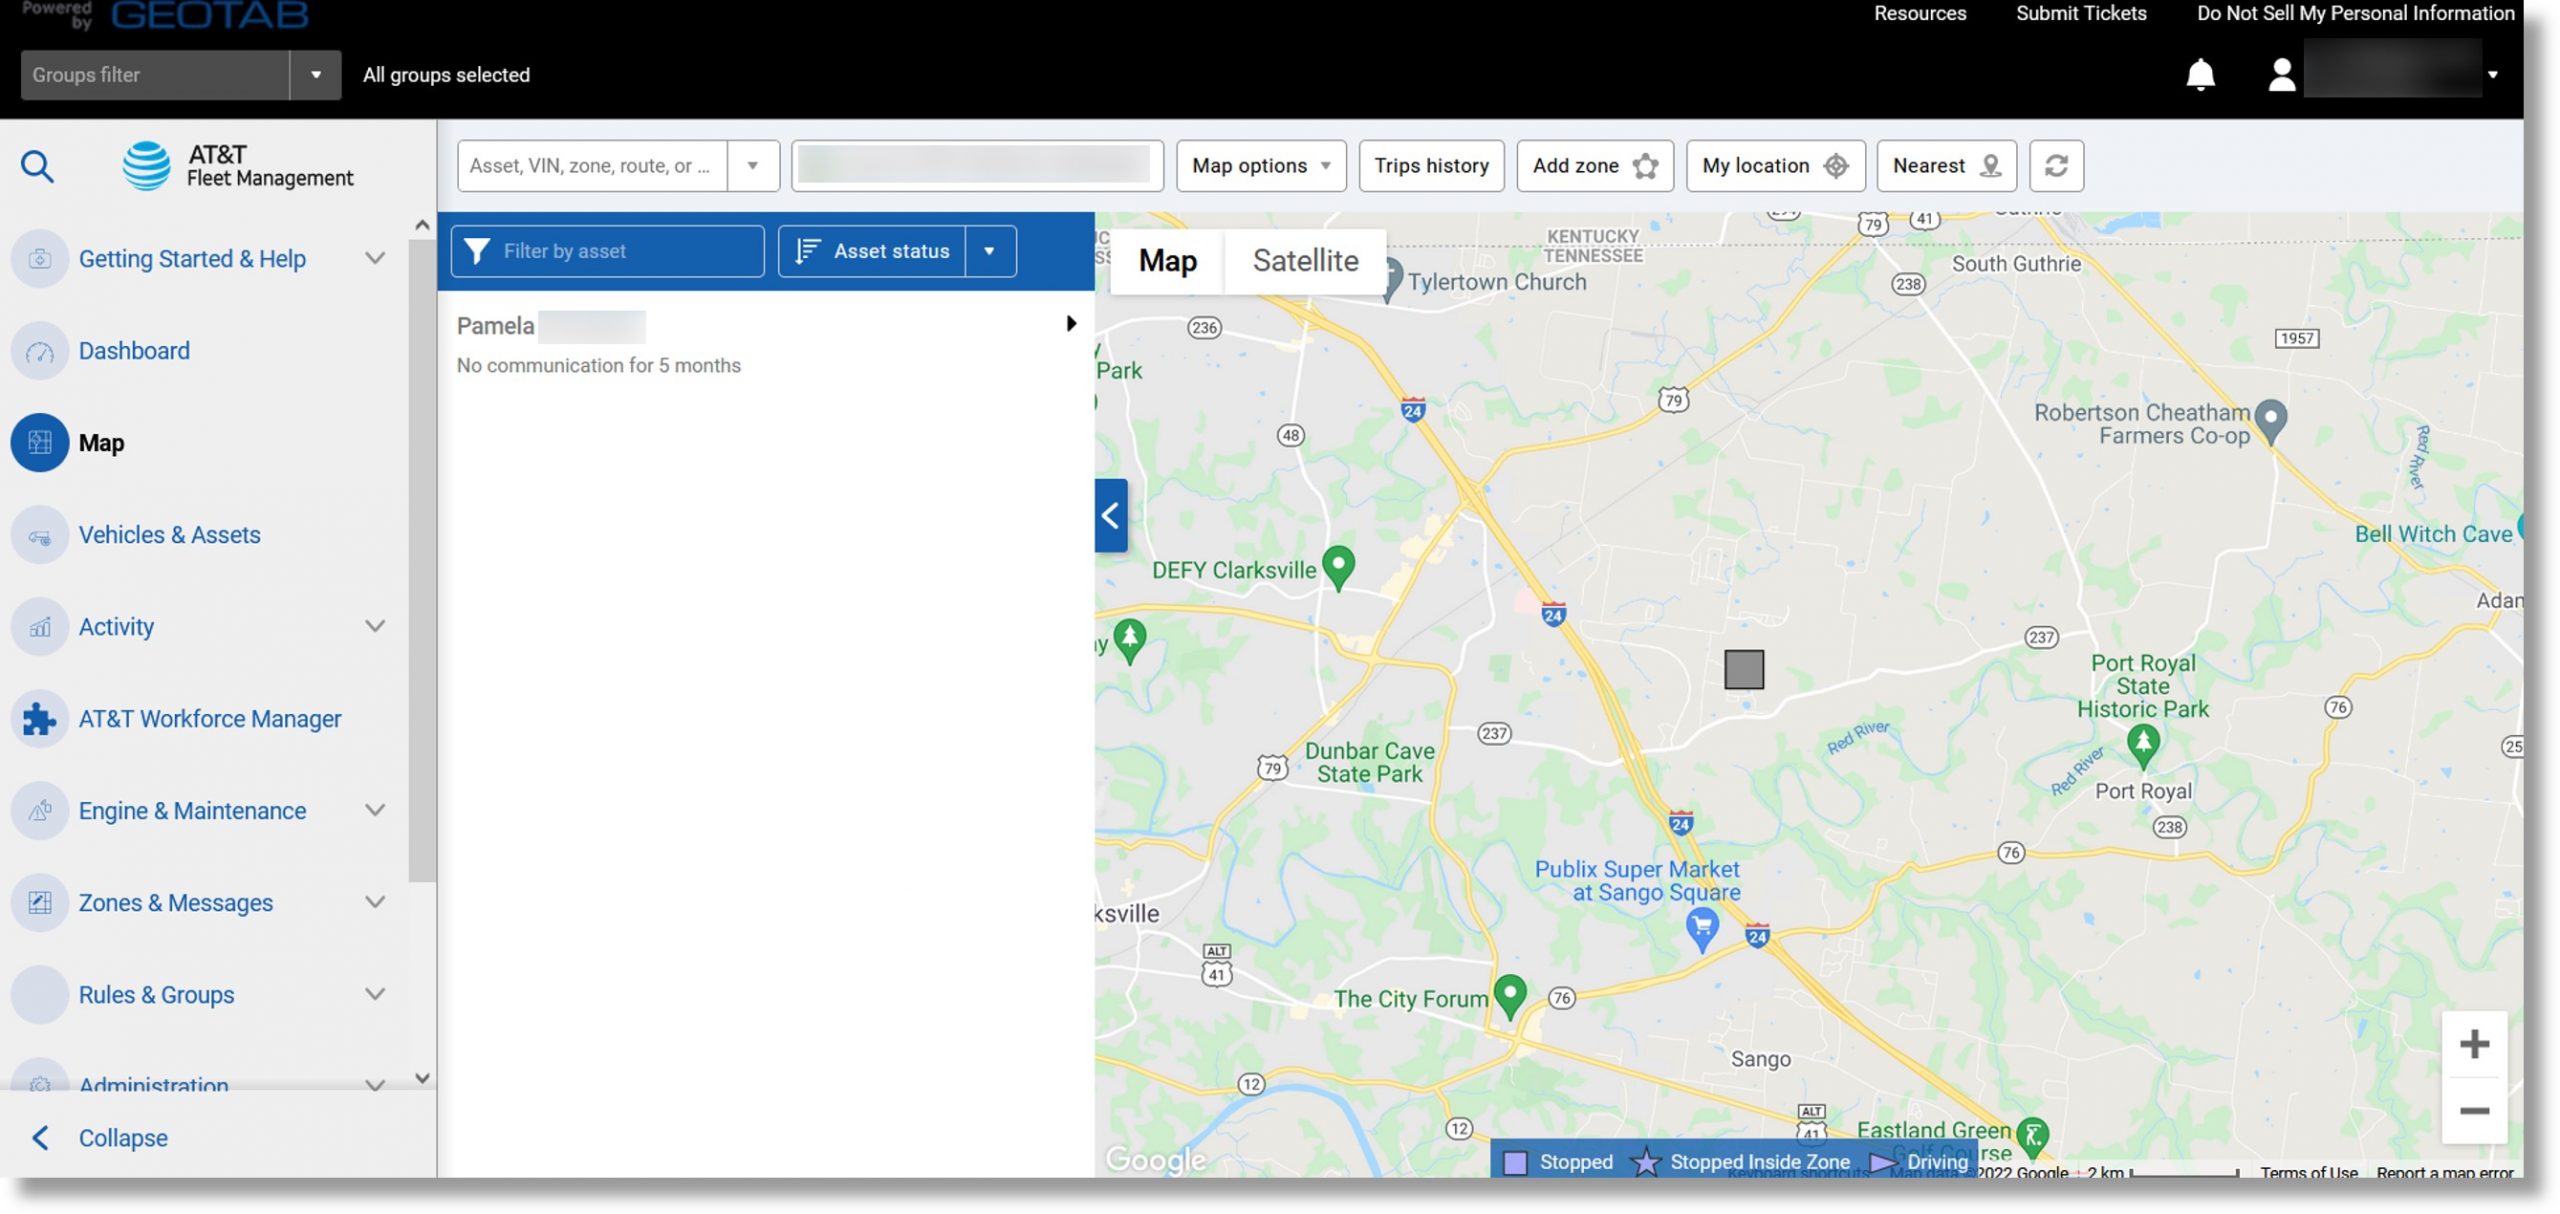
- If there are more than 50 vehicles, select the dropdown arrow to the right of the “Vehicle, VIN, zone, route or address” field and select the desired vehicle(s).
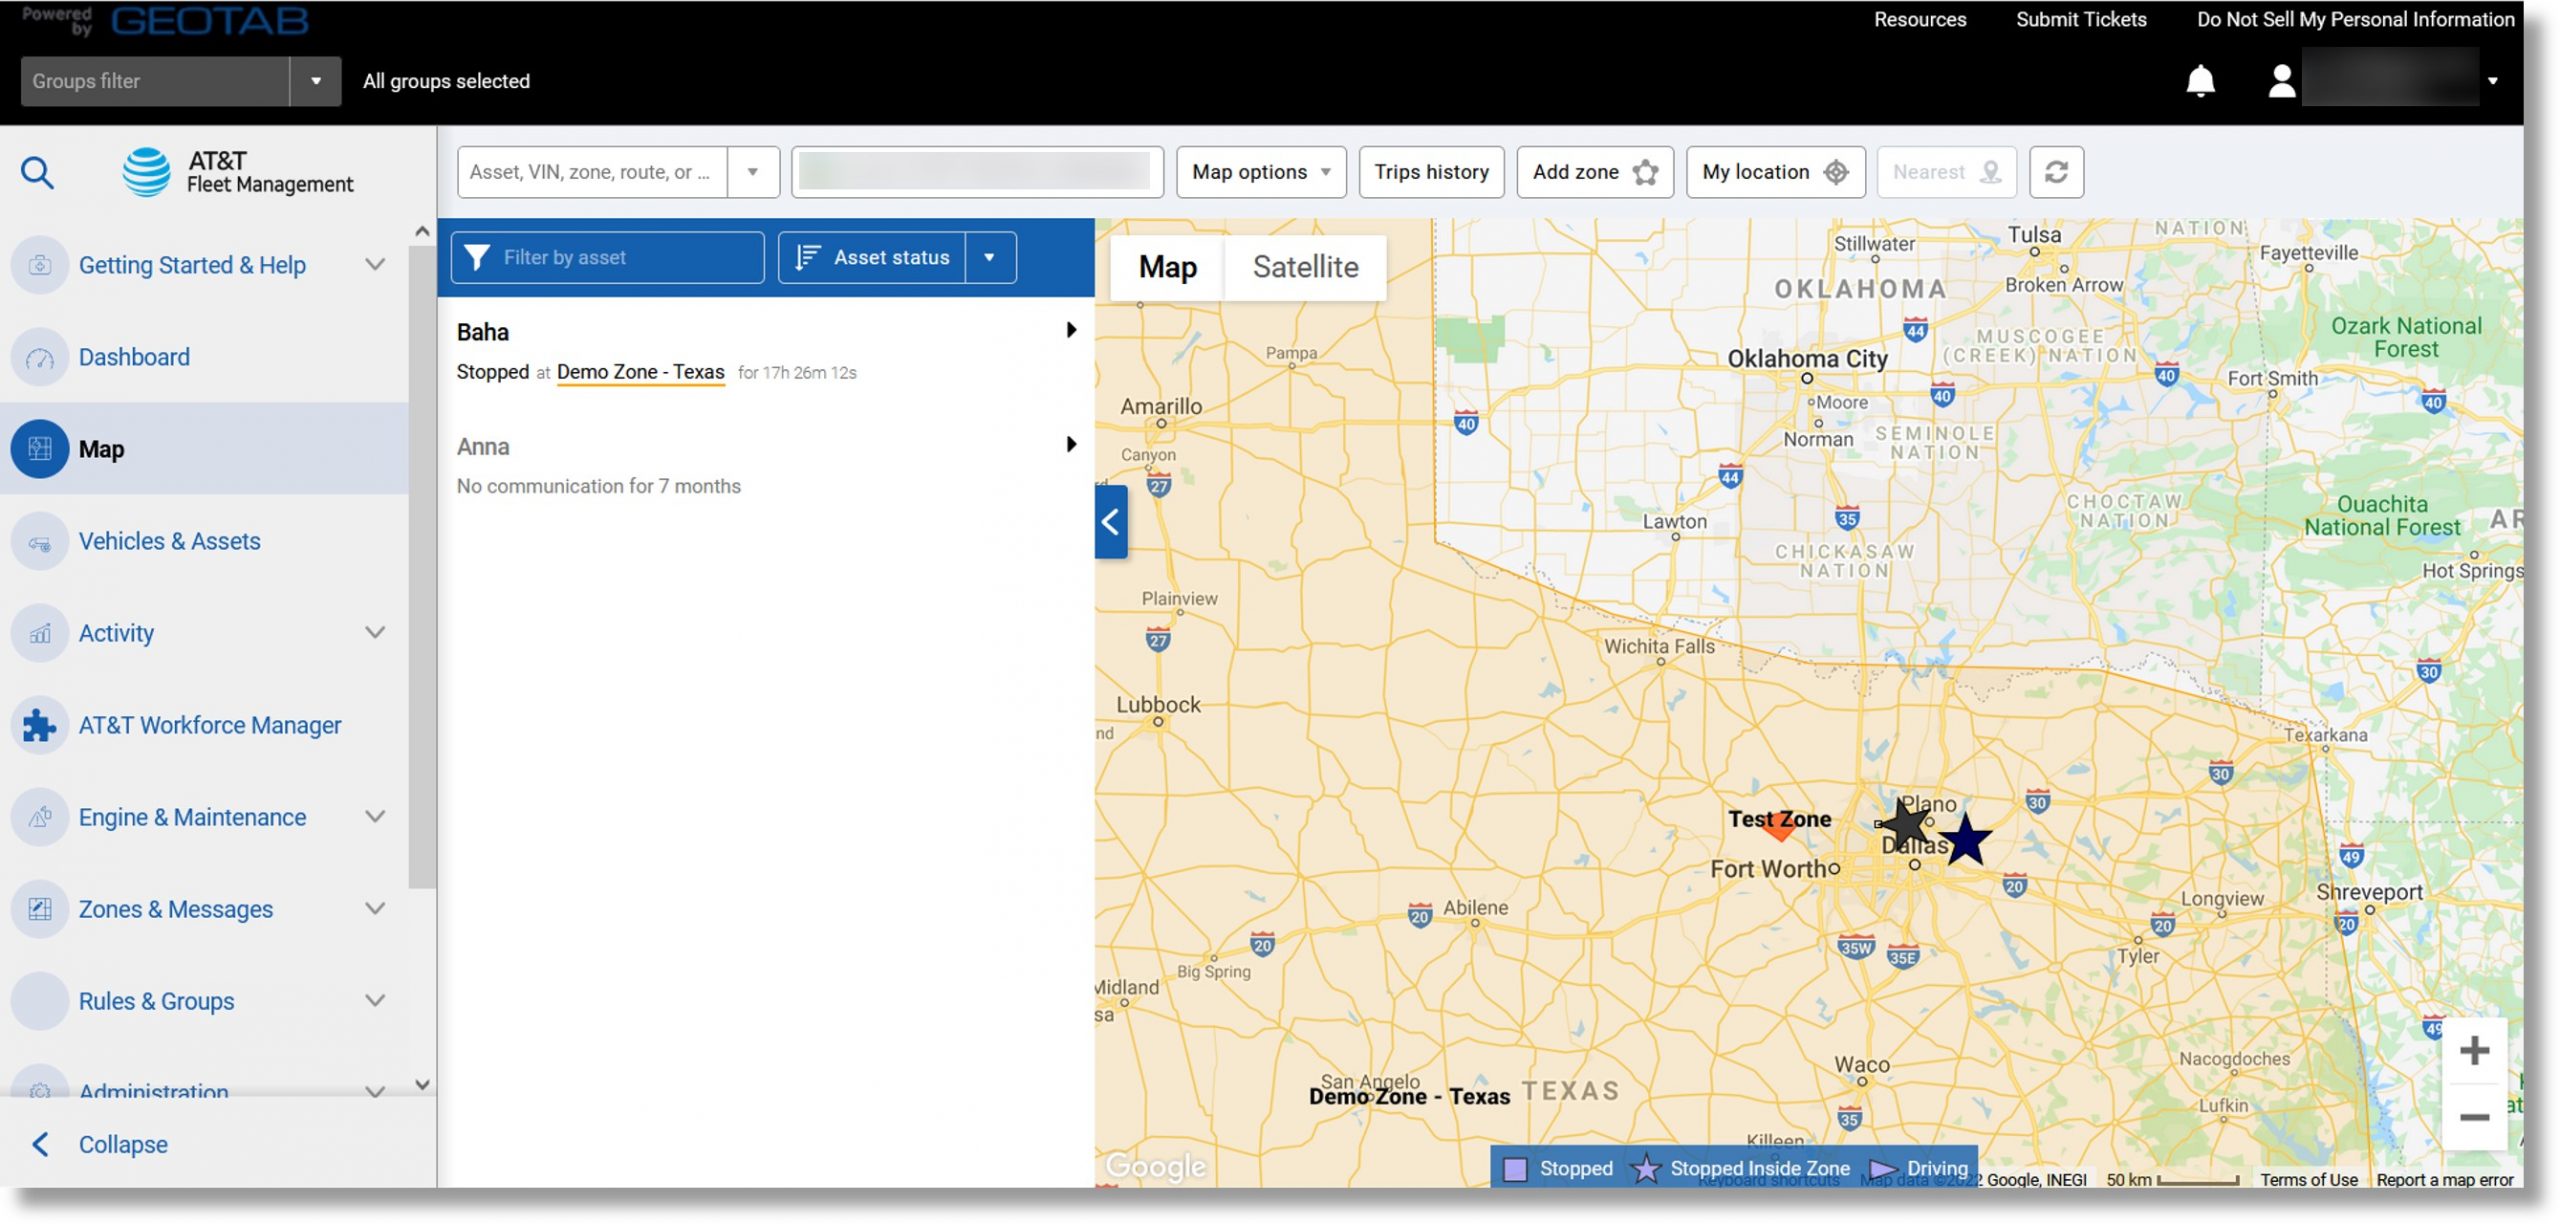
- The vehicle list displays and vehicle positions are visible on the map.
- The vehicle list is sorted by its status:
- Vehicles currently driving are listed first, followed by vehicles that are stopped.
- Vehicles stopped inside of a zone show the location underlined in the zone’s color.
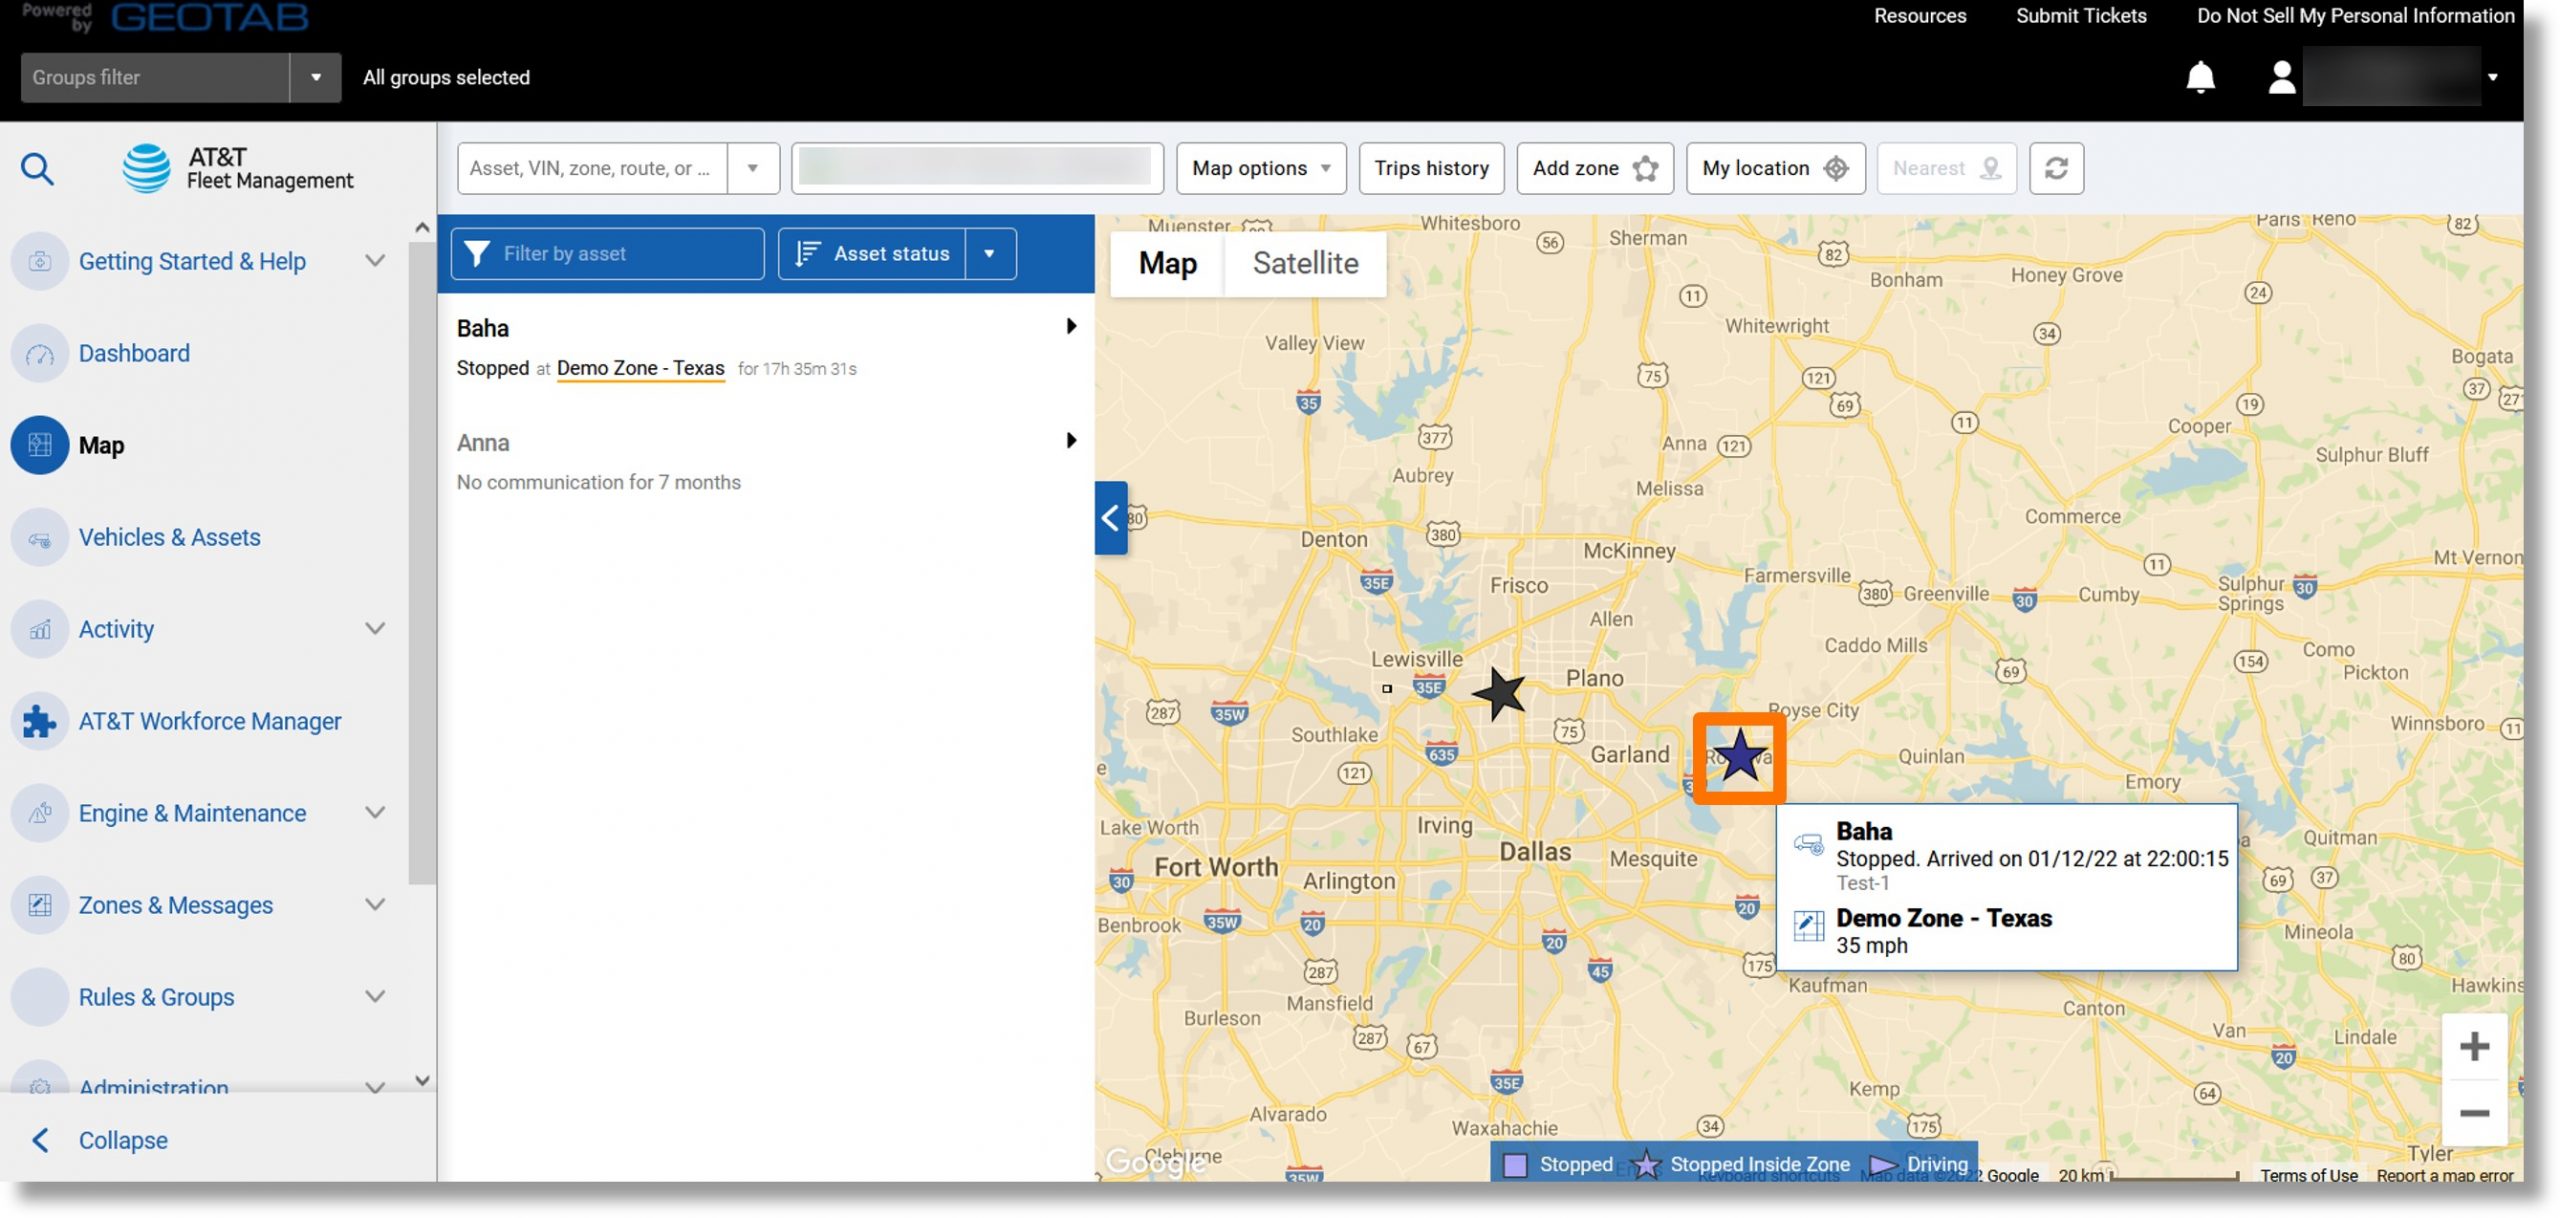
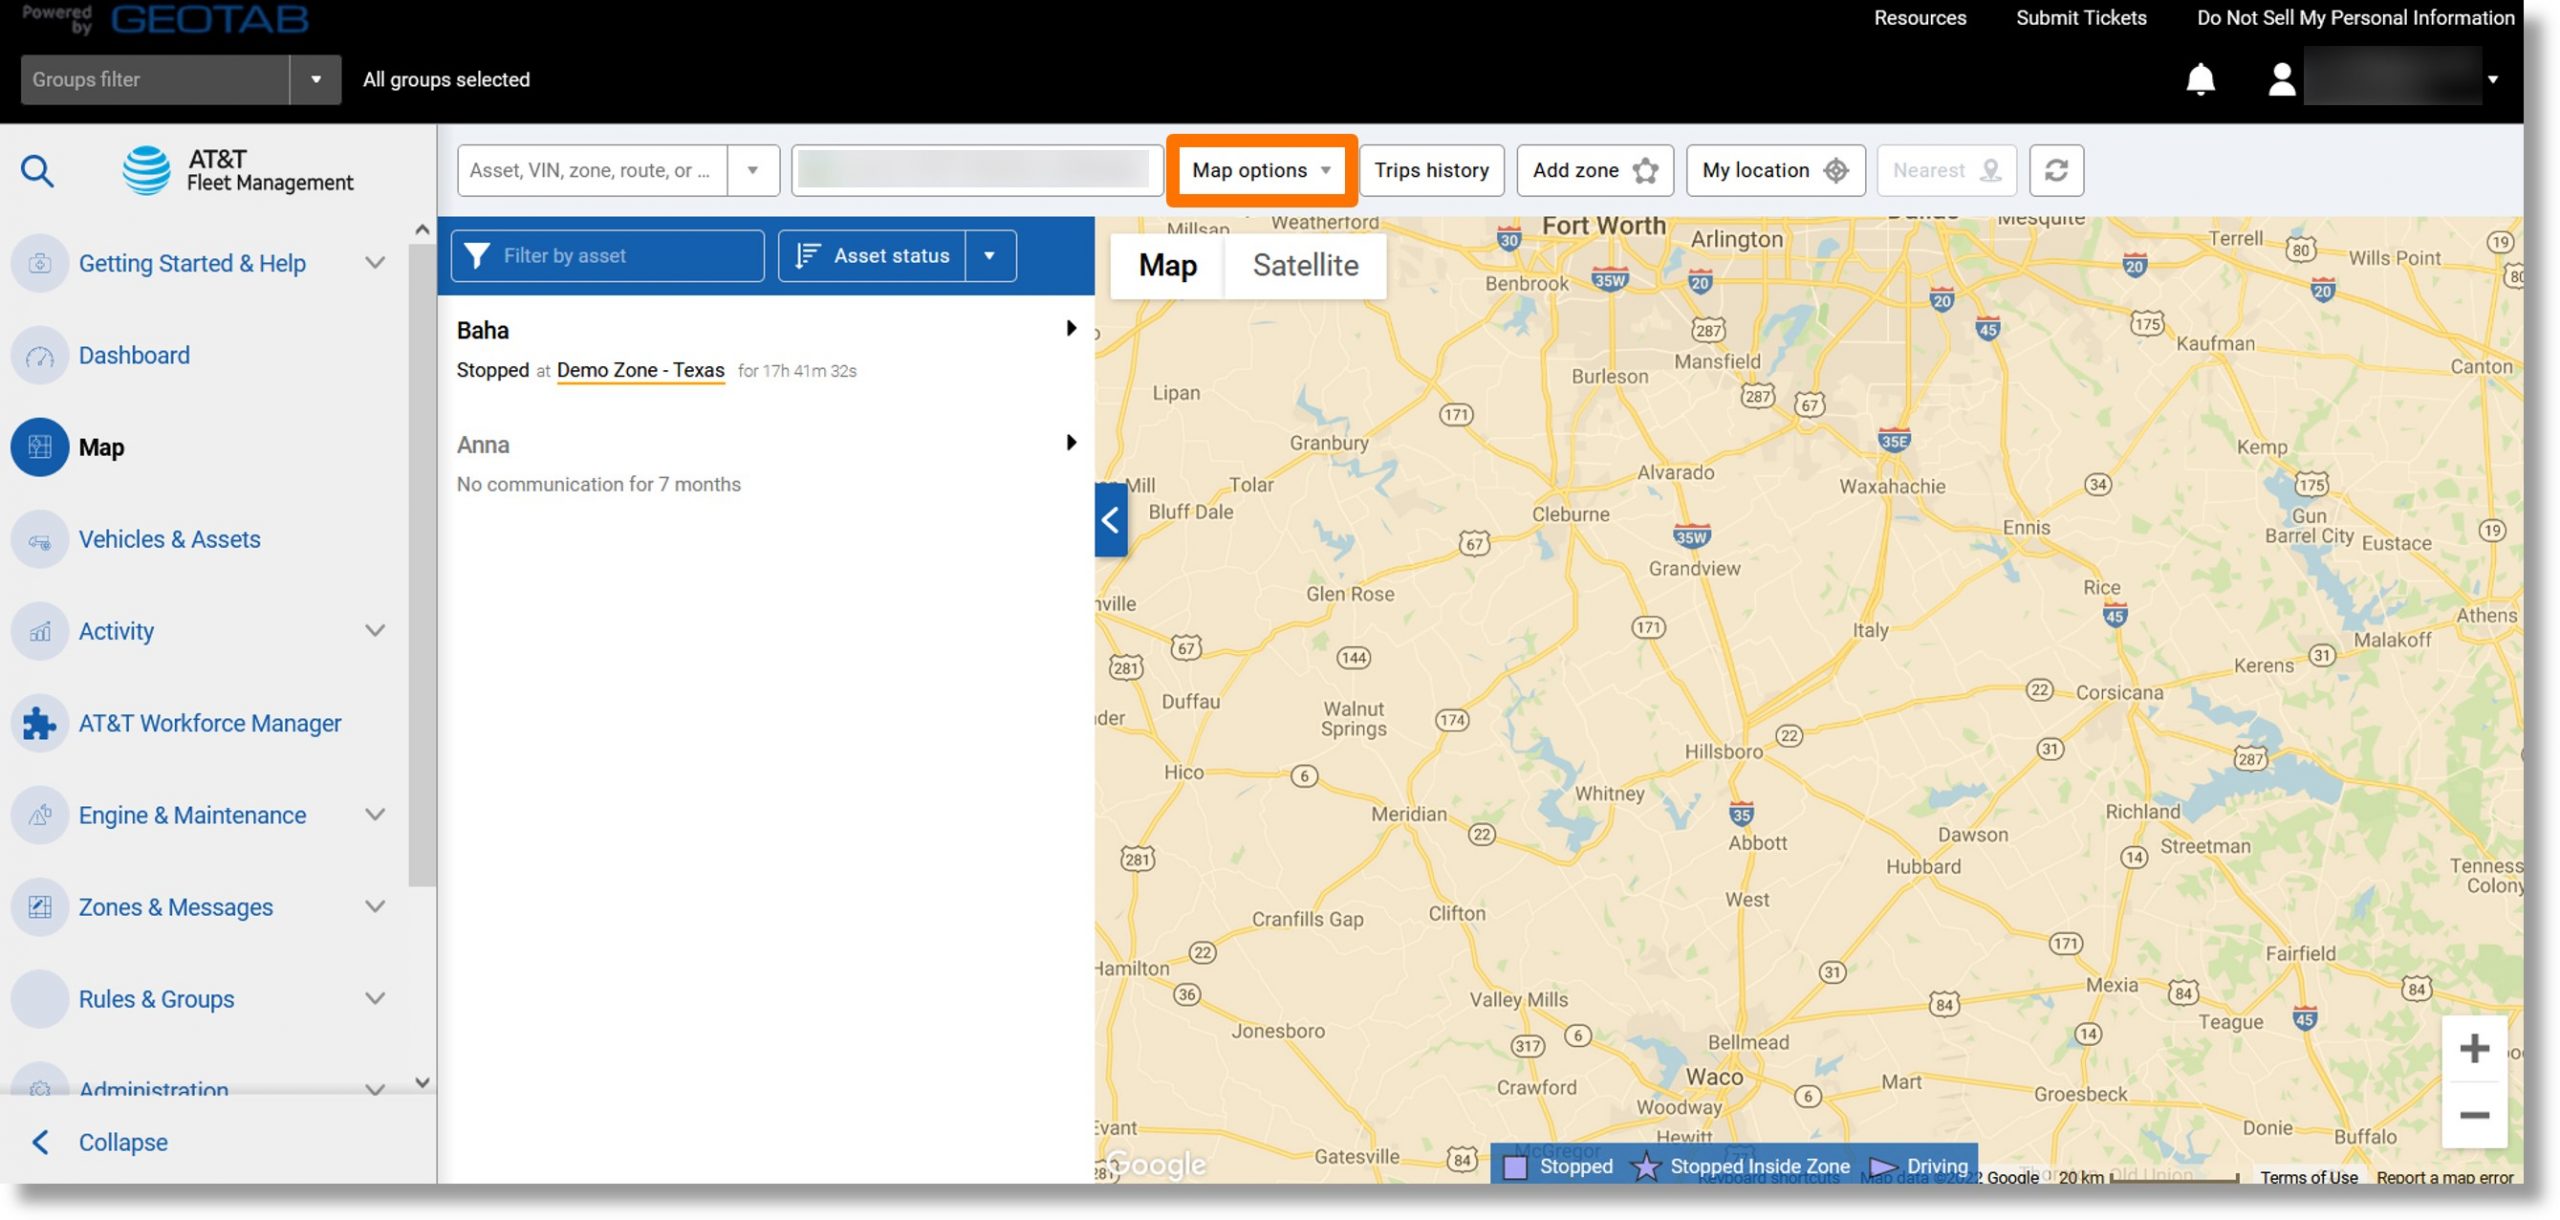
- The vehicle’s shape on the map changes depending on its status:
- Driving = triangle
- Stopped = square
- Stopped in zone = star
- To focus the map on a specific vehicle, click on its name in the vehicle list.
- Hover your mouse over a vehicle to see the current speed (if driving), or the time of arrival (if stopped).
Top
Map Views
- Change the default map view.
- Use the map controls to zoom into the desired area.
- Click the Map options dropdown at the top of the page.
- Click on Views and then Save this view.
- A confirmation message populates. Click in the field to enter a name for the new view and then click the Add view button.
- Click on your username in the top right corner of the page, then click Options.
- Click on the Map Settings tab.
- Navigate to the “View Organizer” section.
- Click and drag the view that you created to the top of the view list.
- Click the Save button at the top of the page when complete.
Top
Additional Map Options
Additional map options.
- While viewing the map, click on the Map options dropdown near the top of the page.
- “Clear map” clears any vehicles currently displayed on the map.
- “Highlight groups” highlights specific groups on the map.
Note: Selections can be reversed by selecting None.
- “Views” lets you choose from previously configured map views. As well as lock or save a map view.
- “Map type” changes your map provider.
Note: The new map provider can be set to default by selecting your username on the top right of the screen, and then clicking on Options then Map Settings.
- “Show traffic” adds color to the roads on the map indicating traffic status.
- “Show legend” adds or removes map symbols and exceptions from the bottom of the map.
- “Show routes” adds new routes directly from the map or shows existing routes on the map.
- “Show zones” adds and removes zones from the map, and can display default zones or all zones.
- “Show labels” adds a visible tag with the asset’s name to the map.
Top
Trips History
Displays details on the path a vehicle has taken during a trip.
- While viewing the map, click the Trips History button on the top of the page.
- The Trips History displays status by vehicle, by date. Use the forward and back arrows to the left of the date to view adjacent days.
Note: If no trips display, click on the Options dropdown and choose a different time frame under “DATE PERIOD”, and then click on the Apply changes button.
- Click on the desired trip under the vehicle name in the trips list to display it on the map.
- The trip is highlighted by a blue line on the map.
- Hover over the line on the map to see the trip date, vehicle name, the assigned driver (if there is one), assigned groups, and total distance traveled for the day
Available Data
Vehicle, trip start and end times, distance, max speed, driving, idling and stop durations, location and zone data
Top
Trips Summary
A summary of vehicles and their activities for the selected date range.
- From “Trips History” menu, click the Summary button at the top of the page to view a summarized version of the report.
- The Activity and Trips Summary Report provides totals for mileage, driving time, and idling for the date range selected.
Note: If the trip selected includes a pie chart, hover your mouse over the chart for detailed information on time spent in customer, non-customer, home, and office locations.
Available Data
Distance, max speed, idling, duration of home, customer, non-customer, and office stops, stop counts, duration percentages
Top
Vehicles
| Vehicle management allows users to keep track of all devices, manage vehicle-based driver feedback, groups, and options, swap and remove devices, and change device settings and time zones. |
Adding Individual Vehicles
Adds new vehicles, one at a time.
- Click on Vehicles & Assets the main menu on the left side of the database.
- Click the Add dropdown, then click Add asset.
- Click in the field to the right of “Serial number” and enter the serial number for the GO device.
Note: The serial number is 12 characters long and contains both letters and numbers. The letter “O” is never a part of the serial number. Dashes are not required.
- Click in the field to the right of “Description” and enter a description for the vehicle (name).
- Click the OK button at the top of the page.
Available Data
Description/Name, device type, serial number, comment, license plate, VIN, odometer, engine hours
Top
Adding Multiple Vehicles
Adds multiple vehicles at once using Quick Import.
- From the Vehicles list, click the Add dropdown and click on Quick import.
- Copy your list of vehicle serial numbers and descriptions and paste them in the “Serial number, vehicle description” field.
Note: The pop-up that populates includes the required format for each vehicle.
- Click the Import button.
Top
Device Info
Displays basic device, vehicle and engine statistics.
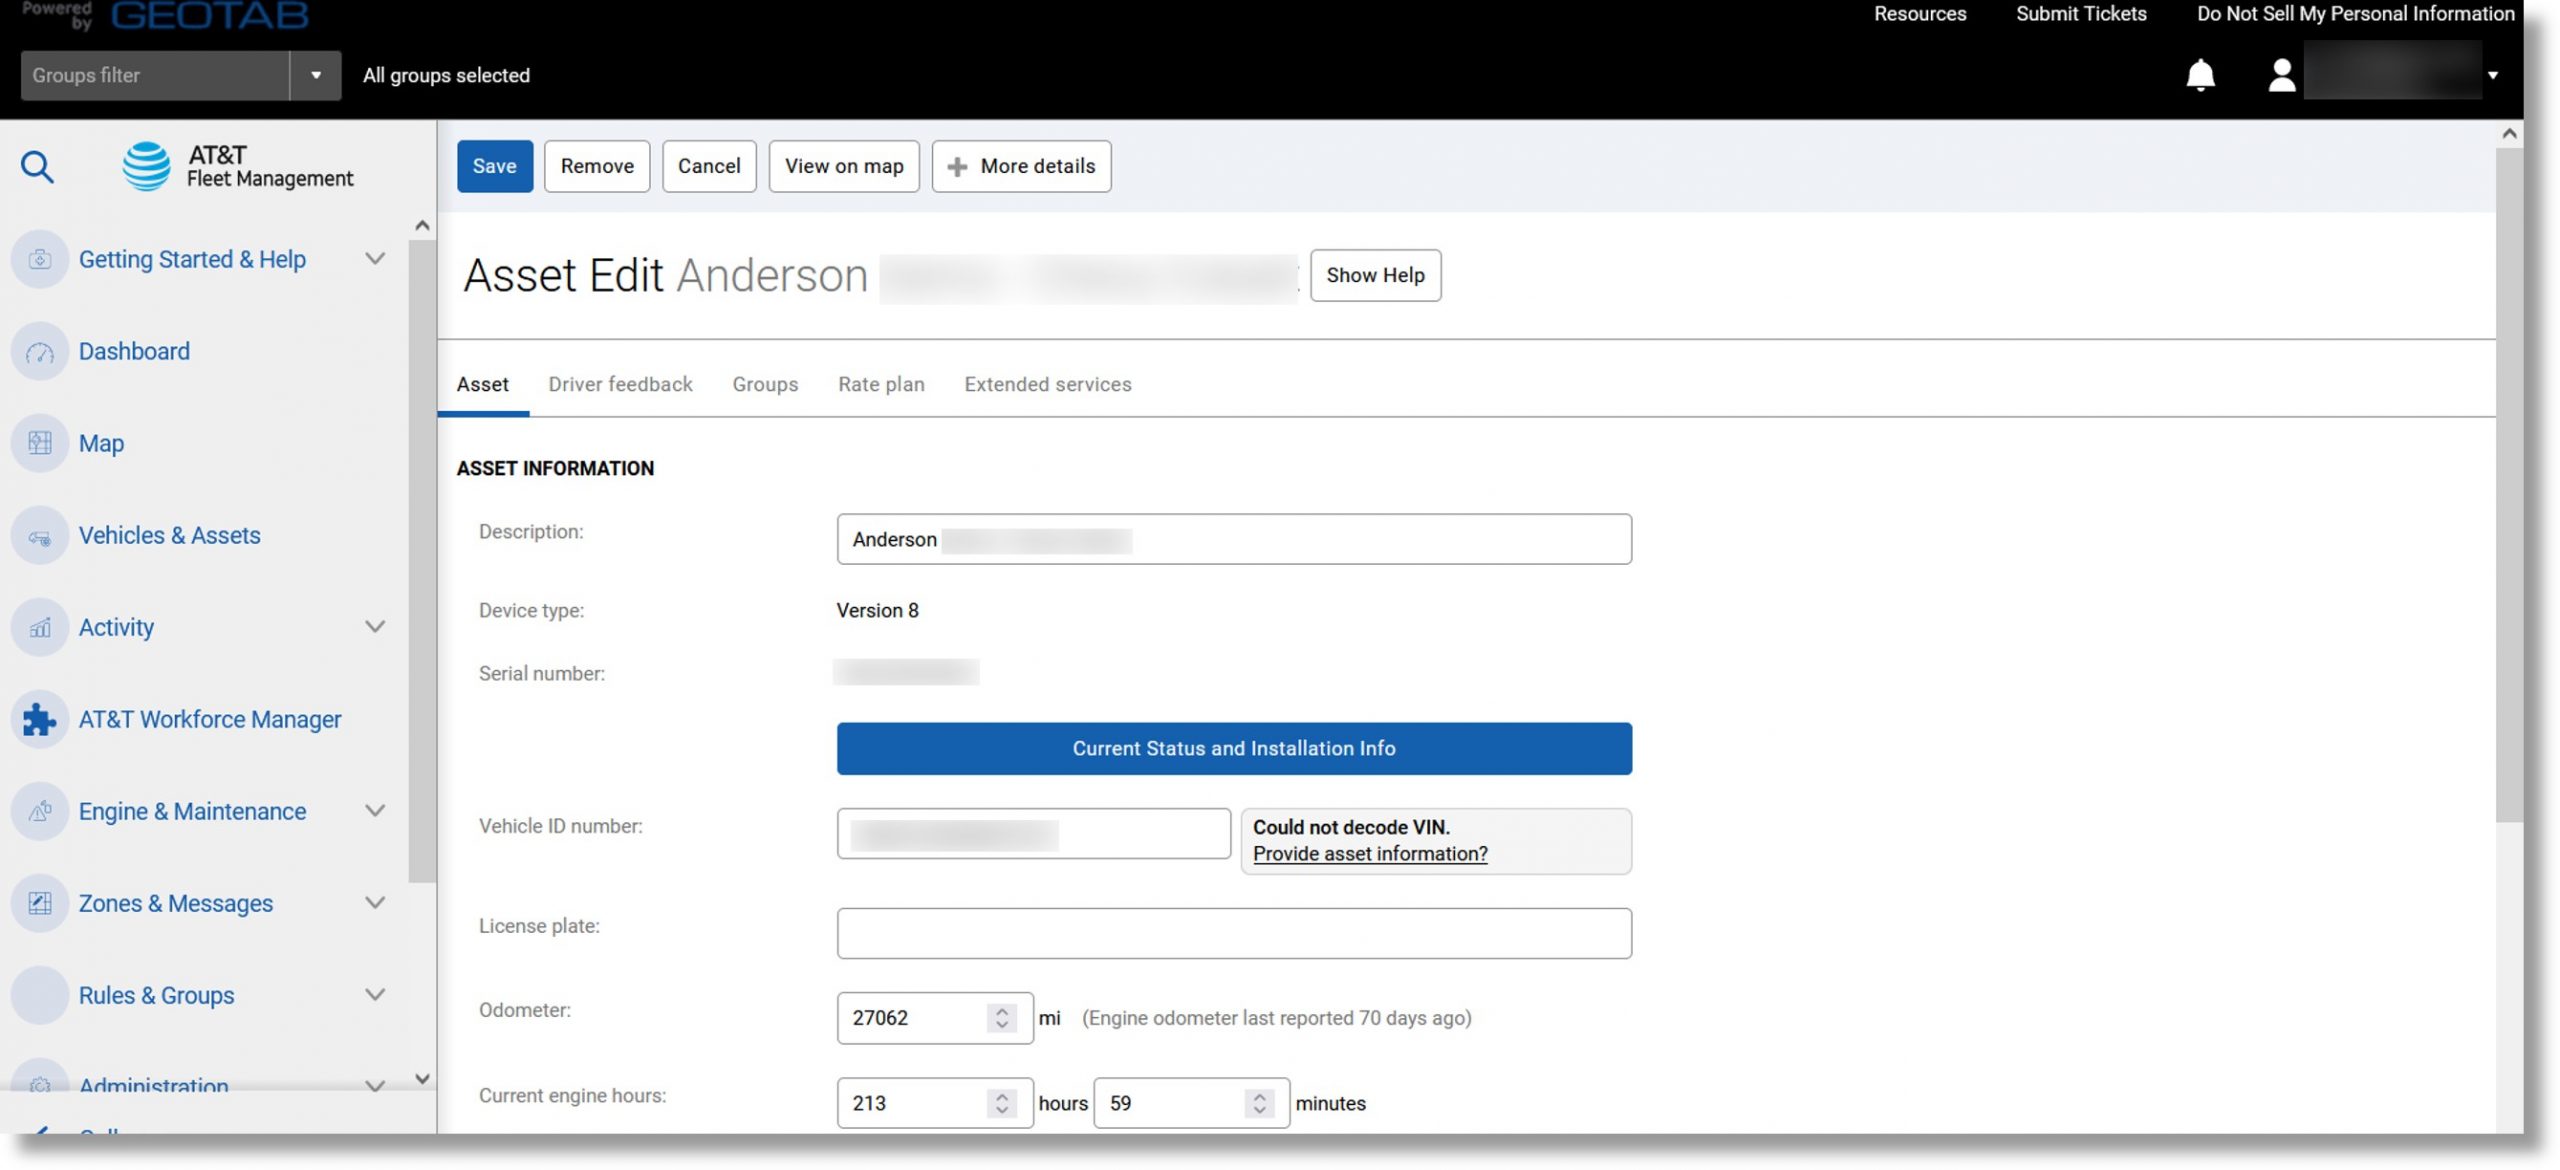
- Access the asset list and click on an asset to view it’s information.
Note: The device type and serial number cannot be changed.
- The Vehicle ID number (VIN), Odometer, and Current engine hours fields populate automatically but can be edited.
- Users can enter or change the Description, License plate, Comments, or State/province.
- Click on the Save button at the top of the page when complete.
Top
Driver Feedback
| Audible in-vehicle alerts can improve the on-road driving behavior of your drivers by notifying them of unsafe or potentially risky driving events. |
- From the “Assets” list, click on the asset you wish to edit.
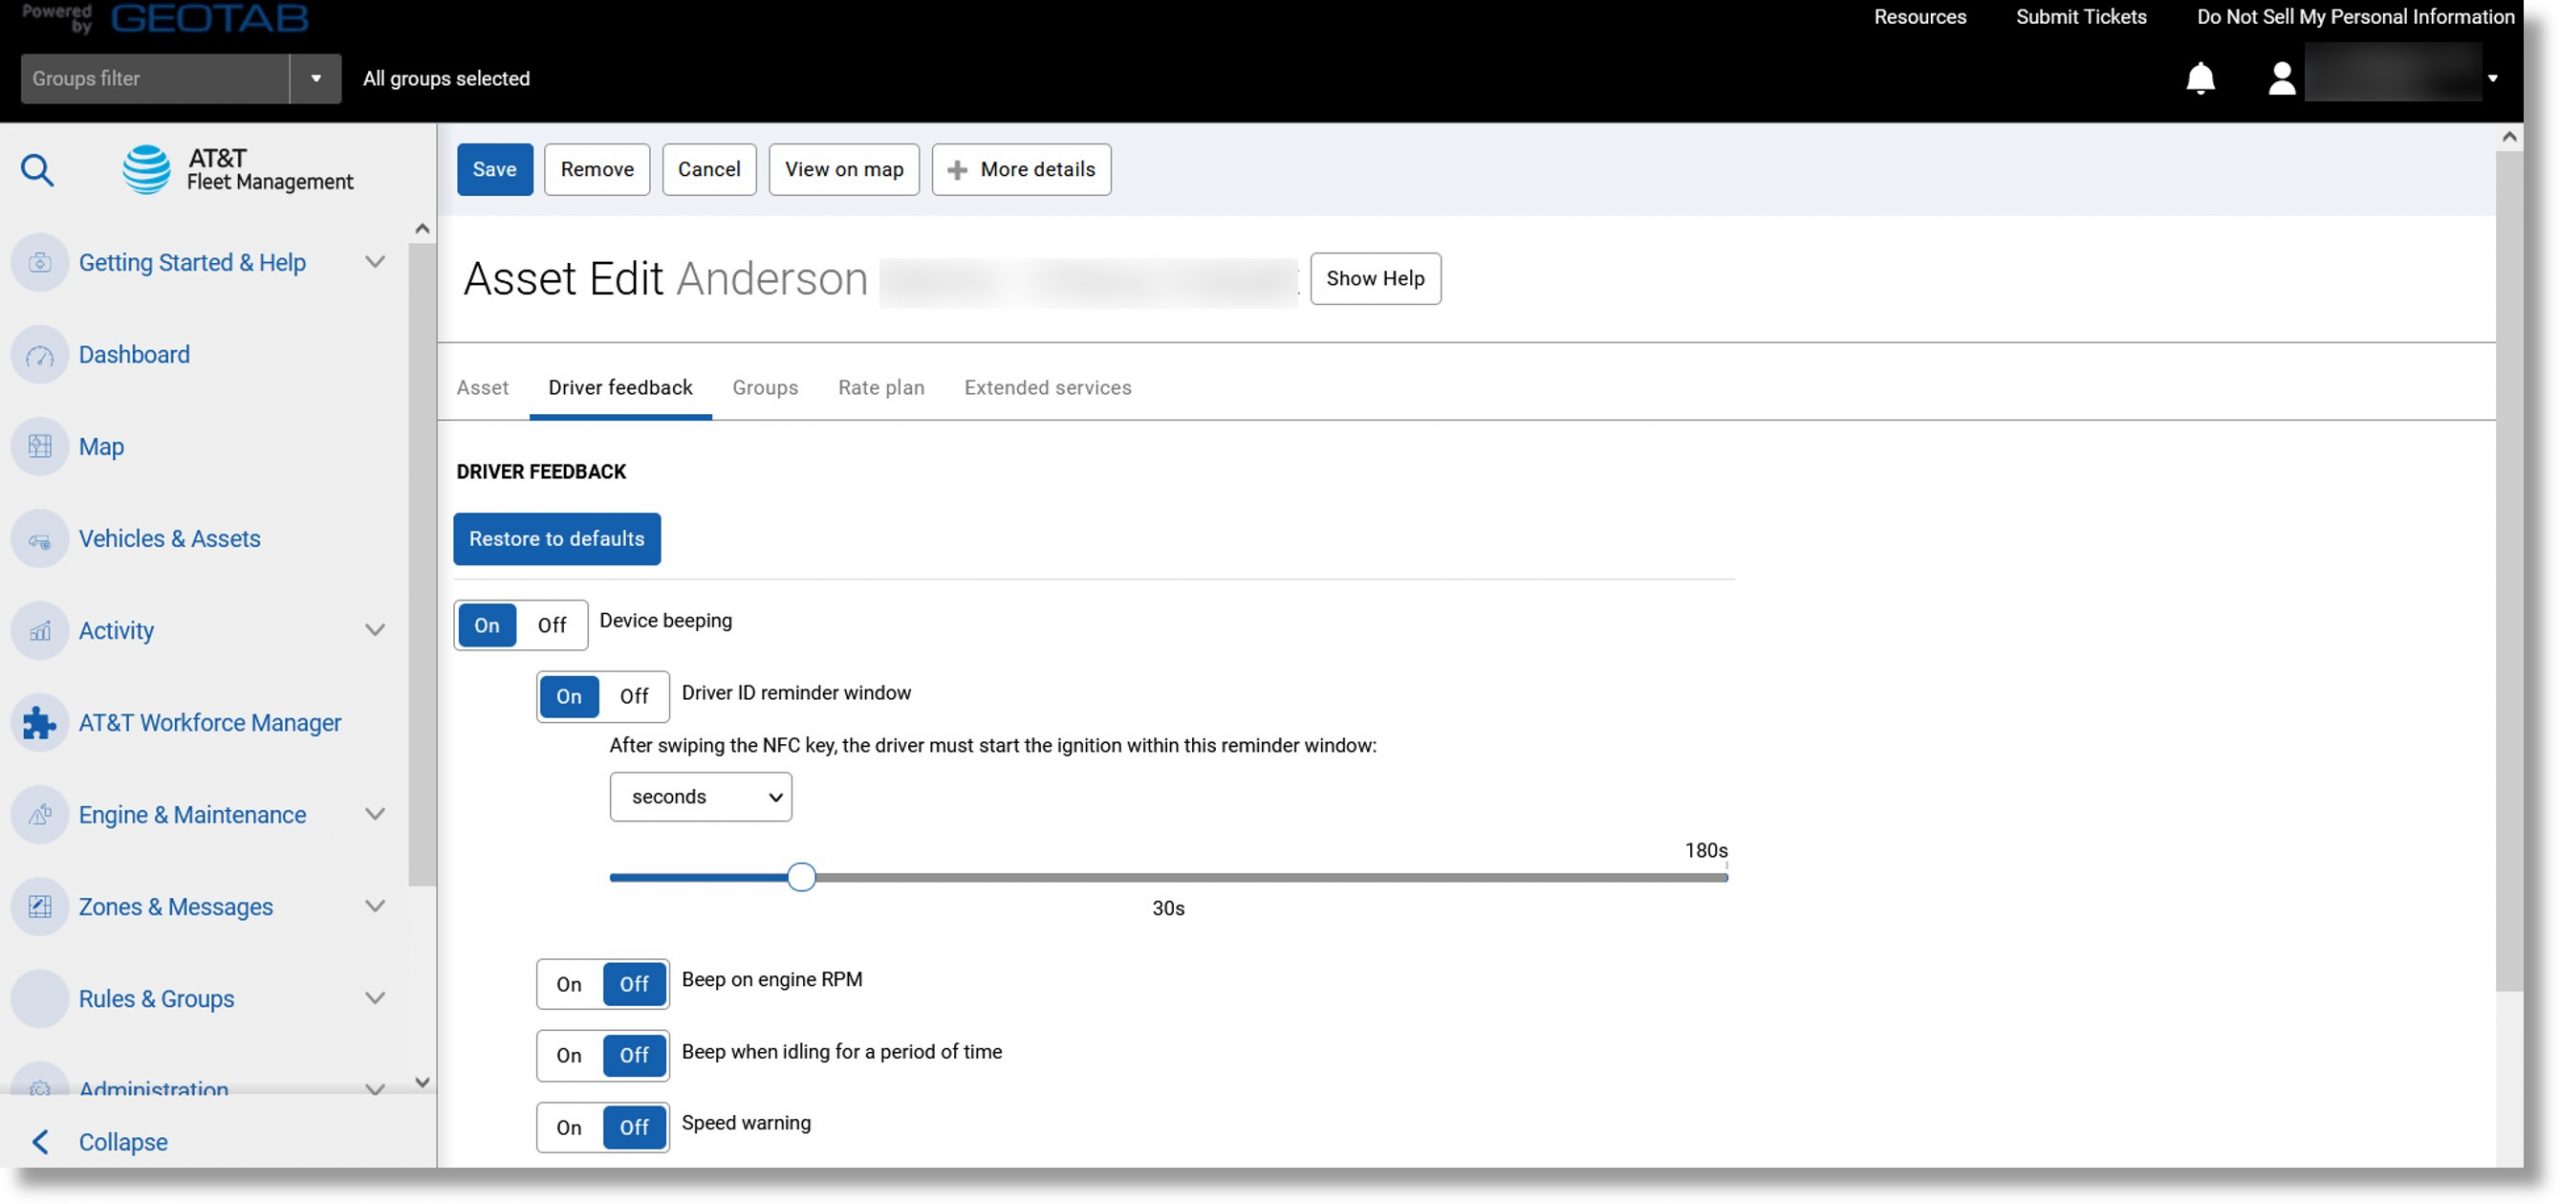
- Click on the Driver feedback tab.
- Click the On button to the left of “Device beeps” to enable feedback options.
- Make adjustments to the options that display as desired.
- Click on the Save button at the top of the page when complete
Feedback Options
- Driver identification reminder is used with IOX-NFC Driver ID. The slider determines how many seconds before beeping to remind the driver to swipe an NFC fob. Once swiped, beeping stops.
- Beep on engine RPM prompts the device to beep if RPM exceeds the set value. Pro or ProPlus subscriptions are required for this feature. If you are interested in upgrading to the ProPlus plan, please contact your AT&T account manager.
- Beep when idling for a period of time prompts the device to beep if the vehicle idles longer than the specified time.
- Speed warning requires two speeds: Start Beeping is the speed at which the device begins beeping, and Stop Beeping is the speed at which the device stops beeping. It is recommended to start beeping at the highest speed and stop at a lower speed. Beep briefly when approaching warning speed is used if the vehicle approaches stop beeping speed.
- Beep on dangerous driving beeps when dangerous driving is detected. Select the box or drag the slider to set the vehicle type. Passenger Car = least sensitive, Heavy-Duty = most sensitive, and Truck/Cube Van = middle. Pro or ProPlus subscriptions are required for this feature. If you are interested in upgrading to the ProPlus plan, please contact your AT&T account manager.
- Beep when seat belt not used sets the speed at which device beeps with seat belt unbuckled. Select to Monitor both passenger and driver seat belts. Pro or ProPlus subscriptions are required for this feature. If you are interested in upgrading to the ProPlus plan, please contact your AT&T account manager.
- Beep when reversing uses accelerometer data to determine when the vehicle is in reverse. Pro or ProPlus subscriptions are required for this feature. If you are interested in upgrading to the ProPlus plan, please contact your AT&T account manager.
Top
Groups
Assign vehicles to a group.
- From the “Assets” list, click on the vehicle you wish to assign.
- Click on the Groups tab.
- Click on the dropdown arrow to the right of “Groups” or click in the “Select groups…” field right of “Groups” and enter the desired group’s information to select a group.
Note: Messaging status groups are not required.
- Click on the Save button at the top of the page when complete
Top
More Details
Displays detailed device, vehicle, and user statistics. This includes device, compliance, and vehicle compliance management options.
- From the “Vehicles” list, click on the desired vehicle.
- Click on the + More details button at the top of the page to display additional fields and options on the Device tab.
Note: This button also populates tabs for Auxiliaries and Custom parameters.
- Make any changes to odometer data or options under “DETAILED DEVICE INFO”.
- Click the Save button at the top of the page when complete, or continue to the Auxiliaries tab to set up driver feedback for Auxiliary devices in the vehicle.
- Click on the Custom parameters tab to enter any custom parameters for the vehicle.
- Click on the Save button at the top of the page when complete
Unplugging Devices
Makes the device inactive while keeping vehicle data.
- Click on Vehicles & Assets in the menu on the left side of the database.
- Click on the desired asset.
- Click on the Asset tab.
- Click the + More details button at the top of the page, then click on the Unplug Device button.
- A confirmation message populates, click on the Unplug Device button to confirm.
- Click on the Save button at the top of the page when complete
Replacing Device
Replaces a vehicle’s GO device while keeping trips data associated with the vehicle.
- Click on Vehicles & Assets in the menu on the left side of the database.
- Click on the desired vehicle.
- Click on the Asset tab.
- Click on the + More details button, then click on the Replace with new device button.
- Click in the field to the right of “Serial number” and enter the new device’s serial number.
- Click on the OK button at the top of the page.
- Click on the Save button at the top of the page when complete
Active Tracking
Refreshes vehicle location every second for up to 20 moving vehicles on the Map.
- Allows continuously up-to-date vehicle positions on the live map.
- If the GO device is on the Pro plan, toggling Active Tracking to On will activate the ProPlus plan. For more information or to add the Pro plan to your account, please reach out to your AT&T account manager.
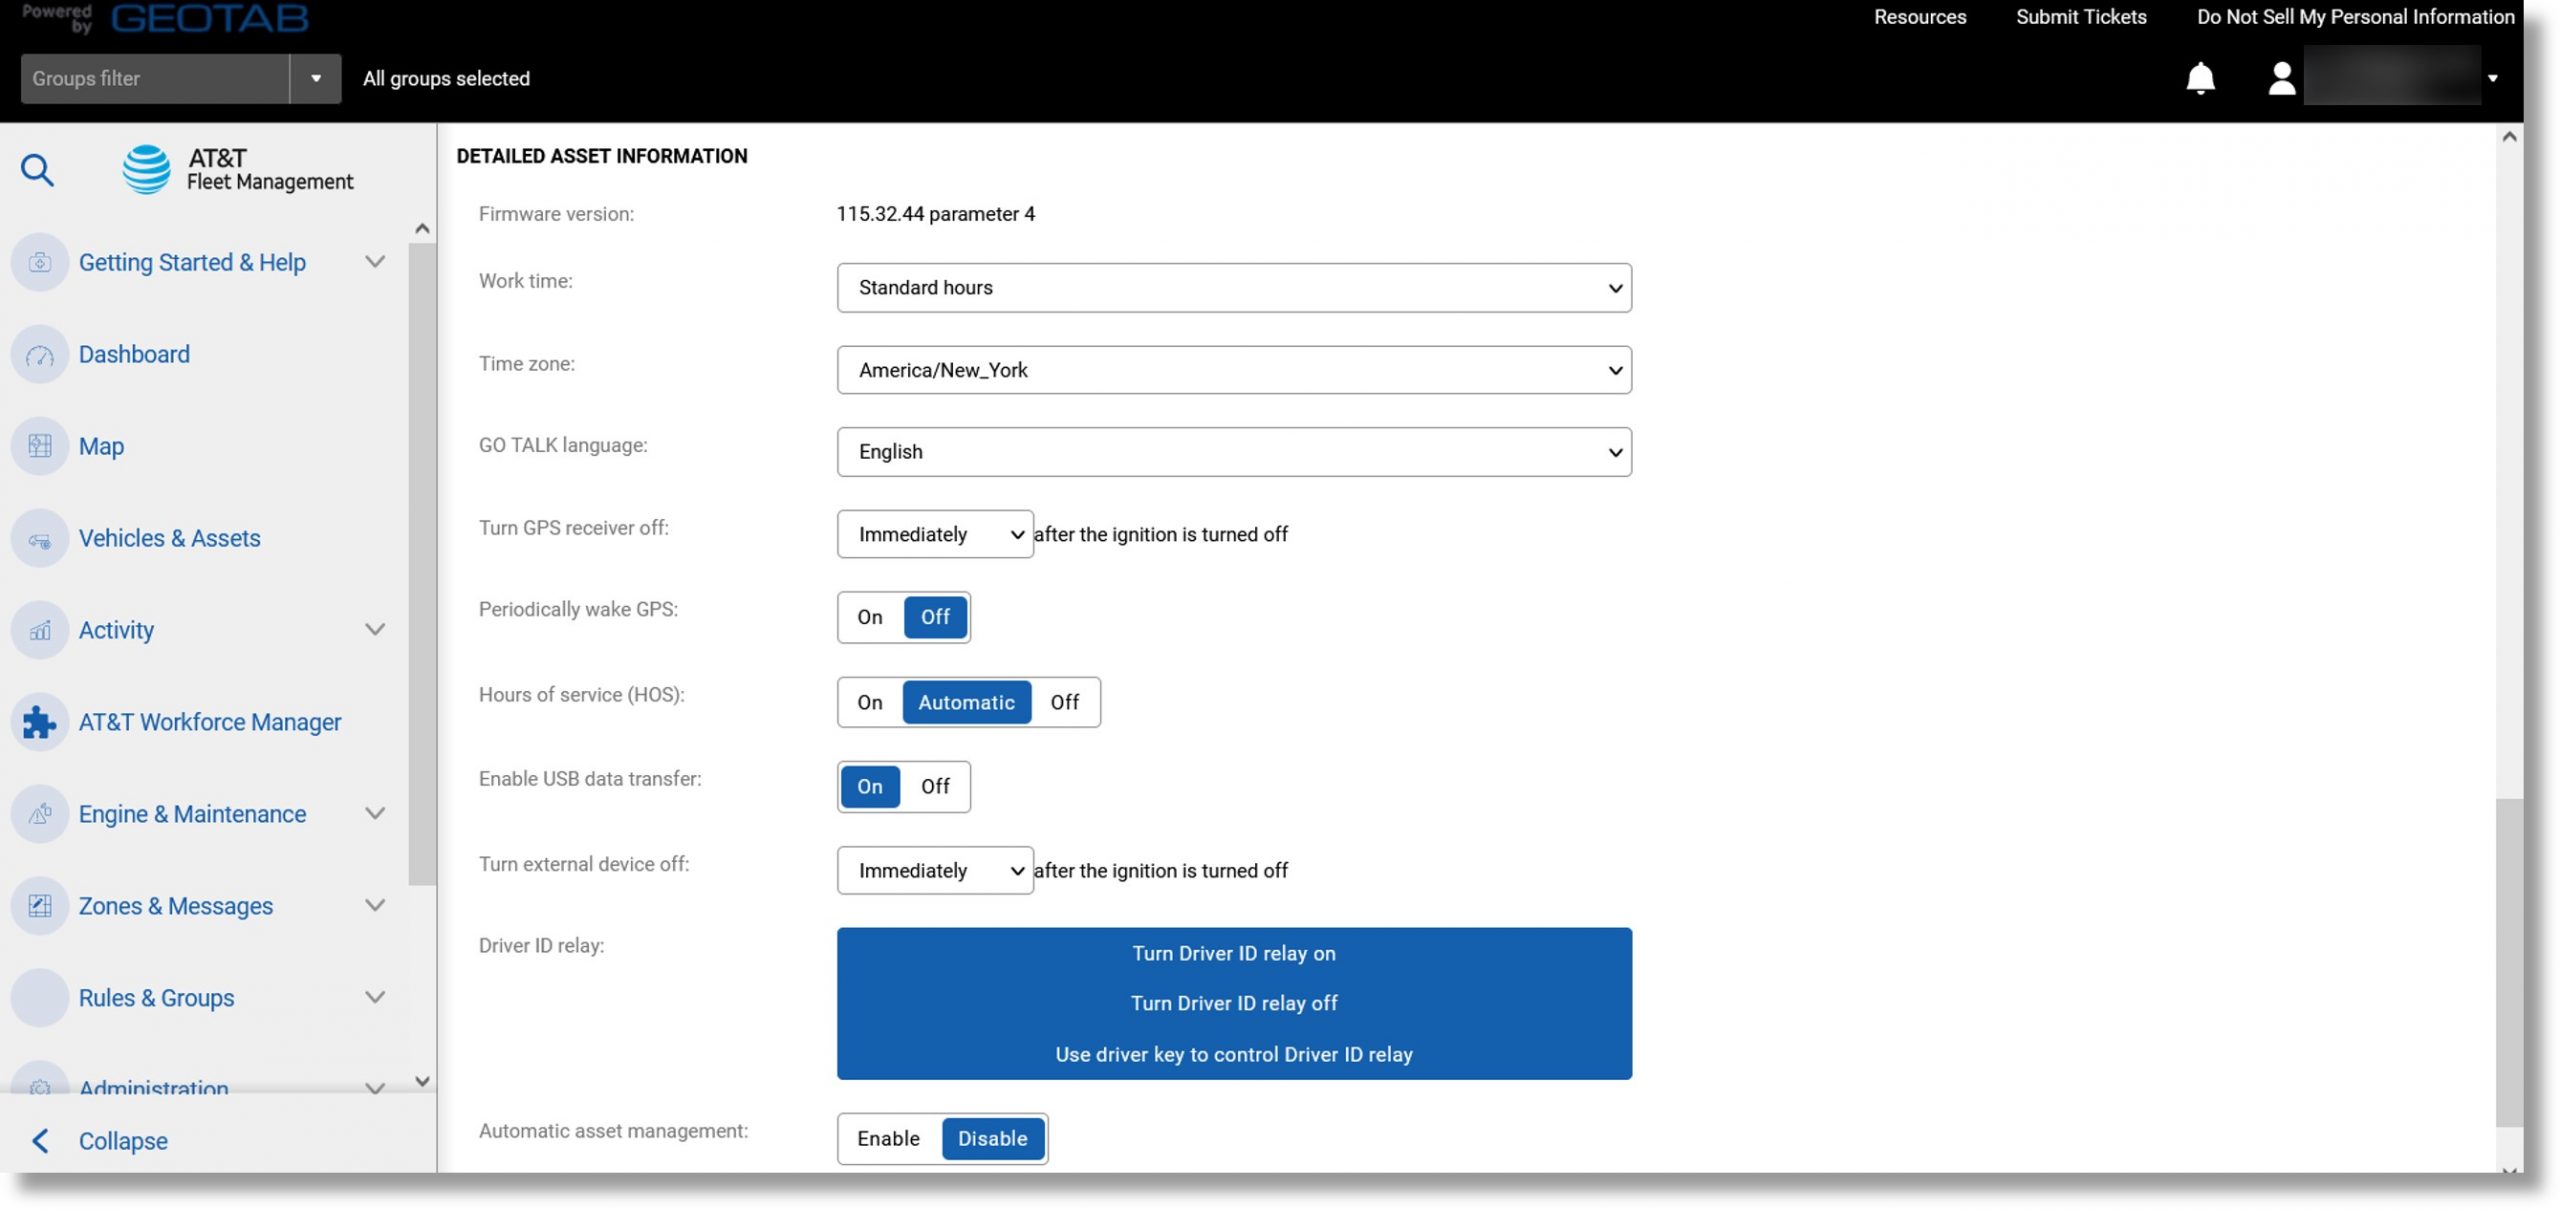
Detailed Device Info
- Work time is used in conjunction with rules. Select work hours from the dropdown list.
- Time zone is used to select the time zone in which the asset will spend most of its time. This feature is important for reporting.
- GO TALK language is used in conjunction with devices connected to a GO TALK IOX. Select the appropriate language from the dropdown list.
- Turn GPS receiver off can force a GPS receiver to remain on after ignition OFF. Useful for fleets that require constant GPS accuracy.
- Periodically wake GPS is used to improve GPS lock on startup.
- Hours of service (HOS) controls the creation of duty status logs for HOS compliance. On enables the device to create automatic duty status logs when the vehicle exceeds 5 MPH. If set to Off, the device will NOT create automatic duty status logs. Automatic will auto-activate if the system determines that the vehicle is using HOS features.
- Turn external device off is used if an external device is connected via IOX, this setting controls when it turns off relative to ignition. This feature is useful for service and delivery fleets.
- Driver ID relay manages when the relay turns on and off when both an IOX-NFC and IOX-RELAY are connected to the GO device. The Turn Driver ID Relay on and off options are used to manually turn the relay on or off from AT&T Fleet Management for Enterprise/Government. Use driver key to control Driver ID relay opens the relay when a viable NFC fob is swiped.
- Automatic vehicle management marks vehicles as archived when the GO device is unplugged and adds new vehicles when a GO device is plugged in. This feature assists with vehicle organization.
- Fuel tank capacity is a reasonable estimate of a vehicle’s fuel tank capacity. Useful for reporting on fuel economy.
- Auxiliaries tab is used if a device is connected to one or more IOX-AUX cables, and contains options specific to the AUX. Invert: toggles AUX inputs to invert (AT&T Fleet Management for Enterprise/Government will state true when AUX is false). This is sometimes required to correct AUX behavior. Beep On: toggles AUX inputs that cause the device to beep when AUX is true and the vehicle is over the speed chosen.
- Custom Parameters tab is used only when necessary. Your support team can add custom parameters if required.
Top
Status Groups
| Drivers with Garmin-equipped vehicles can update their working status by choosing from a set of common statuses. |
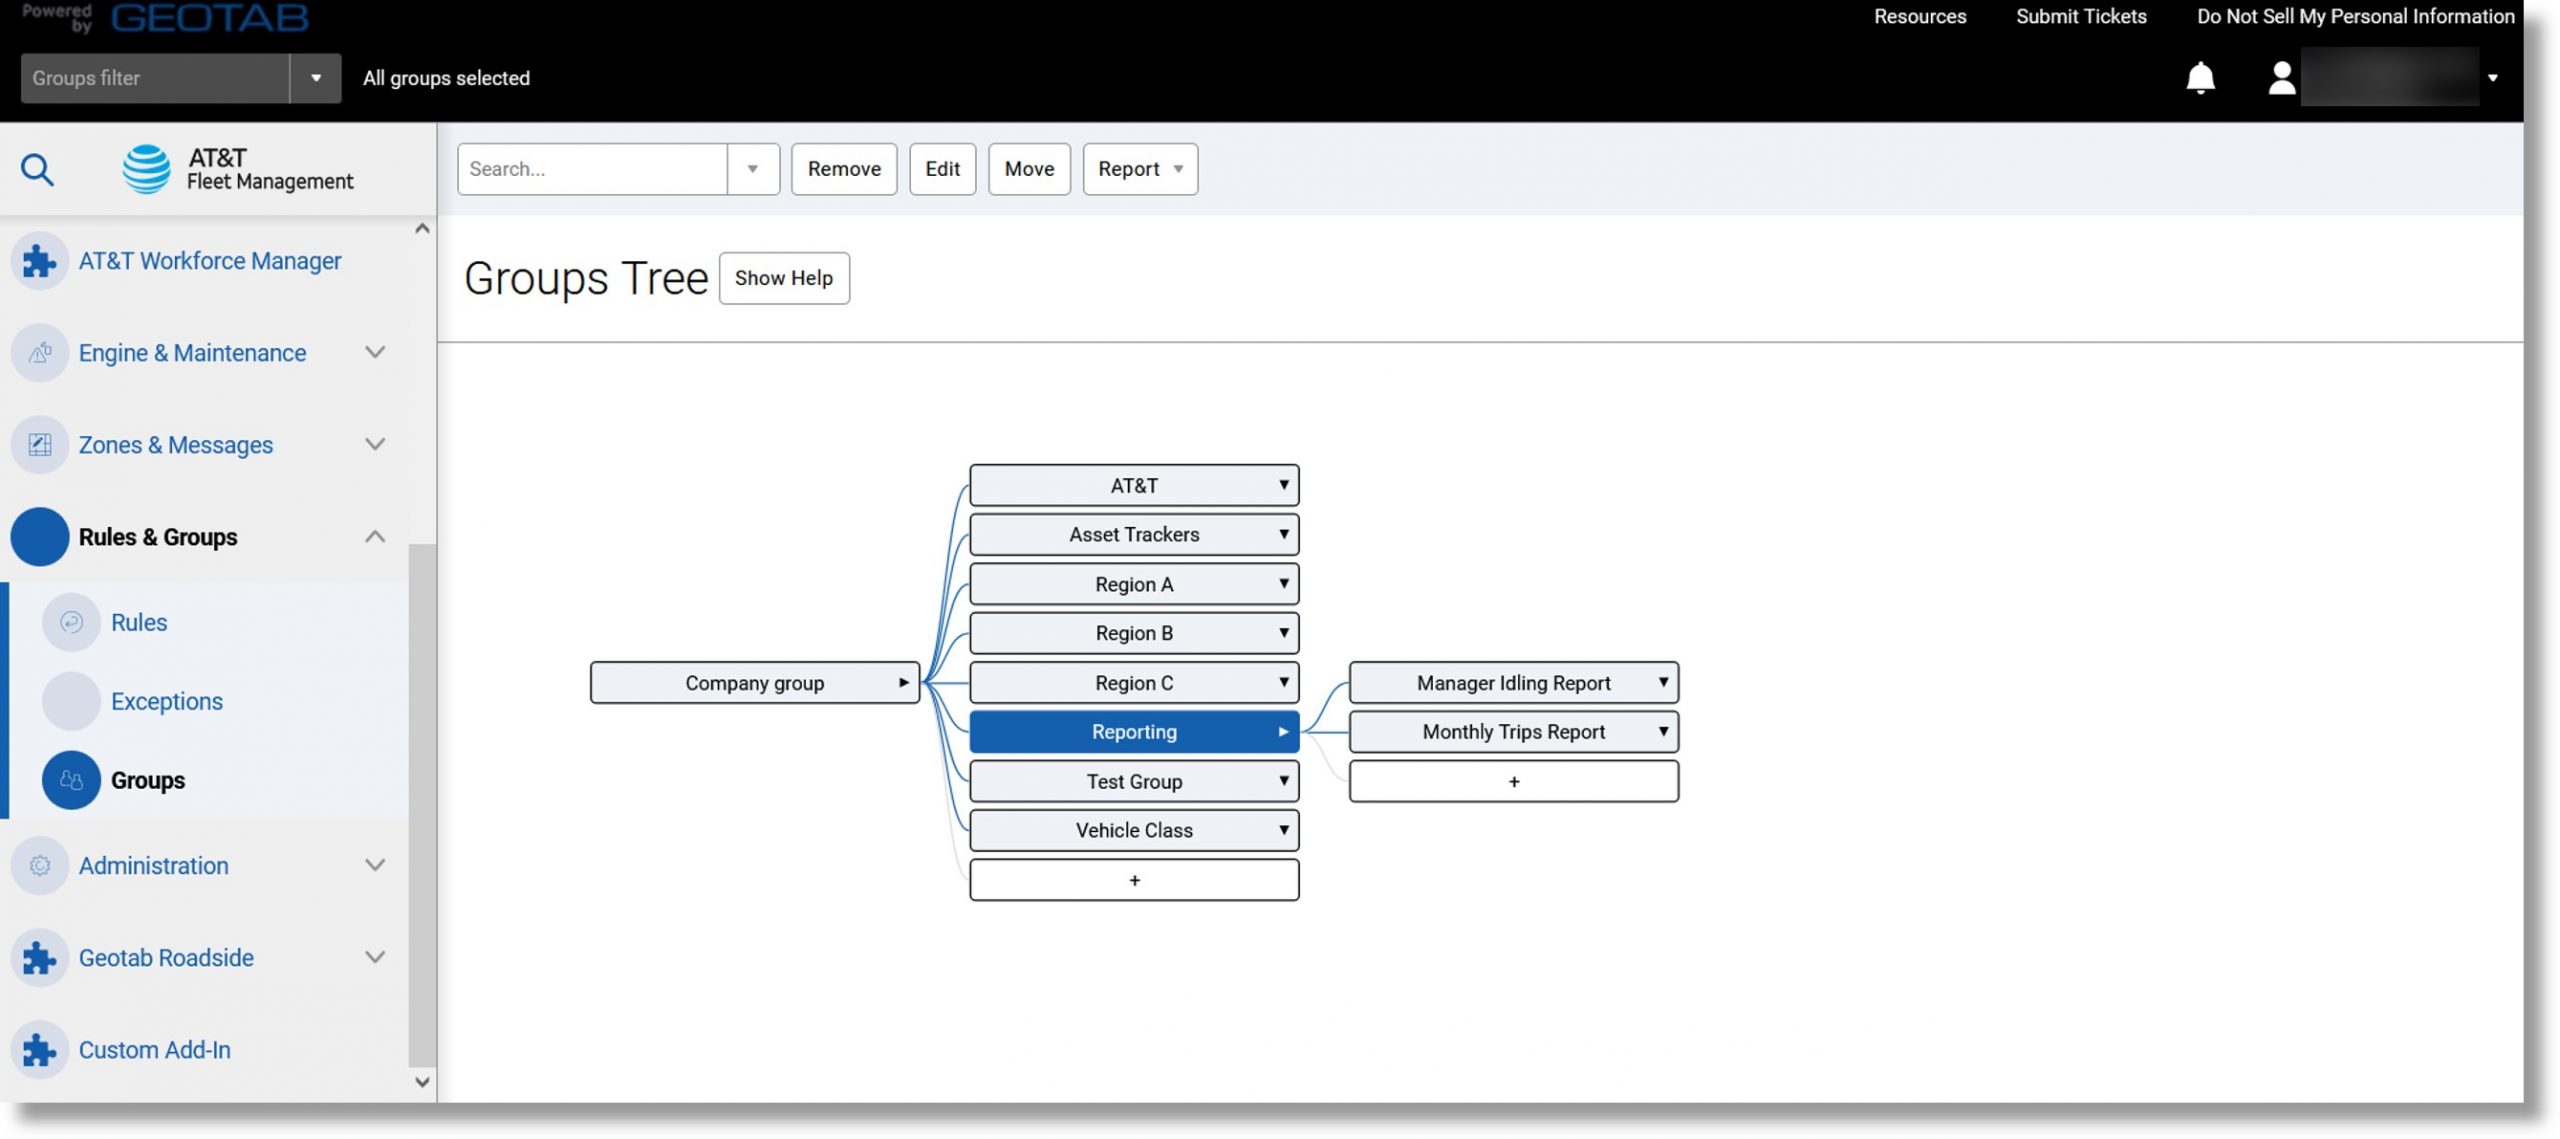
- Click on Rules & Groups in the menu to the left of the database then click on Groups.
- Select the plus symbol to create a new group.
- Click in the field to the right of “Name” and enter “Status Groups”.
- Click on the Save button at the top of the page.
- Repeat the process by creating up to four subgroups inside of “Status Groups”. Each group should be the name of a status the driver can select.
- Click on Vehicles & Assets in the menu on the left side of the database.
- Click on the desired vehicle.
- Select the Groups tab.
- Click the dropdown arrow to the right of “Messaging status groups” and click on the desired group or click in the field labeled “Select group” and enter the name of the status group.
- Click on the Save button at the top of the page when complete.
Top
Mass Editing Vehicles
| Mass editing is used to make changes to the device settings, driver feedback, and group assignments for multiple vehicles at the same time. |
- Click on Vehicles & Assets menu to the left side of the homepage.
- Click on the checkmark dropdown in the upper right of the vehicle list.
- Click on “Select visible”, “Select individual”, or “Select all”.
Note: If selecting individual vehicles, click the check mark to the right of the desired vehicle(s).
- Click on the Edit selected devices button at the top of the page.
- Make the desired edits.
- Click on the Save button at the top of the page when complete
Top
Watchdog Report
| The Watchdog Report shows if devices are communicating, offline, or have not yet been installed in a vehicle. It is designed to provide a quick snapshot to help manage uptime and productivity within a fleet. |
- Click on Vehicles & Assets in the menu to the left of the database.
- Click on the Report dropdown.
- Click on the ellipsis icon to the right of “Watchdog Report”, and then click on View in browser.
- The report displays
Top
Activity
Risk Management
| The Risk Management report displays information on driving time, idling time, speed, length of stops, and up to six exception rules. Because it uses so much data, the report is often used as a template to create various custom reports related to productivity, efficiency, and safety. |
- Click on Activity in the menu to the left of the database and then click on Risk Management.
- The “Options” Menu populates. Click on the desired time frame under “DATE PERIOD”.
Note: You can also use the optional “SUB-PERIODS” setting.
- Click on up to six rules to the right of “Run report by”.
- Click on the Apply changes button when complete.
Available Data
Distance, idling, after hours usage, speed over 70/80/90 MPH, average speed, number of stops, duration, max speed, trips, exceptions data.
Top
Speed Profile
| The speed profile in AT&T Fleet Management for Enterprise/Government is a useful tool that allows users to quickly view a vehicle’s speed and compare it to the posted speed limits. |
- Click on Activity in the menu to the left of the database and then click on Speed Profile.
- The “Options” menu populates. Select your desired time frame under “DATE PERIOD”.
- Click on the dropdown to the right of “Vehicles” and select a vehicle.
- If desired, select a Road speed provider, or leave set to All (recommended setting).
- Click on the Apply changes button.
- The speed profile displays with three colors, including a blue line for the vehicle’s speed, a red line for the posted speed limit, and an orange line for the estimated speed limit.
- Hover the mouse over the graph for details, including the date and time.
- Zoom in to a specific region by scrolling the mouse wheel.
- Scroll left or right by clicking and dragging the mouse.
- Zoom back out by reversing the mouse wheel direction.
- Click on the View trips button to access the “Trips History” report for the selected date range.
Top
Driver Congregation Report
| The Driver Congregation Report is used to determine when more than one vehicle or driver is in close proximity to others. This report can be used to monitor the productivity of your fleet and ensure there is no unnecessary congregating of vehicles or drivers. |
- Click on Activity in the menu on the left side of the database and then click on Driver Congregation.
- The “Options” menu populates. Click on the desired time frame under “DATE PERIOD” and then click on Vehicles to the right of “View by”.
- Click on the dropdown to the right of “Vehicles” and select the desired vehicles.
- Choose parameters for congregating: “Distance from one to another”, “Minimum overlap time”, and “Minimum number of congregating vehicles”.
- Click in the field to the right of “Exclude stops in zone types” to select the zone types to exclude.
- Click on the Apply changes button.
- The congregations’ display.
Available Data
Time of congregation occurred, arrival and departure times, duration, location, zone type, driver data, zone’s external reference.
Top
Work Hours
| Work Hours allow users to create different sets of hours and work times for their fleet. Once set up, they can be used to monitor after-hours usage, long lunches, late arrivals, or any other event that should or should not occur during a specific range of time. |
Editing Standard Hours
- Click on Activity in the menu to the left of the database.
- Click on Work Hours… and then click on Work Hours.
- Click on Standard hours.
Note: If you have trouble finding Standard hours in the list, click in the “Search name” field and type Standard Hours.
- Click the pencil icon to the right of the desired day to edit it.
- Make the desired changes and then click on the green check mark to save the changes, or the red X to cancel.
- Repeat steps 5 and 6 to edit the other days as desired.
- To add days/times, click on the Add work time button.
- Click on the Save button at the top of the page when complete.
Adding New Work Hours
- Click on Activity in the menu to the left of the database.
- Click on Work Hours… and then click on Work Hours.
- Click on the Add button at the top of the page.
- Click on the Add work time button.
- Click the dropdown field that populates and click on the desired weekday.
- Click in the fields to the right of the dropdown and enter a start and end time.
- Select the green check mark to save the changes, or the red X to cancel.
- Repeat steps 4 through 7 to add days/times.
- Click on the Save button at the top of the page when complete.
Top
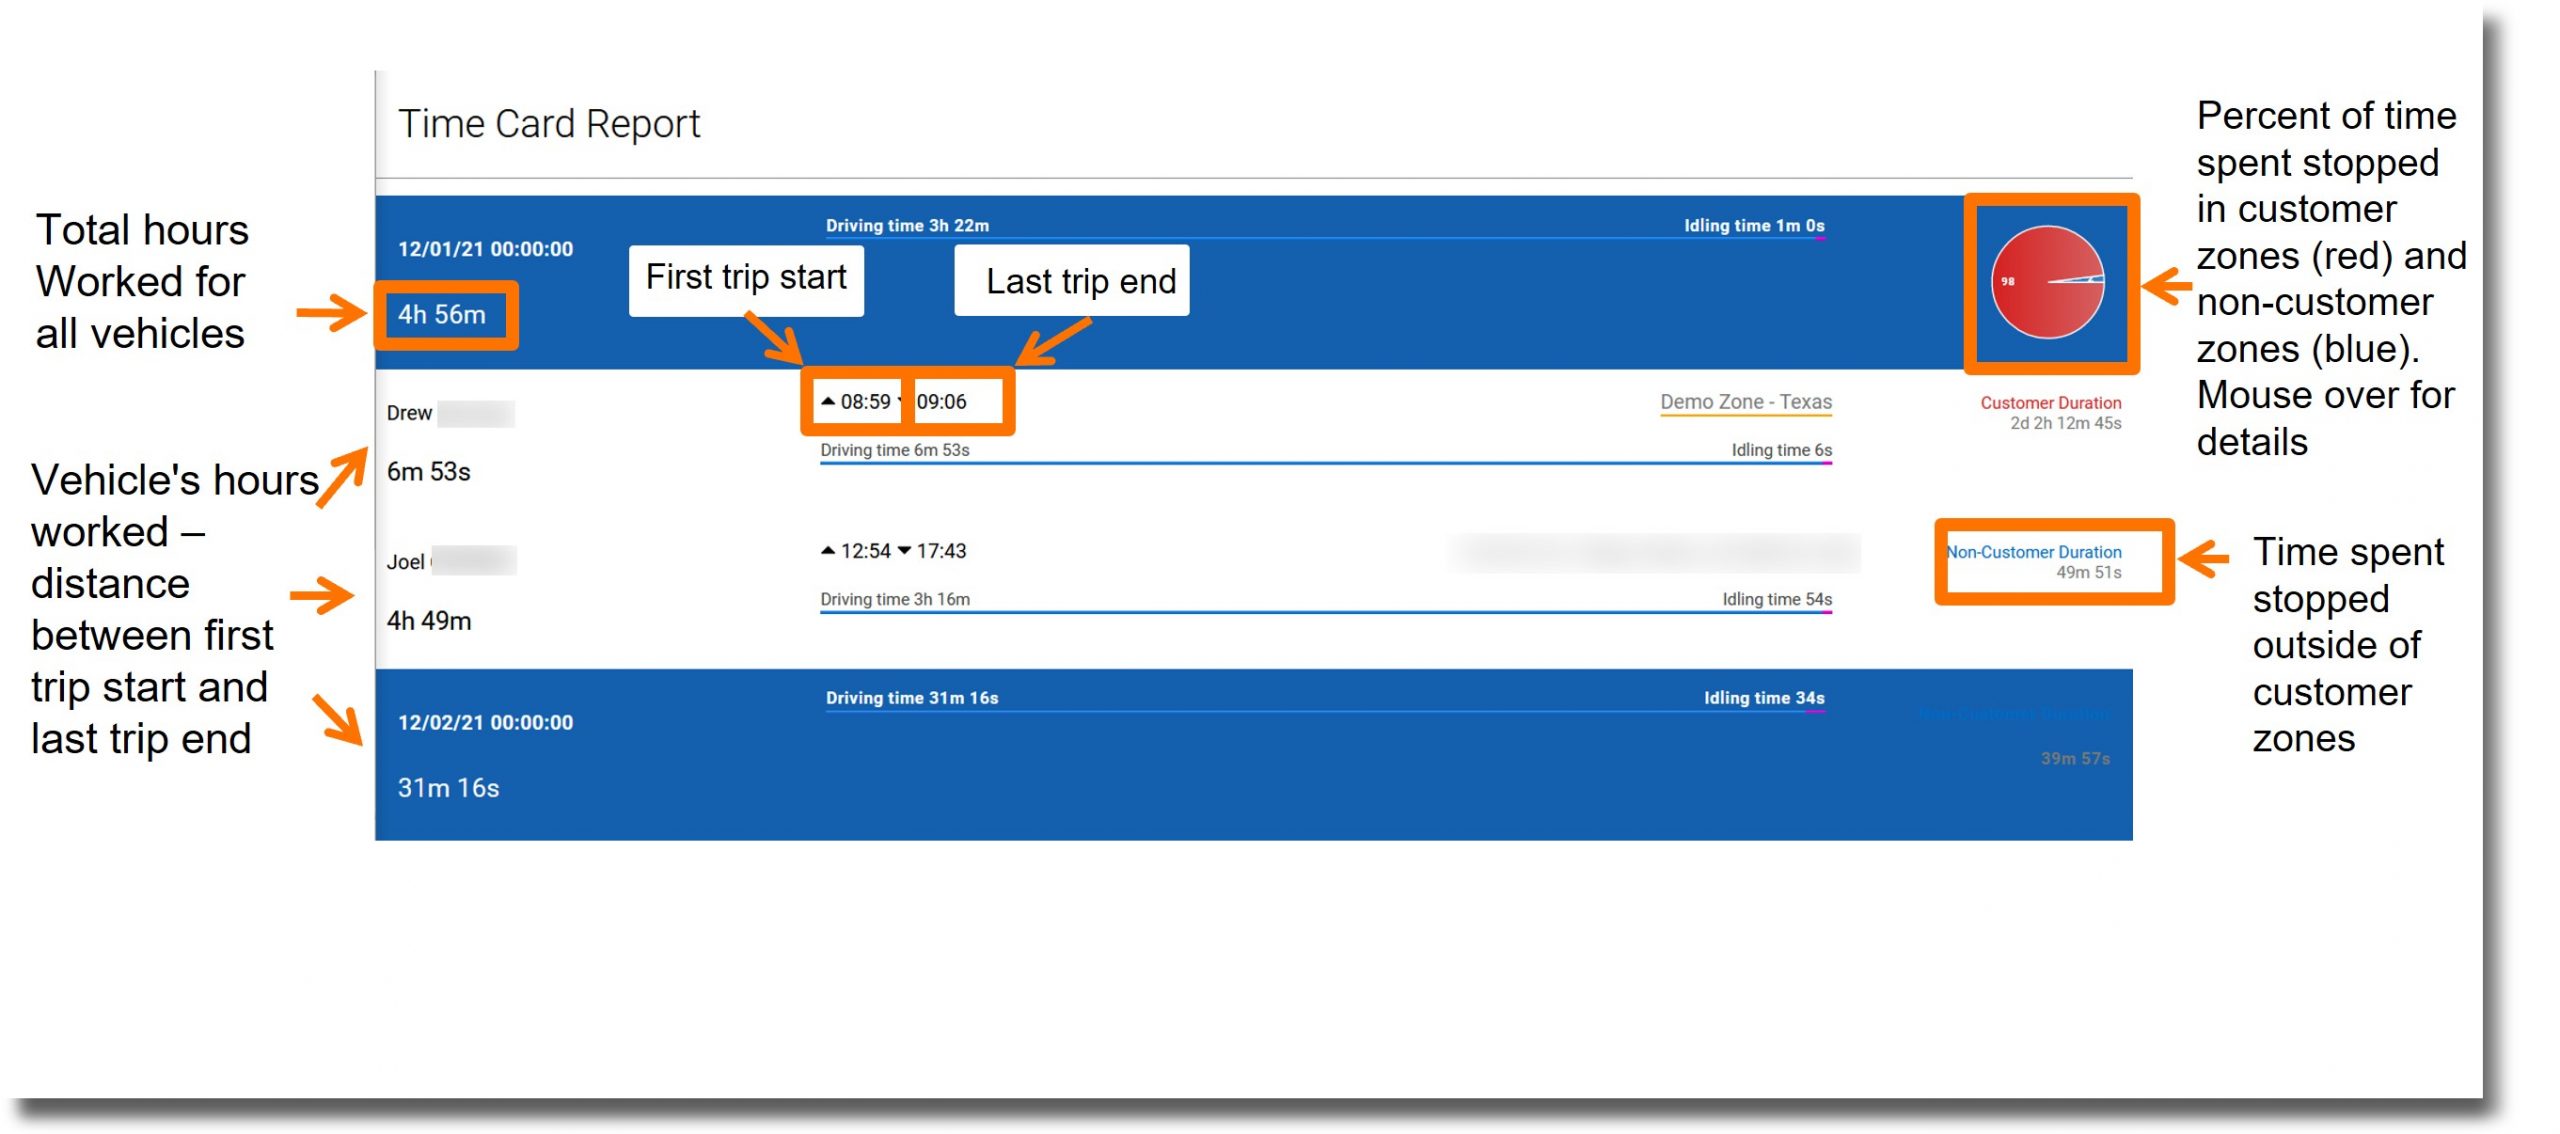
Time Card Report
| The Time Card Report records accurate work hours for each vehicle and is used to assist in vehicle utilization and assignments. |
- Click on Activity in the menu on the left of the database.
- Click on Work Hours… and then on Time Card Report.
- The “Options” menu populates. Click on the desired time frame under “DATE PERIOD”.
- Click on either All or Vehicle to the right of “View wok hours for”.
- Click on either Vehicle or Driver to the right of “View by”.
- To select a start from time, click in the field to the right of “Start from” and use the up or down arrow or enter the hour.
- Click on the Apply changes button when complete.
Top
IFTA Reporting
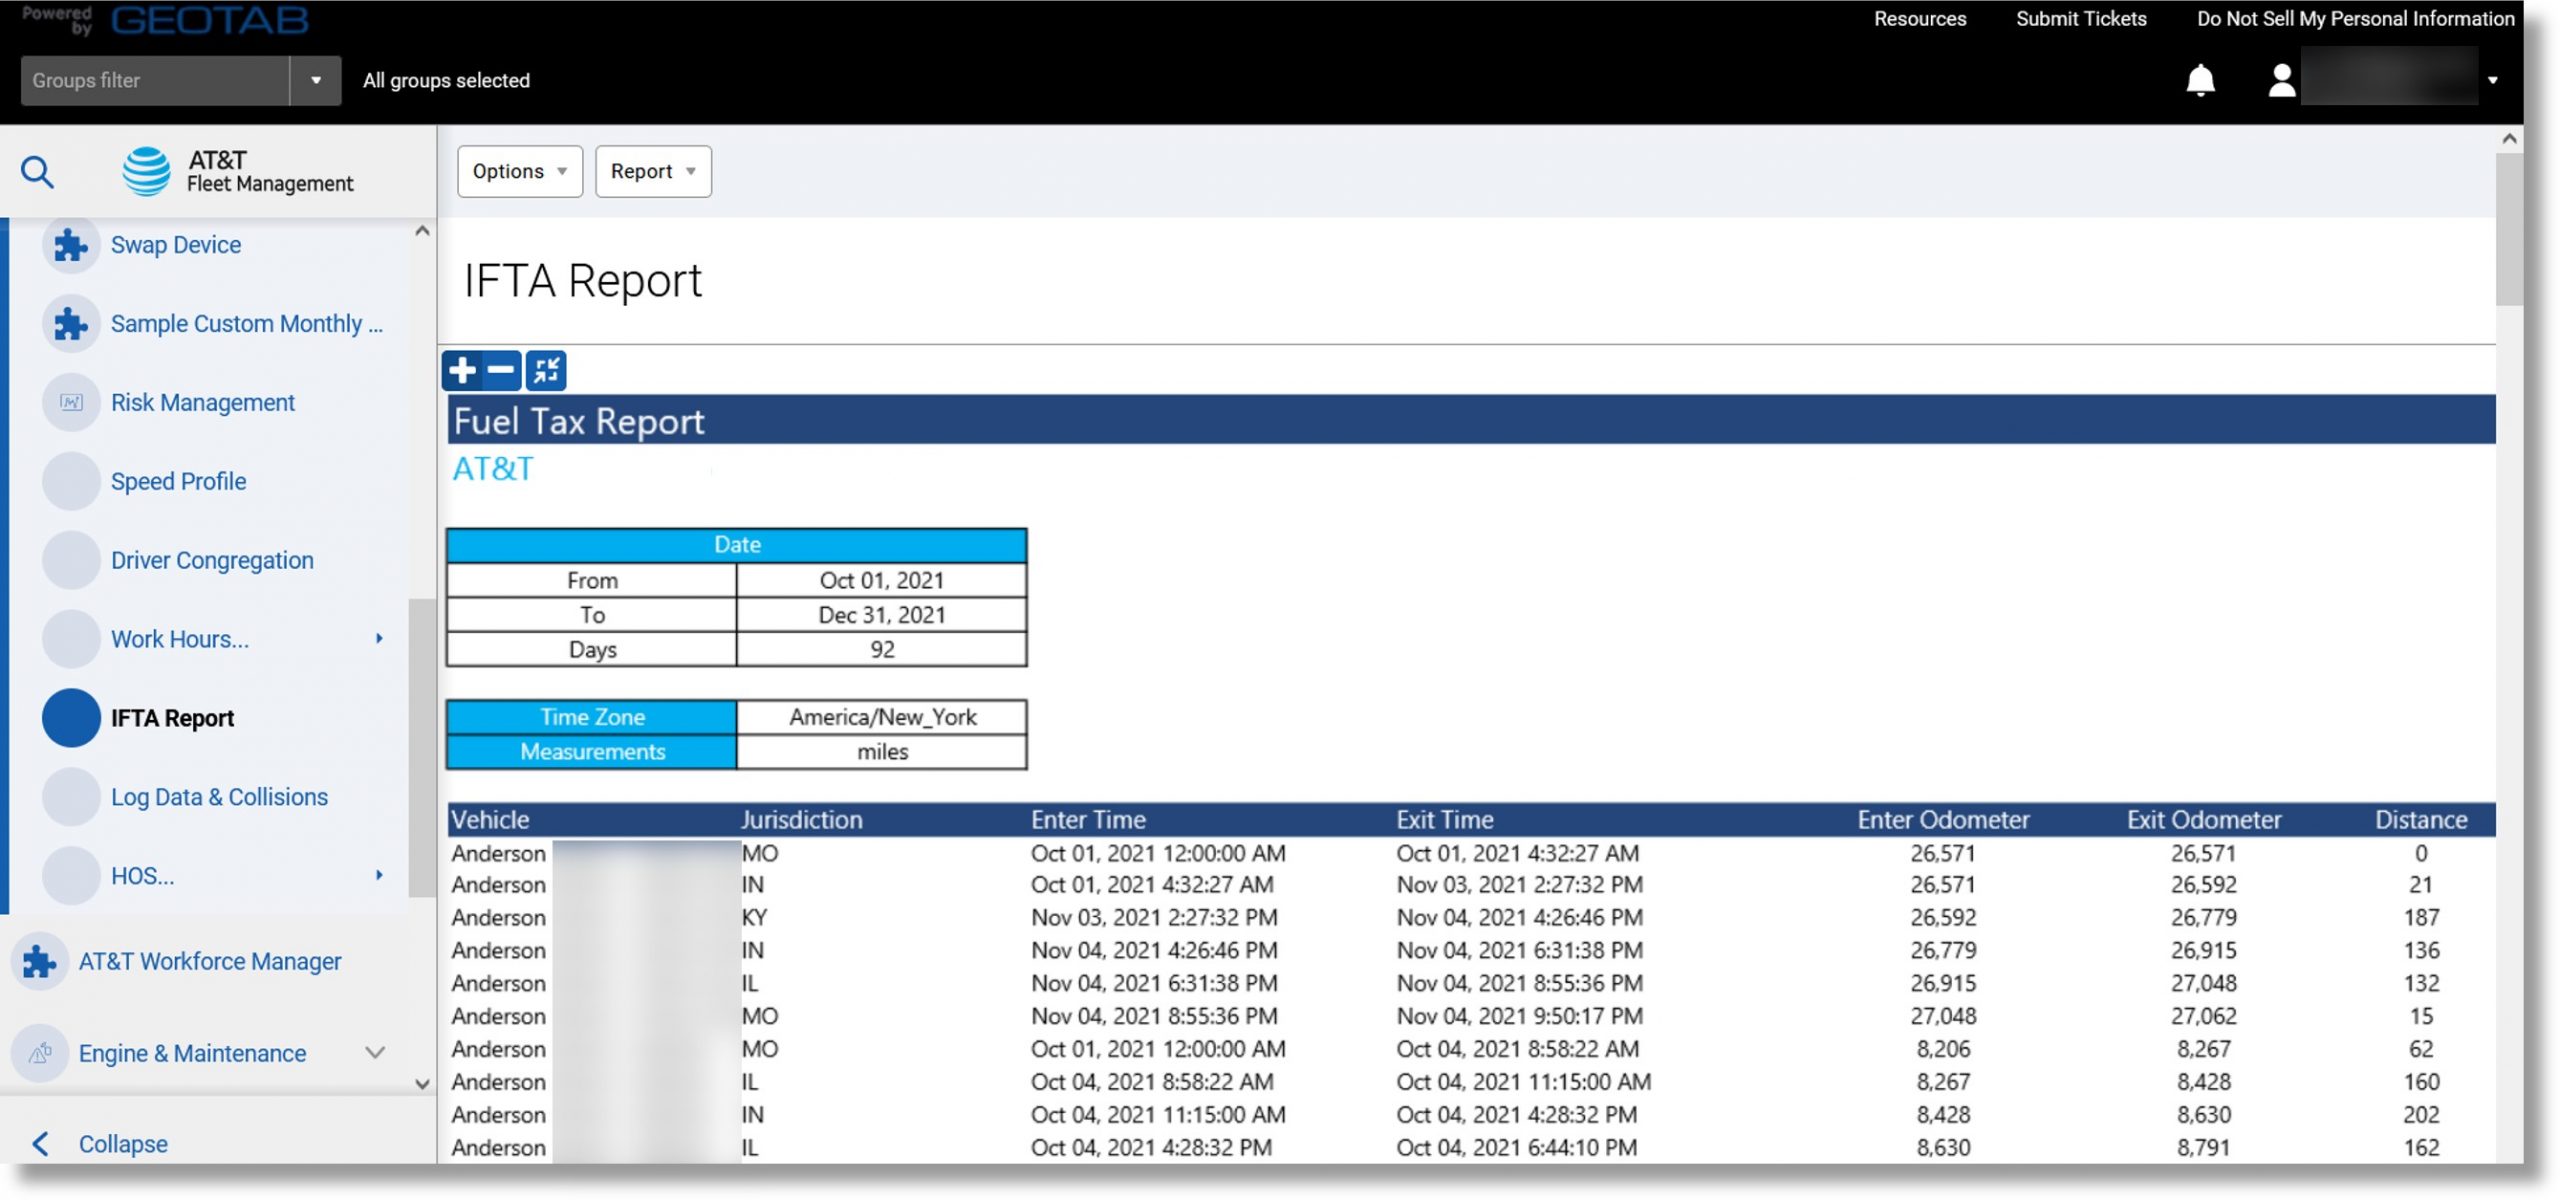
| The International Fuel Tax Agreement (IFTA) exists between the 48 contiguous states of the USA and the Canadian provinces. Its goal is to create a uniform administration of motor fuel taxation law with respect to qualified interjurisdictional motor vehicles. |
- Click on Activity in the menu on the left side of the database and then click on IFTA Report.
- The “Options” menu populates. Click on a timeframe under “DATE PERIOD”.
- Click on either Yes or No to the right of “Include archived (historical) data”.
- Click on the dropdown to the right of “Vehicles” and select the desired vehicle(s).
Note: This report is typically run quarterly but can also be run monthly.
- Click on the Apply changes button when complete
Available Data
Vehicle, state/province, enter/exit time, enter/exit odometer, mileage, fuel data (if recording fuel transactions)
Top
Log Data & Collisions
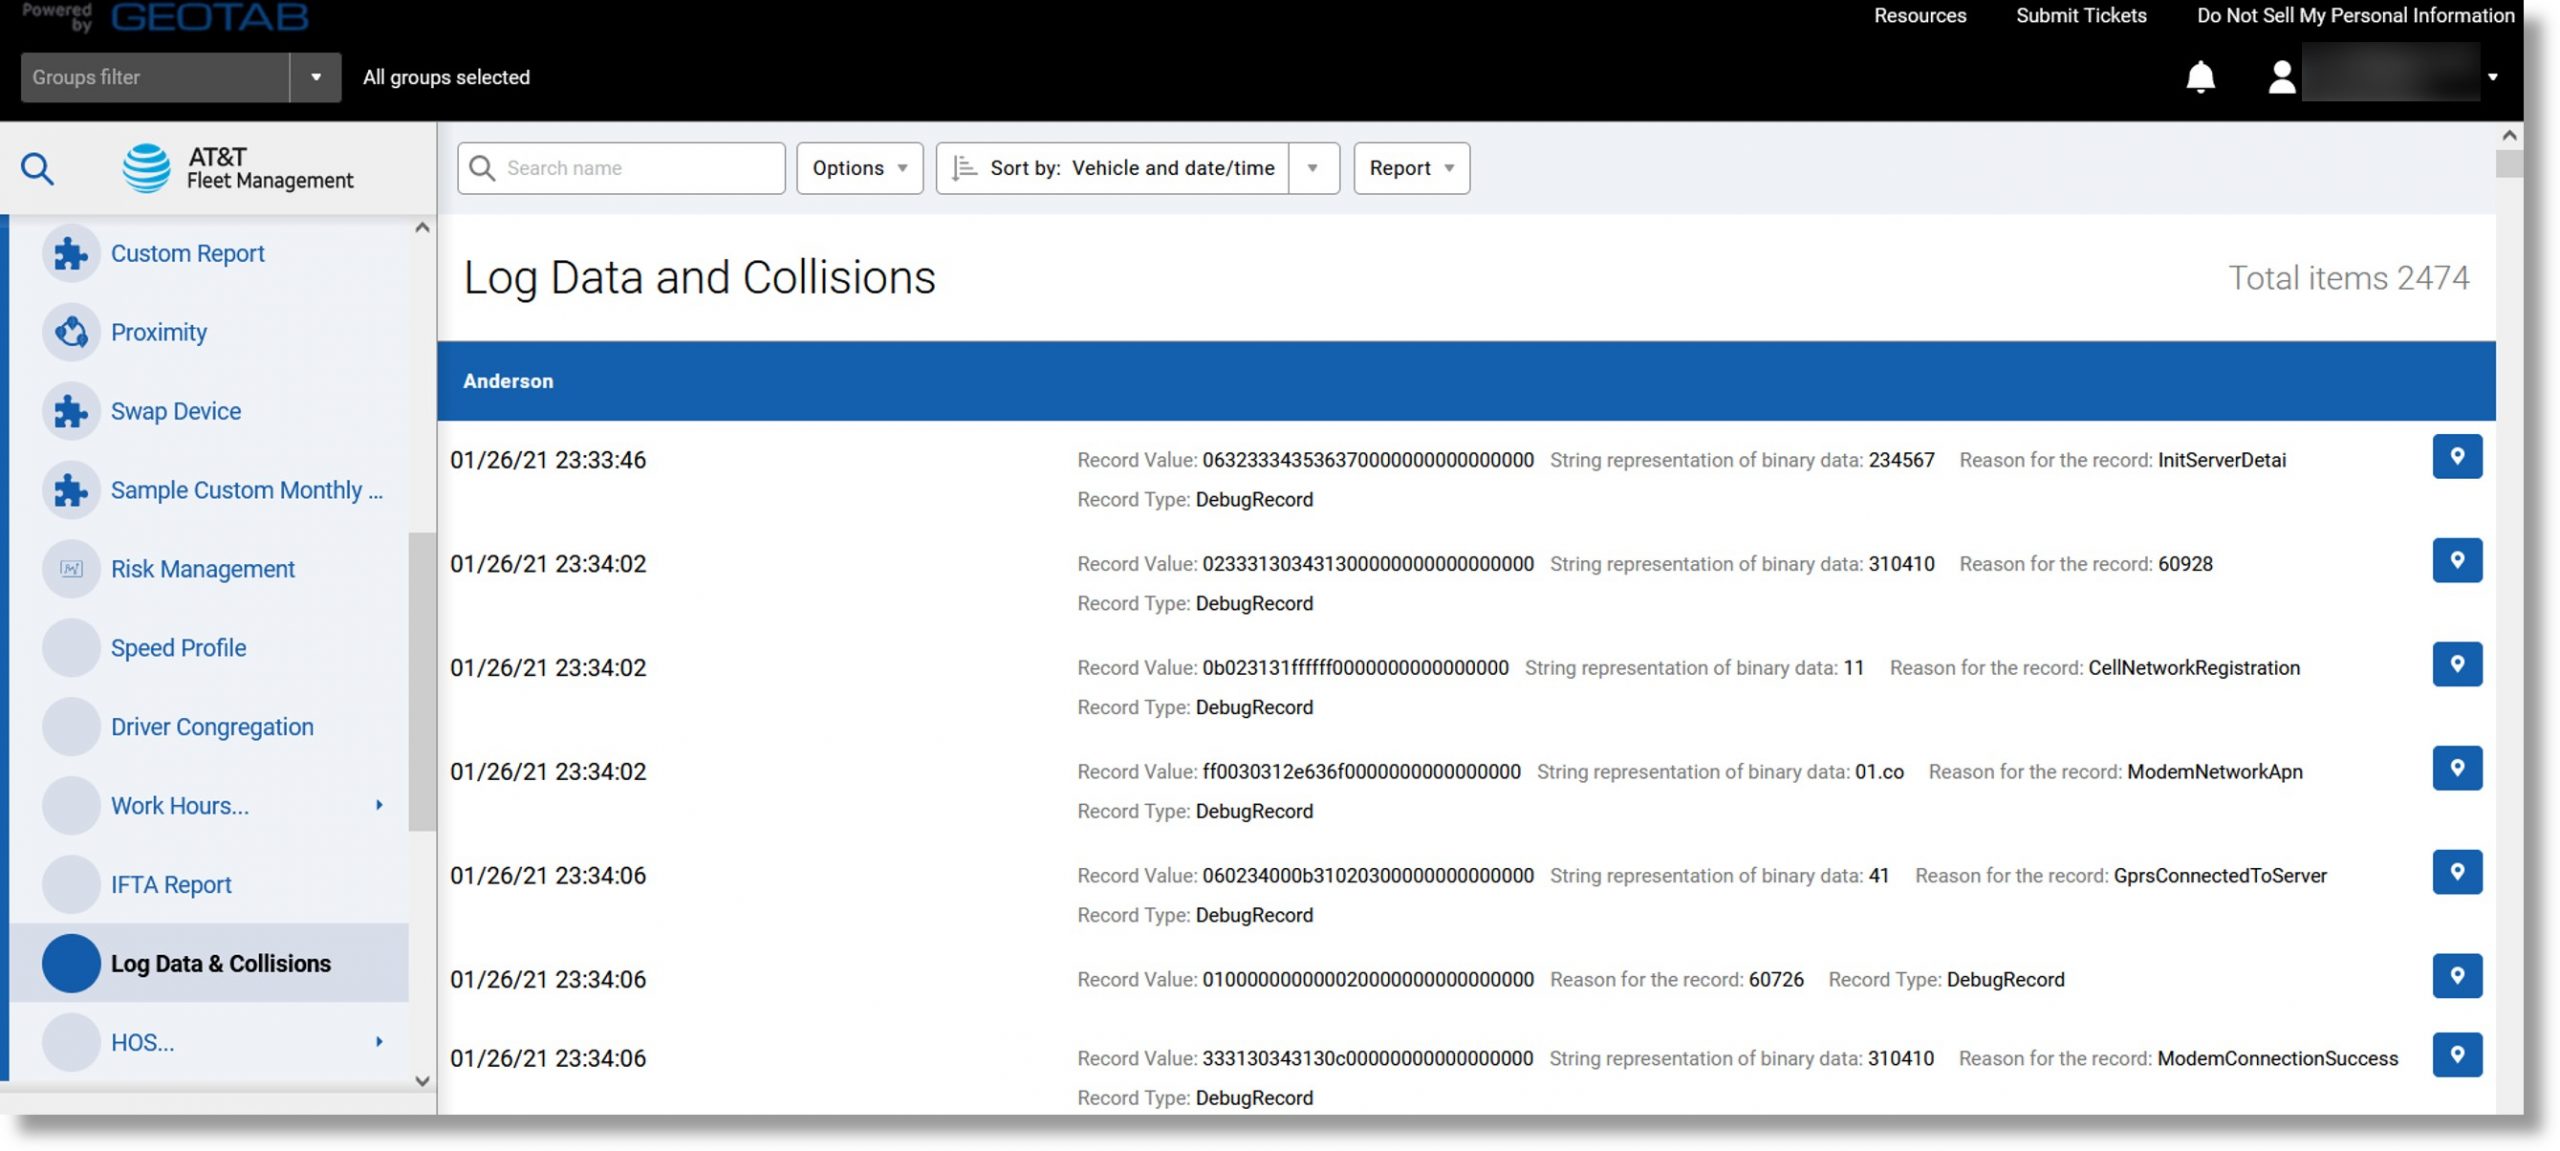
| The Log Data & Collisions Report provides a vast amount of information from the vehicle, including GPS logs, speed, accelerometer data, and engine data. Typically, this report is used for research as part of an investigation following a collision. |
- Click on Activity in the menu on the left side of the database and then click on Log Data & Collisions.
- The “Options” menu populates. Click on the desired timeframe under “DATE PERIOD”.
- Click on either Yes or No to the right of “Include archived (historical) data”.
- Click on the dropdown box to the right of “Vehicles” and select the desired vehicle(s).
- Click the Apply changes button when complete.
Available Data
Record value, reason, record type, vehicle, date/time, details, ignition, group, speed, lat/long, location, the reason for the log, engine diagnostic, controller, failure mode, engine status
Top
Zones & Messages
| Zones are virtual perimeters around a geographical real-world area. They are used to identify important locations such as offices, customer sites, delivery locations, etc. Zones assist in establishing driver accountability, increasing productivity, and tracking high-value assets. |
- Click on Map in the menu on the left side of the homepage.
- Click on the Add zone button at the top of the page.
Note: You can also click on Zones & Messages in the menu on the left side of the homepage, then click Zones and click the Add button at the top of the page.
- Navigate to your desired location on the Map.
- Click on the map to set a start point for the zone.
- Click to place additional points.
- Complete the zone by clicking on the first point you set on the map.
- Enter the zone details and edit the desired options.
- Click on the Save button at the top of the page when complete.
Available Data
Name, zone type, group, comment, map visibility, external reference, start date, end date, create zone stop, latitude/longitude, color.
Top
Importing Zones
Create a spreadsheet to import zones.
- Click on Zones & Messages in the menu on the left side of the home screen and then click on Import Zones.
- The Import Zones page displays and includes two sample templates.
Note: The first template uses latitude and longitude coordinates, while the second uses the street address.
- Open a blank spreadsheet, and copy and paste the sample data into it.
- Enter the desired Name of each zone.
- Enter either the Latitude and Longitude coordinates, or the complete street address with zip/postal code.
- Enter the desired information under “References” and “Comments”, or leave cells blank.
- Enter “Yes” or “No” under “Is the zone circular?”.
- Enter the zone’s diameter under “Diameter”.
- Save the spreadsheet as a .xlsx, .xlsm, or .zip file.
- Drag and drop the file into the feature provided, or click to browse for the file.
- The zone information displays as “Valid zones” or “Invalid zones”.
Note: Invalid zones contain missing or invalid location information and need to be updated.
- Click on the import icon to the right of “Valid zones”.

Top
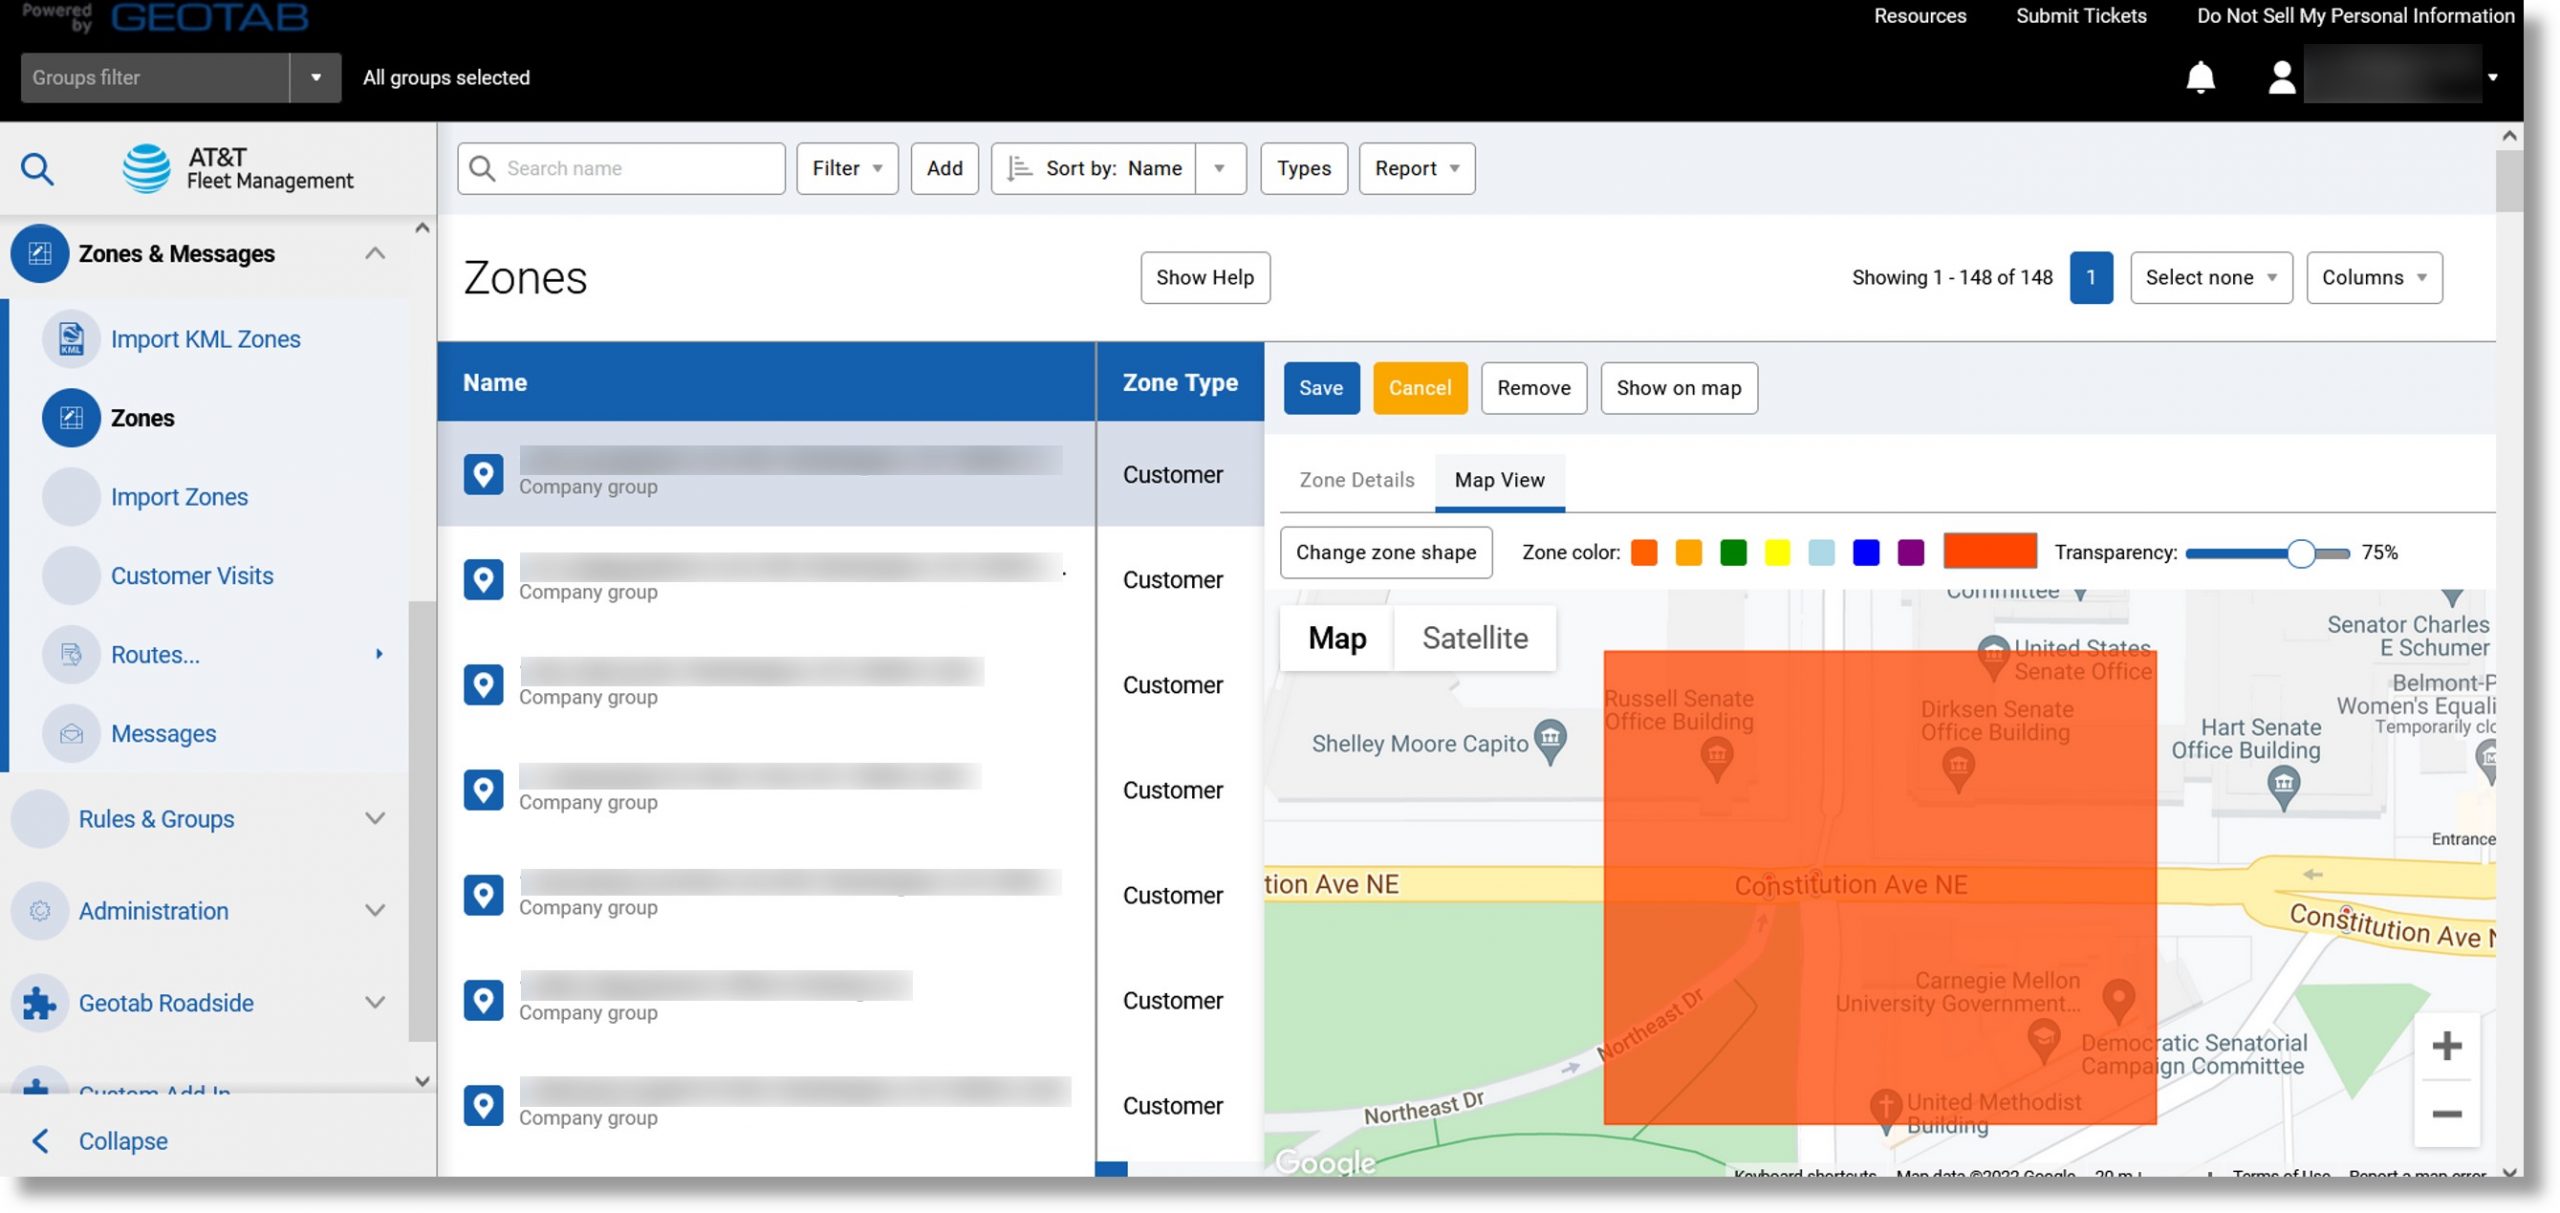
Editing Zones
Change a zone’s shape, edits zone attributes, or removes the zone entirely.
- Click on Zones & Messages in the menu on the left side of the database and then click on Zones.
- Click on the desired zone in the list.
- Edit the desired settings such as the Name, Groups, Comment, or Type.
- Click on the Map View tab to see the zone on the map.
- Click on the Save button above the map.
Top
Resizing Zones
Resize a single zone on the Map.
- Click on Zones & Messages in the menu on the left of the database and then click on Zones.
- Click on the desired zone in the list, then click on the Show on map button at the top of the page.
- Select the zone on the map, then click on Change zone shape in the menu that populates
- Select a point on the zone and drag to resize the border.
- To create a new point on the zone, select the border, then drag it into position.
- Click on the Save button at the top of the page when complete.
Top
Removing Zones
Deletes a single zone on the Map.
- Click on Zones & Messages in the menu on the left side of the database and then click on Zones.
- Select the desired zone from the list, and then click on the Remove button above the zone details.
Note: You can also click the show on map icon on the right side of the desired zone. Click on the zone on the map and then select Remove zone from the menu that populates.
- Click on the Save button at the top of the page when complete.
Top
Mass Editing Zones
| Zones in AT&T Fleet Management for Enterprise/Government can have customized settings like visibility on the map, group assignments, and types, and mass editing can be used to apply these settings and make changes to multiple zones at the same time. |
- Click on Zones & Messages in the menu on the left side of the database, and then on Zones.
- Click on the checkmark dropdown on the upper right of the zone list.
- Click on either “Select Visible” or “Select individual” in the menu.
Note: If you click on “Select individual” you will need to click the checkboxes to the right of the desired zones.
- Click on the Edit selected Zones button.
- Edit the desired settings.
- Click the Save button at the top of the page when complete.
Top
Zone Types
| Zone types are used to categorize zones. The default zone types are home, office, and customer, but users can add and assign additional zone types. |
- Click on Zones & Messages in the menu on the left side of the database and then click on Zones.
- Click the Types button at the top of the page.
- Click the Add button at the top of the page.
- Click in the field to the right of “Name” and enter a name for the zone type.
- To add a comment for the zone type, click in the field to the right of “Comment”.
- Click on the Save button at the top of the page when complete.
Top
Customer Visits Report
| The Customer Visits Report displays the time spent within zones for each vehicle, as well as arrival and departure times. This report can be used to view interactions with specific zones or all zones of a certain type. |
- Click on Zones & Messages in the menu on the left side of the database and then click on Customer Visits.
- Select the desired asset.
- The drivers/customer visits display.
Note: You can use the Options dropdown to narrow your customer visit list based on a specific timeframe, driver, vehicle, or zone type.
Available Data
Zone, vehicle, group, time of arrival, duration, time of departure, zone type, distance to arrival.
Top
Creating Routes
| A route is a sequence of zones strung together to plan a path for a vehicle. Routes are valuable in tracking deviations from a plan and optimizing miles driven. |
- Click on Zones & Messages in the menu on the left side of the database.
- Click on Routes….
- Click on Routes.
- Click on the Add route button near the top of the page.
- Navigate to the desired location on the map.
- Click on the desired location and then click Add waypoint in the menu that populates.
- Use the map to navigate to your next desired location and click on it.
- Click on Add waypoint in the menu that populates.
- The route displays.
Note: Repeat steps 6 and 7 to add waypoints until you reach your desired destination.
- Click on the Save route button near the top of the page.
- The route detail options display.
- Edit the details as desired and then click on the Save button near the top of the page.
Note: You can have AT&T Fleet Manager for Enterprise/Government optimize the route by clicking on the button the right of “Optimize (shortest distance)” under the Zone Organizer list.
- The route displays.
Top
Sending a Route to a Vehicle
- Send routes to vehicles.
- Click on Zones & Messages in the menu on the left and then scroll down.
- Click on Routes….
- Click on Routes.
- Click on the desired route from the list.
- Click on the Send to vehicle button at the top of the page.
- The Assets and Drivers display.
- Click on the checkbox to the left of the desired vehicle.
- Click on the Compose Message button.
- A message dialogue displays.
- Click on the Send button at the bottom right.
Top
Creating a Route Plan
Add a start time as well as planned stop times to the route. Useful for Actual vs. Planned reporting.
- Click on Zones & Messages in the menu on the left side of the database.
- Click on Routes… and then click on Routes.
- Click on the desired route from the list, and then click the Create plan button at the top of the page.
- Note: if you don’t currently have a route configured, you will need to create one.
- Click in the field to the right of “Vehicle” and enter the vehicle’s name or click the dropdown arrow and select the desired vehicle from the list.
- Click in the field to the right of “Start date” and enter the desired date.
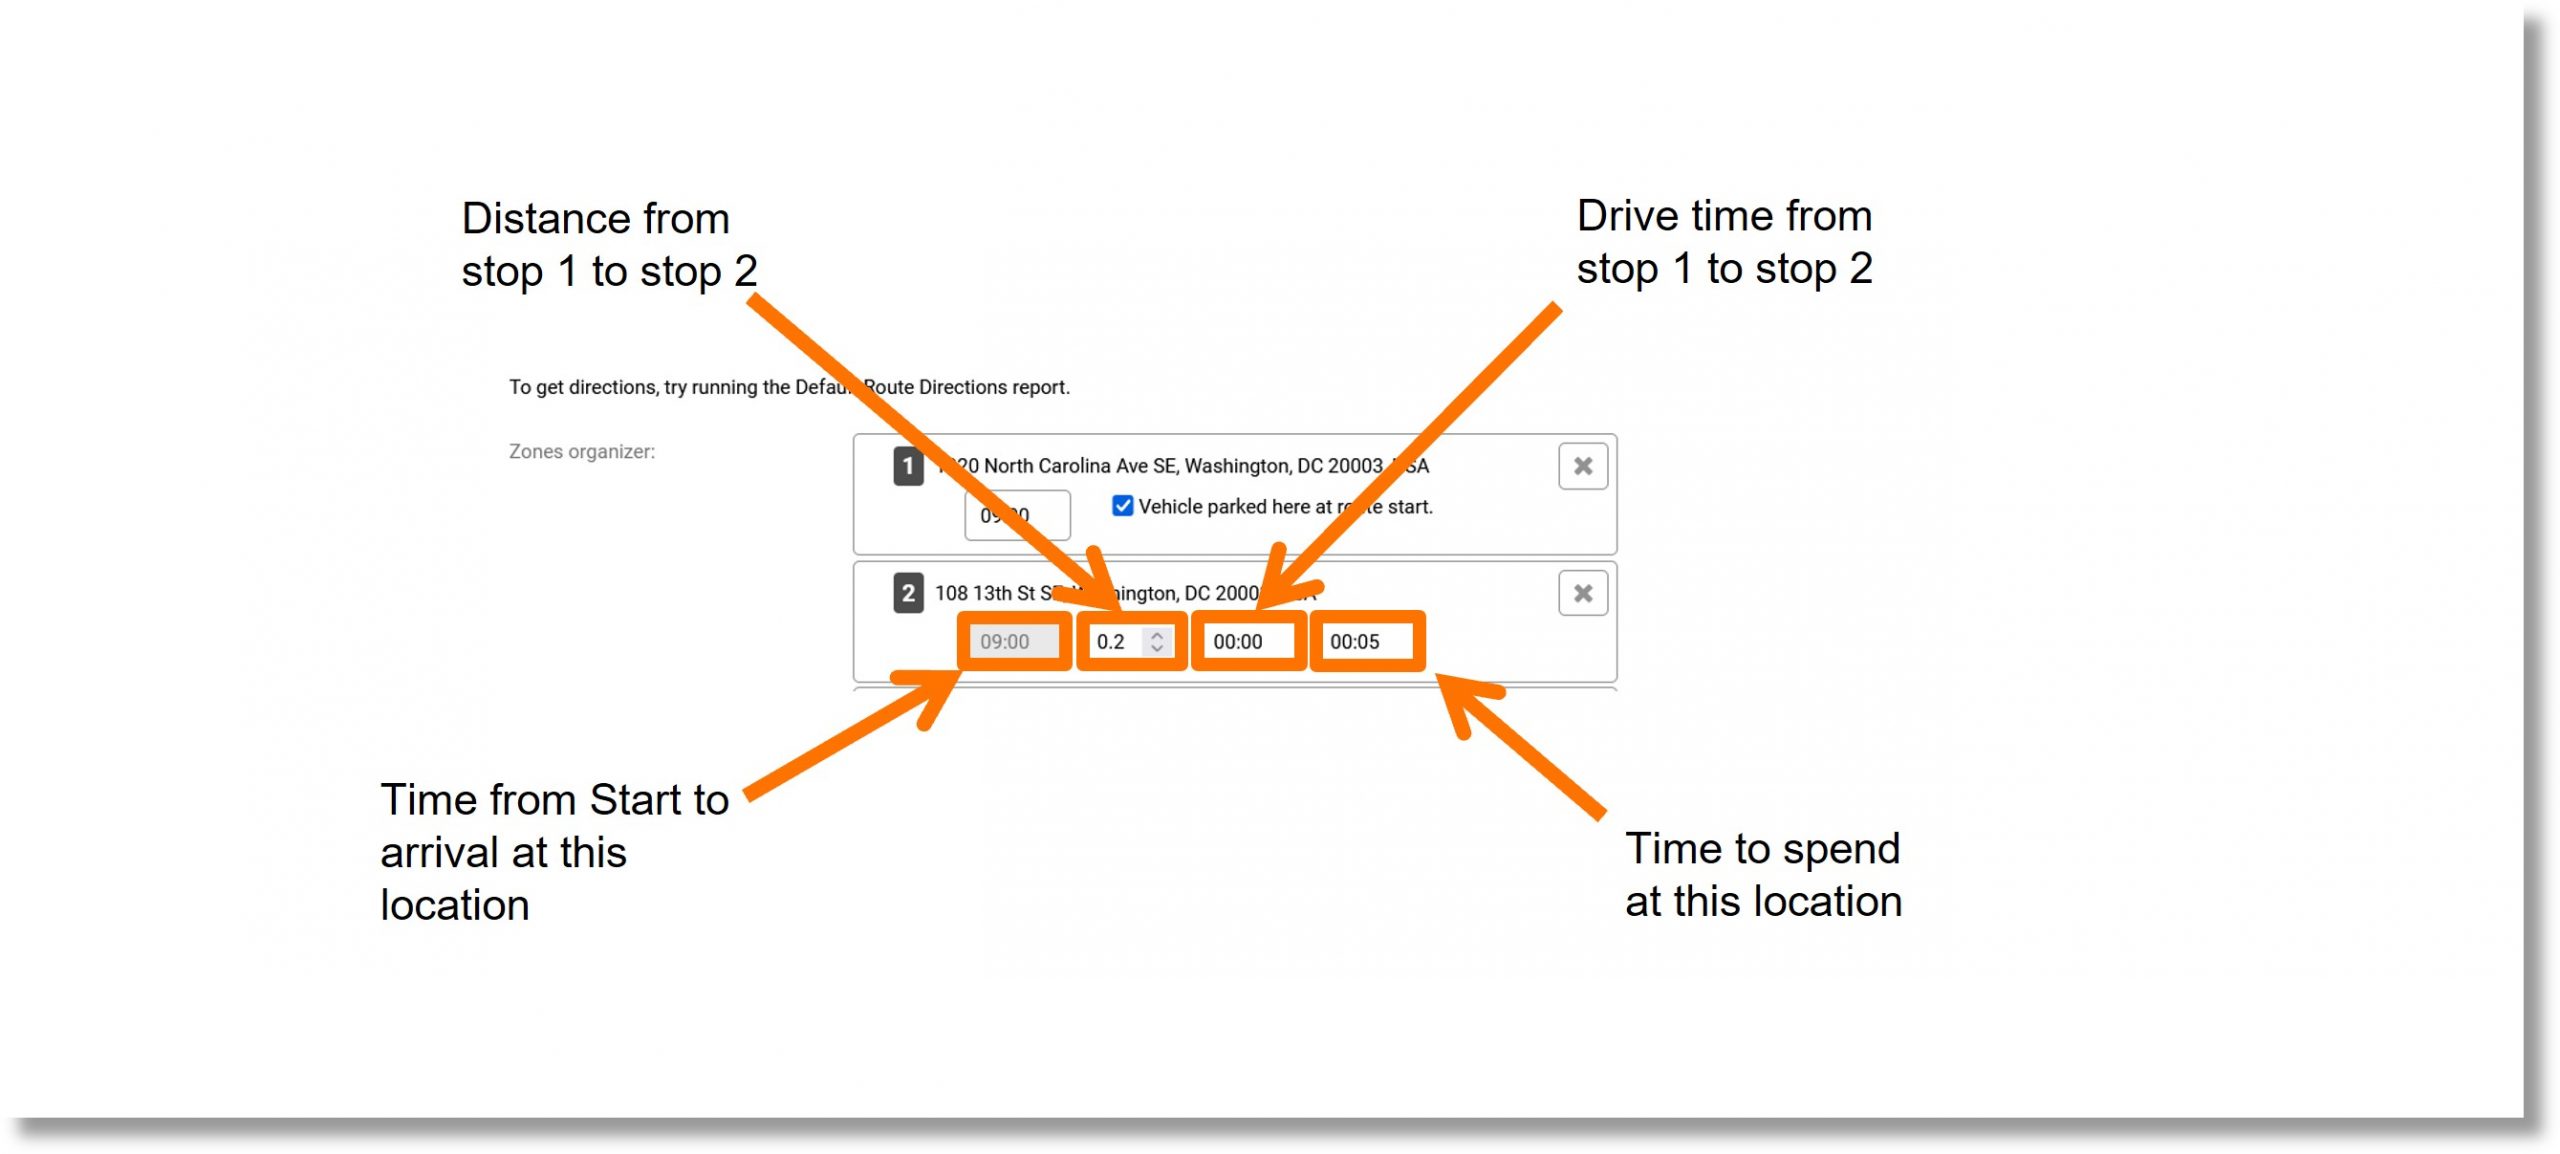
- Click in the fields to the right of “Zone organizer” to enter the desired distance and drive time between stops for each location.
- Note: The time to start from or arrive at each location populates automatically.
- Click on the Save button at the top of the page when complete.
Top
Rules
Default Rules
| Rules are a powerful way to monitor and manage a fleet. Designing rules around a company’s policies and procedures can reinforce standards and help drivers to become better at their job. Productivity, safety, and proactive engine monitoring are all areas that can be measured and improved with rules and conditions, either by standard rules or custom rules. The standard rules apply to the entire fleet, while custom rules can be set for certain vehicles or groups. |
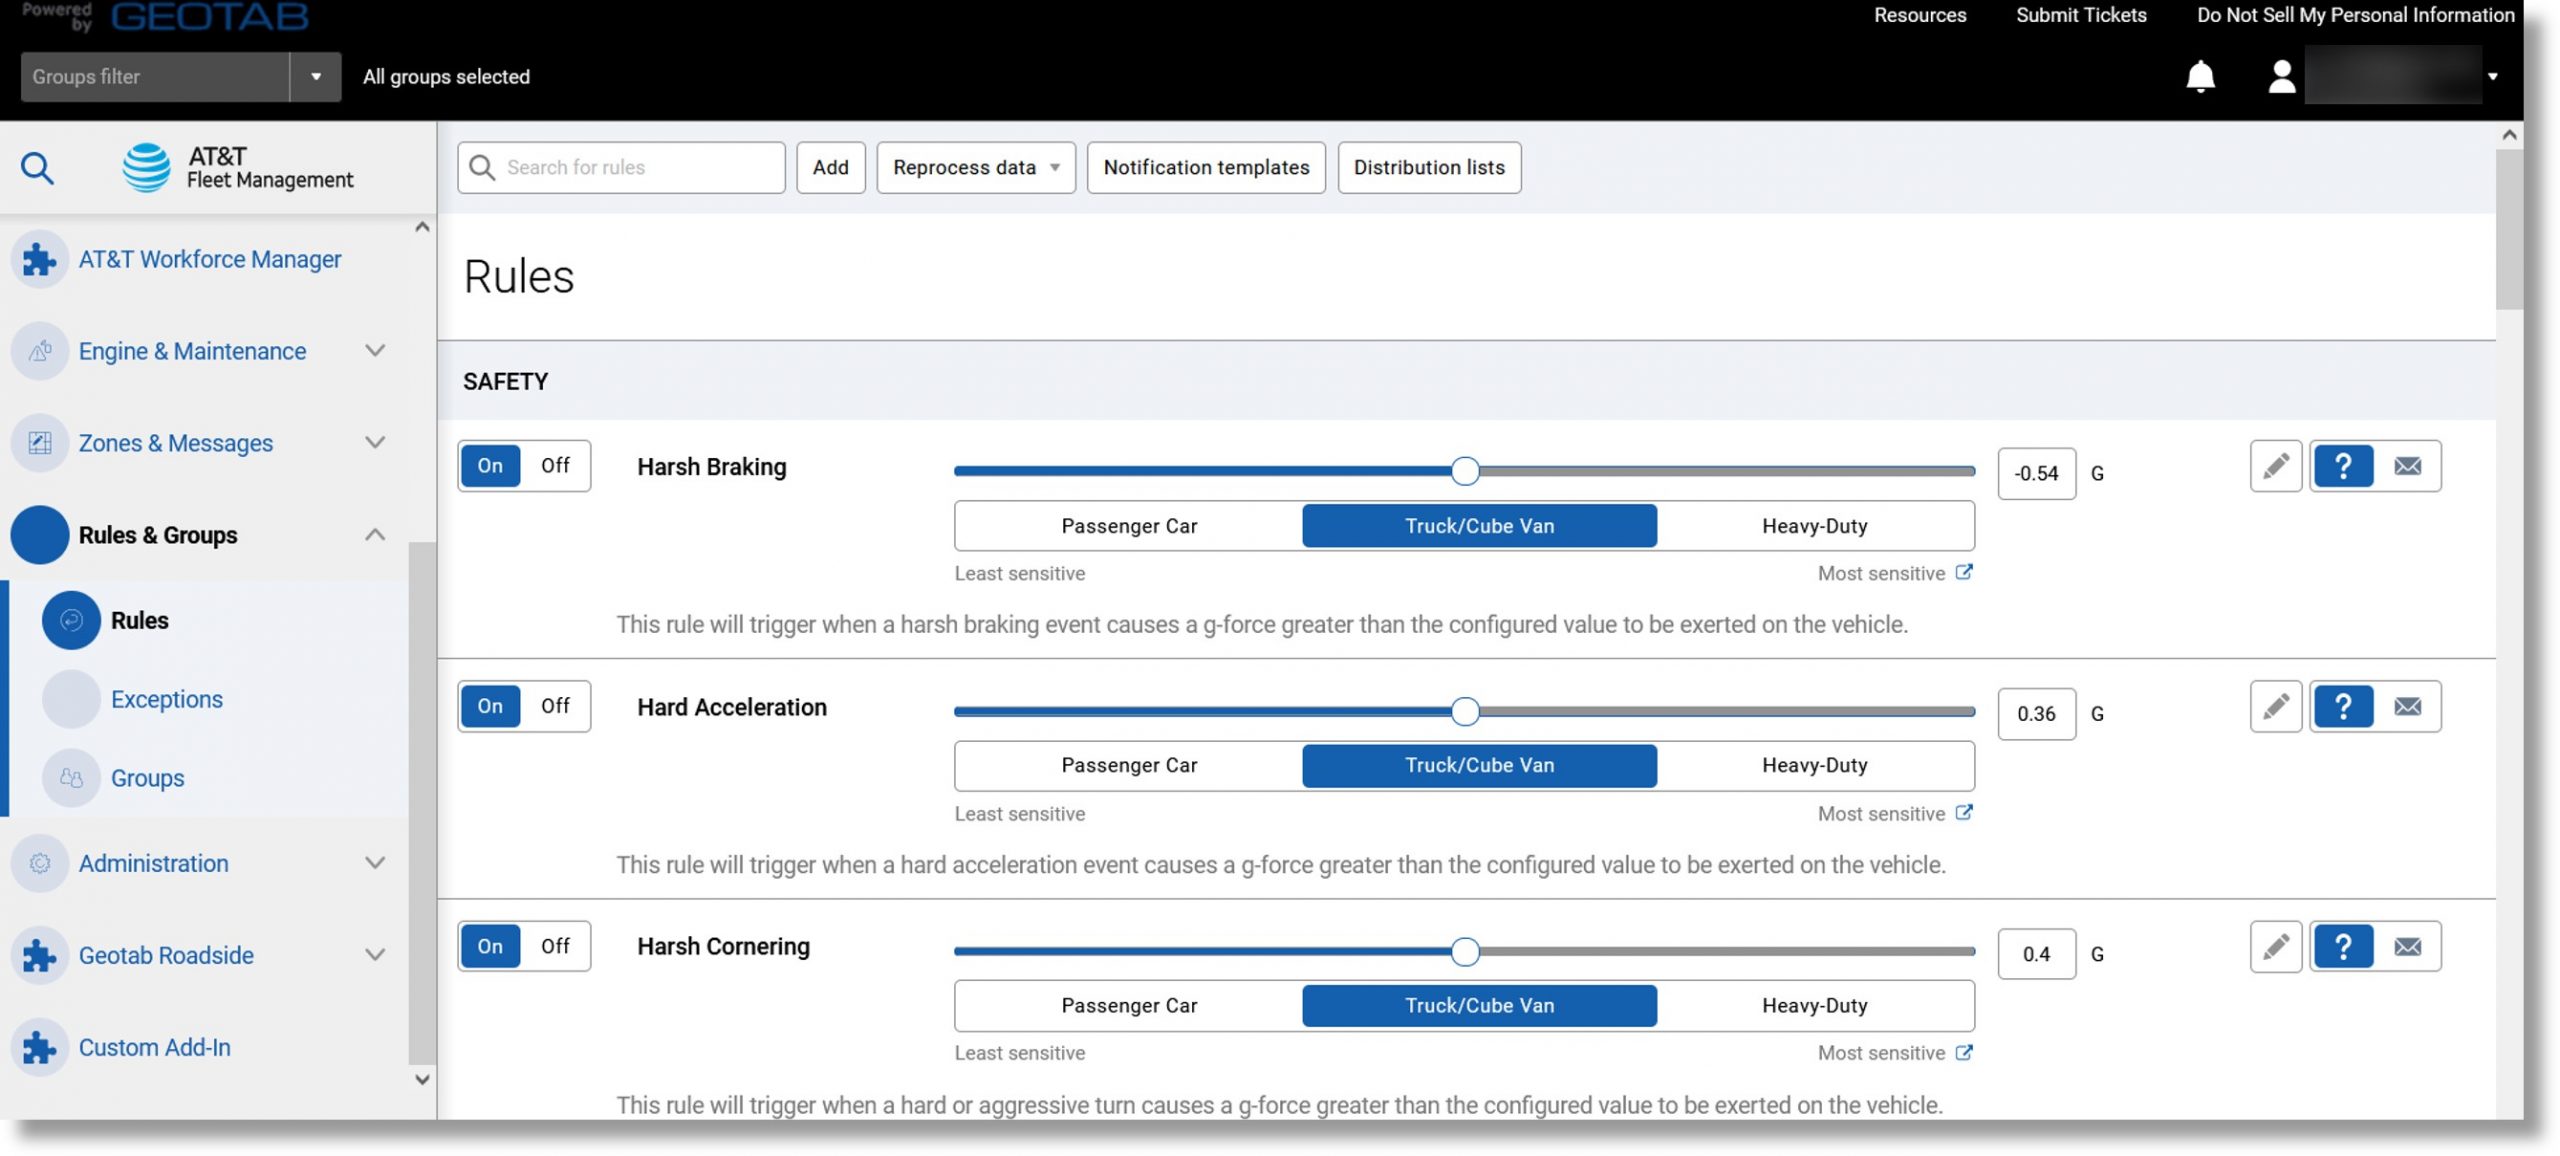
- Click on Rules & Groups in the menu on the left side of the database and then click on Rules.
- The rules display and are categorized by Safety, Productivity, and Fleet.
- Click the On button to the left of the desired rule to enable it.
- Click the pencil icon to make changes to the rule.
- Click the question mark icon to display an explanation of each rule.
- Click the envelope icon to view notification recipients when the rule is broken.
Safety Rules
- Harsh Braking, Hard Acceleration, Harsh Cornering monitors when g-force event thresholds are broken, based on the slider. Rules can be adjusted for use with passenger vehicles, pickup trucks, step vans, or heavy-duty vehicles. The larger the vehicle, the more sensitive the conditions should be.
- Speeding by default is set to 6 mph/10 kph over the posted speed limit for a minimum of 20 seconds. Use the slider to change the speed, or enter the posted speed.
- Seat belt rule is broken when the vehicle exceeds 6.21 mph/10 kph and driver not wearing a seat belt.
- After Hours Usage rule is broken when a vehicle is driven outside of the designated work hours.
- Possible Collision rule is broken when the device detects a g-force event of 2.5 in 1 second, in any direction.
Productivity Rules
- Idling identifies instances where the engine is running, but the vehicle is not moving for longer than the defined period.
- Late Arrival, Early Leave, Unauthorized Home Stops, Too Much Office Time, Long Lunch, and Long Stops During Work Hours are designed for work hours and zones. These rules can be used after work hours and after zones have been added.
Fleet Rules
- Fleet Idling is used to distinguish between idling in office versus other locations.
- Engine Light On can be used to alert users when the check engine light illuminates.
- Battery Drain triggers when a vehicle’s battery drops below 9 volts.
- Unauthorized Device Removal monitors when a device is plugged back in after having been removed.
- Engine Abuse is broken when a vehicle’s RPM level exceeds 7000.
- Backing Up When Leaving assists in reinforcing the best practice of backing up when arriving as opposed to leaving. The rule is broken when a vehicle is in reverse any time between the beginning of the trip and the specified distance, which is 20 yards by default.
Top
Custom Rules
|
Custom rules are used to monitor driver behavior, engine data, vehicle utilization, and more, based on your fleet’s needs and company policies. Like the stock rules that are built into the database already, these rules can be monitored in several ways, including real-time notifications and automated reporting.
Custom rules can be applied to individual vehicles/groups, while stock rules cannot.
|
- Click on Rules & Groups in the menu on the left side of the database and then click on Rules.
- Click on the Add button at the top of the page.
- Click on the field to the right of “Name” and enter a name for the new rule.
- Click on a color to the right of “Color” to configure the color of the breadcrumb trail when the rule is broken.
Note: Red is the default color. Not visible is also an option.
- To apply the rule to a group, click on the dropdown arrow to the right of “Publish to groups” and then click on the desired group.
Note: By default, the custom rule will apply to all vehicles in the Company group.
- Click in the field to the right of “Comment” to add a comment.
- Click on the Conditions tab.
- Click on the desired category button or click on the More dropdown to select a category not currently displayed.
- Click on the “Add a condition…” field and enter the conditions for the rule.
- Fill in any required values, then select the Add button.
- Click on the Notifications tab.
- Click on the desired method of notification and enter the requested information.
- Click the Save button at the top of the page when completed.
- The new rule displays below the stock rules under Advanced
Creating Custom Rules From Existing Rules
- Click on Rules & Groups in the menu on the left side of the database and then click on Rules.
- Click the pencil icon to the right of the existing rule.
- Click in the field to the right of “Name” and enter a name for the rule.
- Click on the desired color to the right of “Color”.
- Click on the dropdown to the right of “Publish to groups” to assign the rule to a specific group.
- Click in the field to the right of “Comment” to enter a comment.
- Click on the Conditions tab.
- Click on the condition(s) you would like to add or click the Advanced conditions editor icon to change conditions in the code.
Note: If using the Advanced conditions editor, click in the field under “ADVANCED CONDITIONS EDITOR” to make your edits.
- Click on the Notifications tab and select the desired notifications method.
- Enter the requested notification information.
- Click on the Save button at the top of the page when complete
Available Conditions
- Add Engine includes Active Fault measured as on or off (active faults only), Any Fault measured as on or off (active and inactive faults), and Measurement or Data, which is the reported value, as opposed to on or off.
- Add Zone or Zone Type includes Entering zone, Exiting zone, Outside zone, Inside zone, and Stopped inside zone. Zone These can be based on an individual zone or all zones of a specific type (customer, home, office).
- Add Speed sets a threshold for over or under the defined speed.
- Add Speed Limit defines speed allowed over the posted limit. Includes or excludes estimated speed limits, and specifies the road speed provider (Commercial, Community, All).
- More includes conditions for Device, Trip, Auxiliaries,
- Device — Device Ignition specifies ignition on or off, Device creates a rule for a specific device, and Driver creates a rule for a specific driver.
- Trip — Trip Driving means the vehicle must be driving to meet conditions, Stop means the vehicle must be stopped to meet conditions, Trip Distance means the trip distance must be above, below, or equal to the value, and the Trip Duration must be above, below, or equal to value.
- Auxiliaries — Monitor on/off sensors, external input devices connected to the GO device.
- Work Hours — After work hours rule means the event must occur after a given set of work hours, Work hours rule means the event must occur during a given set of work hours, After work hours device means the event must occur after a vehicle’s assigned work hours, and Device work hours means the event must occur during a vehicle’s assigned work hours.
- Wrappers — Is value more than/less than/equal to is used for conditions that do not already require these values, and Invert result inverts all conditions.
- Logic — And means already assumed when using multiple conditions, and Or means must be selected manually.
Top
Exceptions Reporting
| Exceptions occur when a rule is broken. After setting up rules and gathering data, exceptions reporting can provide valuable insights into driver behavior. |
- Click on Rules & Groups in the menu on the left side of the database and then click on Exceptions.
- The “Options” menu populates.
- Click on the desired time frame under “DATE PERIOD”.
- Click on either Vehicle or Driver to the right of “View by”.
- Click on the dropdown to the right of “Vehicles” and select the desired vehicle(s).
- Click on the dropdown to the right of “Rules” and select the desired rule from the menu.
- Click on the Apply changes button.
- A list of exceptions displays.
- Click on the desired exception type and then on the desired driver or vehicle for details.
Note: if multiple rules are selected, you will need to click on the exception name before you select a vehicle or driver.
Available Data
Vehicle, driver, group, rule, duration, distance, count, location, details, date/time
Top
Notifications
| Real-time notifications allow users to stay up to date on critical information and decrease their reaction time to important events. With optimal usage, they can increase the efficiency of fleet managers and maintenance personnel, and aid in making informed business decisions. |
Setting Up Email Notifications
- Click on Rules & Groups in the menu on the left side of the database and then click on Rules.
- Click the pencil icon to the right of the desired rule, and then click on the Notifications tab.
- Click on the Add email button.
- Click on the dropdown to the right of “TEMPLATE” to select the desired template.
- Click in the field to the right of “EMAIL” and enter the recipient’s email address.
- Click the Add button.
- Repeat steps 3 through 5 for additional recipients.
- Click the Save button at the top of the page when complete.
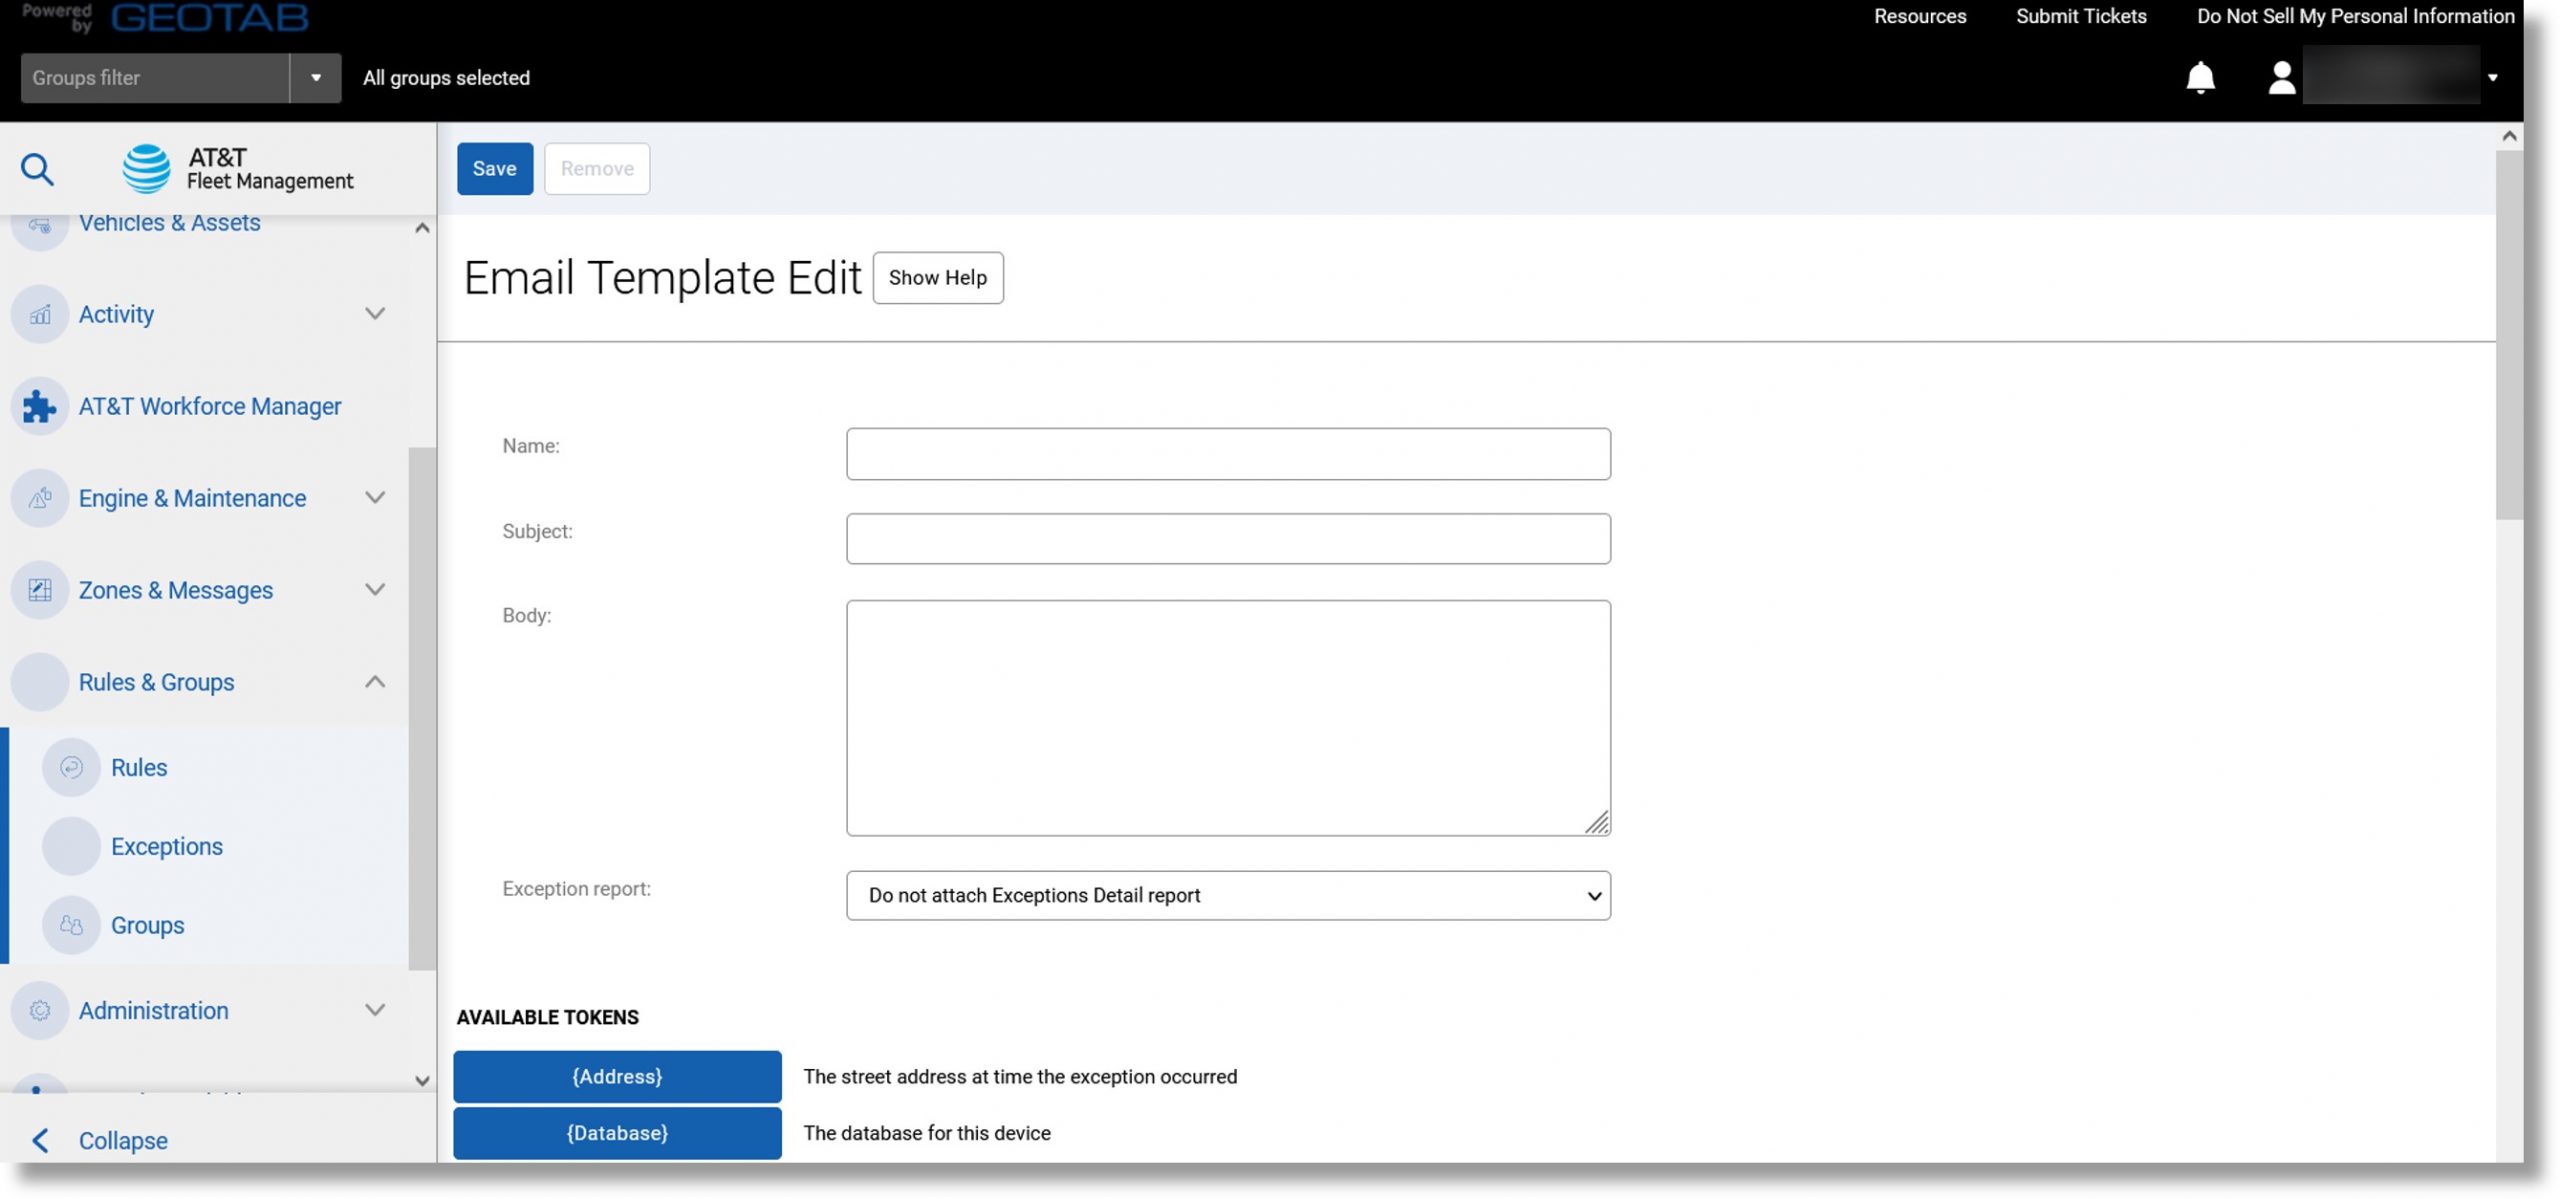
Notification Templates
Send notifications using three types of templates.
- Click on Rules & Groups in the menu on the left side of the database and then click on Rules.
- Click the Notification templates button, and click on the desired template type button at the top of the page.
- Add email template is a notification with field tokens.
- Add web template is a notification posted to a web URL with field tokens.
- Add text template is a popup notification with field tokens.
- Enter the requested information.
- Click on the desired tokens in the list under “AVAILABLE TOKENS”.
Note: Do not change the token’s name or remove parentheses.
- Click on the Save button at the top of the page when complete
Distribution Lists
Create a list of users that receive notifications when a rule is broken.
- Click on Rules & Groups in the menu on the left side of the database and then click on Rules.
- Click on the Distribution lists button at the top of the page.
- Click the Add button at the top of the page.
- Click in the field to the right of “Name” and enter a name for the list.
- Click on the Add email button.
- Click on the dropdown to the right of “TEMPLATE” and select the desired email template.
- Click in the field to the right of “EMAIL” and enter the desired email address(s).
- Click on the Add button.
- Click the Save button at the top of the page when complete.
Top
Viewing Previous Vehicle Locations
| Occasionally, there is a need to find out if any drivers were in a specific area at a certain time. This data can be pulled by first creating a zone, then creating and applying a custom rule to view zone interactions. |
- Click on Rules & Groups in the menu on the left side of the database and then click on Rules.
- Click the Add button at the top of the page.
- Enter the desired rule attributes.
- Click on the Conditions tab and then on the Add zone or zone type button.
- Click on either Zone or Zone Type to the right of “Type”.
- Click on the field to the right of “Zone” and select the desired zone from the list.
- Click on the desired option to the right of “Event”.
- Click on the Add button.
- Click the Save button at the top of the page when complete.
Note: Data is generated for events from this point forward.
Top
Reprocessing Data
Generate exceptions for vehicle activity that occurred in the past. Thirteen months is the maximum period that data can be reprocessed.
- Click on Rules & Groups in the menu on the left side of the database and then click on Rules.
- Click the Reprocess data dropdown at the top of the page.
- Click on the field to the right of “Start date” and use the calendar that populates to select the desired start date.
- Click on the dropdown to the right of “Vehicles” and select the desired vehicle(s).
- Click the Apply changes button when complete.
Groups
| Groups are designed to separate data into sections for ease of viewing and reporting. Vehicles, users, rules, and zones use groups to organize a fleet. Groups are also used to designate data access. Assets assigned to a group will be visible to any users that have access to that group or higher (one of its parents). |
Popular Grouping Options
- Locations
- Vehicle Types
- Industry
- Department
- Ownership type (leased/owned/rental vehicles)
Top
Creating Groups
Create groups to organize vehicles, users, and zones.
- Click on Rules & Groups in the menu on the left side of the database and then click on Groups.
- Select the plus symbol to create a new group or subgroup.
- Click in the field to the right of “Name” and enter a name for the group.
- Click in the field to the right of “Description” to enter a description for the group.
- Click on the desired color to the right of “Color”.
- Click on the Save button at the top of the page when complete

Top
Editing Groups
- Click on Rules & Groups in the menu on the left side of the database and then click on Groups.
- Click on the group or subgroup you would like to edit.
- Click on the Edit button at the top of the page.
- Edit the desired settings or attributes.
- Click on the Save button near the top of the page when complete.
Top
Moving Groups
- Click on Rules & Groups in the menu on the left side of the database and then click on Groups.
- Click on the group or subgroup you would like to move.
- Click the Move button at the top of the page.
- Click on the new destination parent group.
- Click on the Move to Selected button at the top of the page.
Top
Removing Groups
- Click on Rules & Groups in the menu on the left side of the database and then click on Groups.
- Click on the group or subgroup to remove.
- Click on the Remove button at the top of the page.
- A confirmation message populates, click on Remove.
Note: Groups cannot be removed while subgroups are attached, or if assets or users are still assigned.
Top
Groups Filter
| After groups have been created and assigned to vehicles, users can choose to view only certain groups of assets at a time. This is accomplished with the groups filter box located in the upper left corner of the screen and is helpful for isolating groups for vehicle tracking, zone interactions, or exceptions reporting. |
- Click in the field labeled “Groups Filter” at the top left of the database and start typing the desired group’s name, or click the dropdown arrow to the right to select a group.
Note: The application only displays information for the groups selected. The application only displays groups and subgroups the user is assigned to.
- To remove the group, filter click the X sign to the right of the group name.
Top
Engine & Maintenance
Engine Faults
| The GO device monitors the health of the vehicle by recording both the dash warning lights and the faults recorded by the vehicle. Additionally, the GO device is self-reporting, allowing users to view telematics related faults. |
- Click on Engine & Maintenance in the menu on the left side of the database.
- Click on Engine and Device and then click on Faults.
- The options menu populates, click the desired time frame under “DATE PERIOD”.
- Click on either Yes or No to the right of “Include archived (historical) data”.
- Click on the dropdown to the right of “Vehicles” to select a vehicle.
- Click on the dropdown to the right of “Diagnostics” to focus on a specific diagnostic.
- Click on either Yes or No to the right of “Show dismissed faults”.
- Click on the Apply changes button to complete.
- The faults display
Fault Types
- OBD are engine faults recorded by the Engine Control Module (ECM). Some faults can result in check “engine light”. Description is the description of the fault code.
- Telematics device is used for notes or issues with the device itself (i.e., accelerometer calibrations, power removal, firmware updates, etc.). Can indicate possible installation issues or other important alerts.
Available Data
Vehicle, group, fault, count, date/time, description, source, controller, code, failure mode.
Top
Engine Measurements
| Engine measurements provide a log of all engine data received by the GO device. View available measurements and ranges, identify measurements available for specific vehicles, and determine measurements to be used for rules, maintenance. |
- Click on Engine & Maintenance in the menu on the left side of the database.
- Click on Engine and Device… and then click on Measurements.
- The Options menu displays. Select the desired time from under “DATE PERIOD”.
- Click on either Yes or No to the right of “Include archived (historical) data”.
- Click on the dropdown to the right of “Vehicles” and select the desired vehicle(s).
- Click on the dropdown to the right of “Diagnostics” and select the desired diagnostic(s).
Note: If no diagnostic is selected, the report returns all measurements for the date range.
- Click on the Apply changes button.
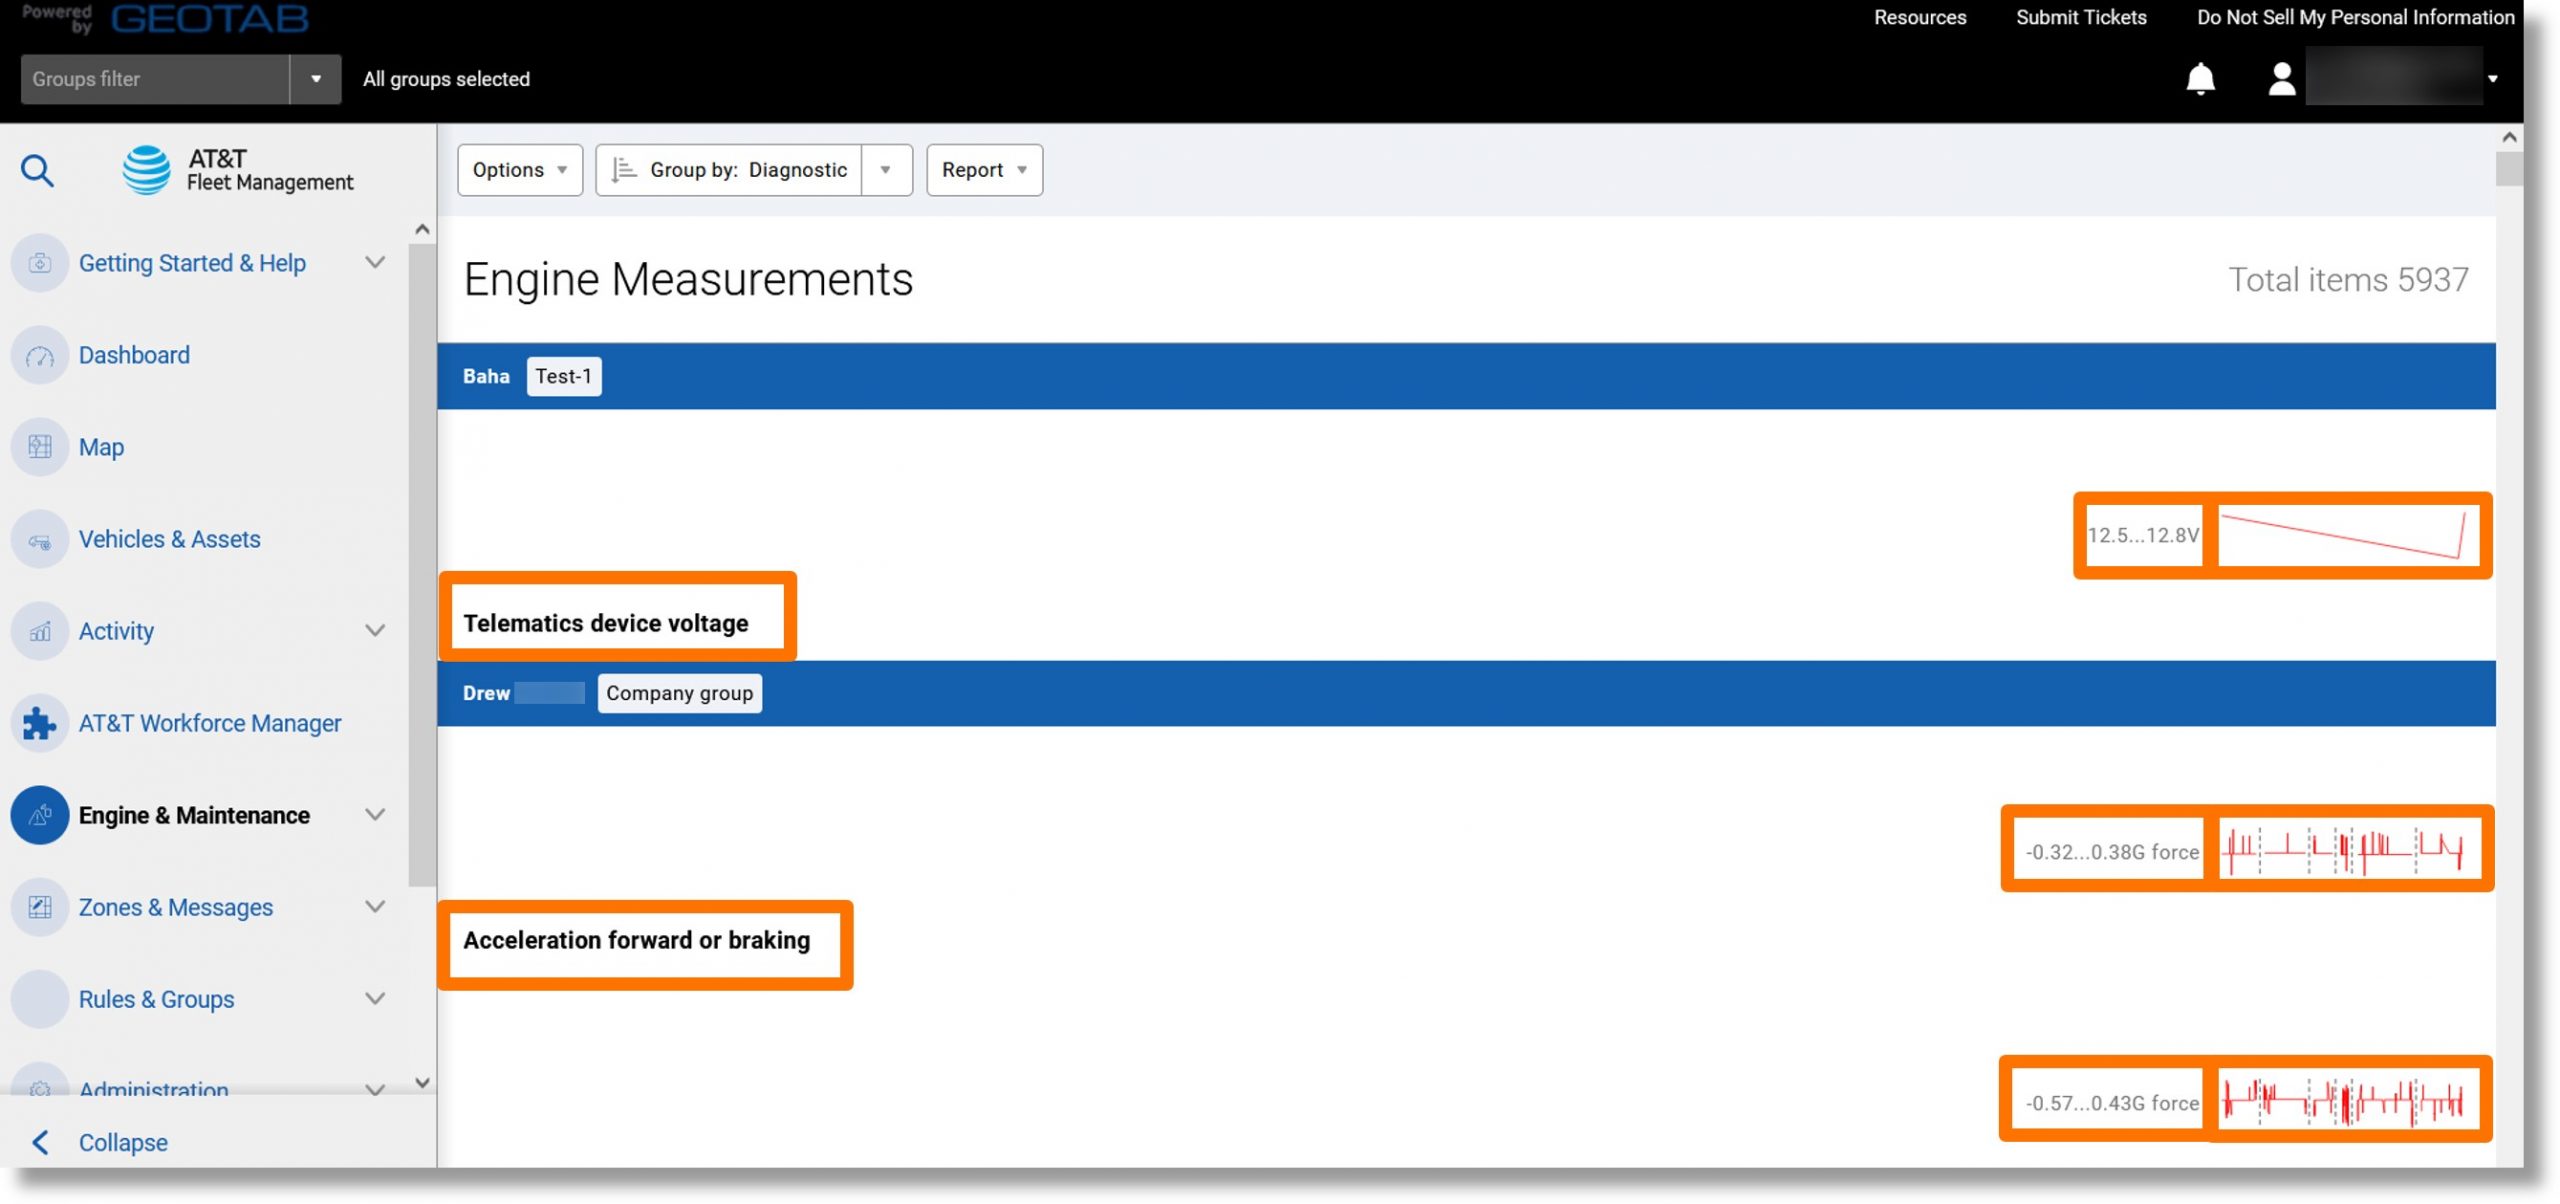
- Click on a measurement name to view individual events, or the graph to view the data in a visual format.
Available Data
Vehicle, group, measurement, range, graph, date/time, description, source, controller, value
Top
Fuel and EV Energy Usage
Display fuel consumed, distance driven, and fuel economy for the period selected.
- Click on Engine & Maintenance in the menu to the left of the database and then click on Fuel and EV Energy Usage.
- The “Options” menu populates, click on the desired timeframe under “DATE PERIOD”.
Note: You can also click on the On button to the right of “SUB-PERIODS” to include a sub-time period.
- Click on Yes or No to the right of “Include archived (historical) data”.
- Click on the dropdown to the right of “Vehicles” and select the desired vehicle(s).
- Click on the Apply changes button when complete.
- Click on either the Fill-Ups or the EV Charging button at the top of the page to view fuel or charging transactions.
Top
Maintenance Reminders
| Proactive maintenance is critical in keeping a fleet running smoothly. Remembering when to perform oil changes, tire rotations, and other automotive services can be completely automated using accurate GPS fleet tracking. Create recurring reminders to alert you when a vehicle is due for service. |
- Click on Engine & Maintenance in the menu on the left side of the database.
- Click on Maintenance… and then click on Reminder Setup.
- Click on the Add reminder button at the top of the page.
- Click on the field to the right of “Reminder name” and enter a name for the reminder.
- Click in the dropdown to the right of “Maintenance type” and select the desired type.
Note: You can also click on the + Add new maintenance type link to create a new rule type.
- Click on either the Yes or No button to the right of “Reminder repeats”.
- Enter the desired timeframe, milage, etc. or the desired date.
Note: The options displayed differ depending on the setting chosen in step 6.
- Click on the Add Assets tab.
- Click in the field labeled “Search assets” and enter the desired vehicle’s information or click on the dropdown to the right of the field to select the vehicle from a list.
- Repeat step 9 to add more vehicles.
- The vehicle’s information displays. Including the current date, odometer reading, and engine hours.
- Click in the fields under “Last Maintenance Date”, “Odometer”, or “Engine hours” to log the most recent maintenance.
- Click the Save button to the right of the vehicle.
- Click on the Notifications tab.
- Click on the dropdown to the right of “Notification type” and select the desired type.
- Click on the dropdown to the right of “Recipient” and click on the desired users.
- Click in the fields to the right of “Trigger notification” and enter the desired conditions for “days before due”, “mi. before due”, and then “engine hours before due”.
- Click the Add button.
Note: To add more notifications, click on the Add new notification button.
- Click the Save button at the top of the page when complete.
Reminders Due
- Click on Engine & Maintenance in the menu on the left side of the database.
- Click on Maintenance… and then click on Upcoming maintenance.
- Click on the Complete button to the right of the desired reminder.
- Click in the field to the right of “Date completed” and enter the date that the maintenance took place.
- Click in the field to the right of “Odometer reading” to update the mileage.
- Click in the field to the right of “Engine hours reading” to update the vehicle’s engine hours.
- Use the optional fields to enter the desired details for the maintenance performed.
- Click the Save button at the top of the page when complete.
Maintenance History
- Click on Engine & Maintenance in the menu on the right side of the database.
- Click on Maintenance… and then click on Maintenance Records.
- Click on the Filter dropdown.
- Click on the desired time frame under “DATE PERIOD”.
- Click on the dropdown to the right of “Reminder rule” and select the desired rule.
- Click on either Yes or No to the right of “Show completed maintenance”.
- Click on either Yes or No to the right of “Include archived (historical) data”.
- Click on the dropdown to the right of “Vehicles” and select the desired vehicle(s).
- Click on the Apply changes button at the top of the page when complete.
- The maintenance records display.
Top
Administration
Audit Log
| The Audit Log lists events that have occurred in the database. This report is useful for tracking changes to your account when multiple users have administrative access. |
- Click on Administration in the menu on the left side of the database.
- Click on System and then click on Audit Log.
- Click on the Options dropdown.
- Click on the desired time frame under “DATE RANGE”.
- Click in the field to the right of “Audit types” and click on the desired audit type.
- Click on the dropdown to the right of “Users” and select the desired user(s).
- Click on the Apply changes button when complete.
- The audit log displays.
Available Data
User, event, details, date/time
Top
User Options
Display user preferences such as regional, Map and UI settings; and applicable HOS rulesets.
- Click on your username in the upper right corner of the database and then click on Options.
- Edit the desired settings.
Note: The “Main Settings” tab contains regional and UI settings. The “Map Settings” tab contains map settings. The “HOS Settings” tab contains rulesets and other HOS settings.
- Click on the Save button at the top of the page when complete.
Top
Viewing Users
Display a navigable list of users and their details.
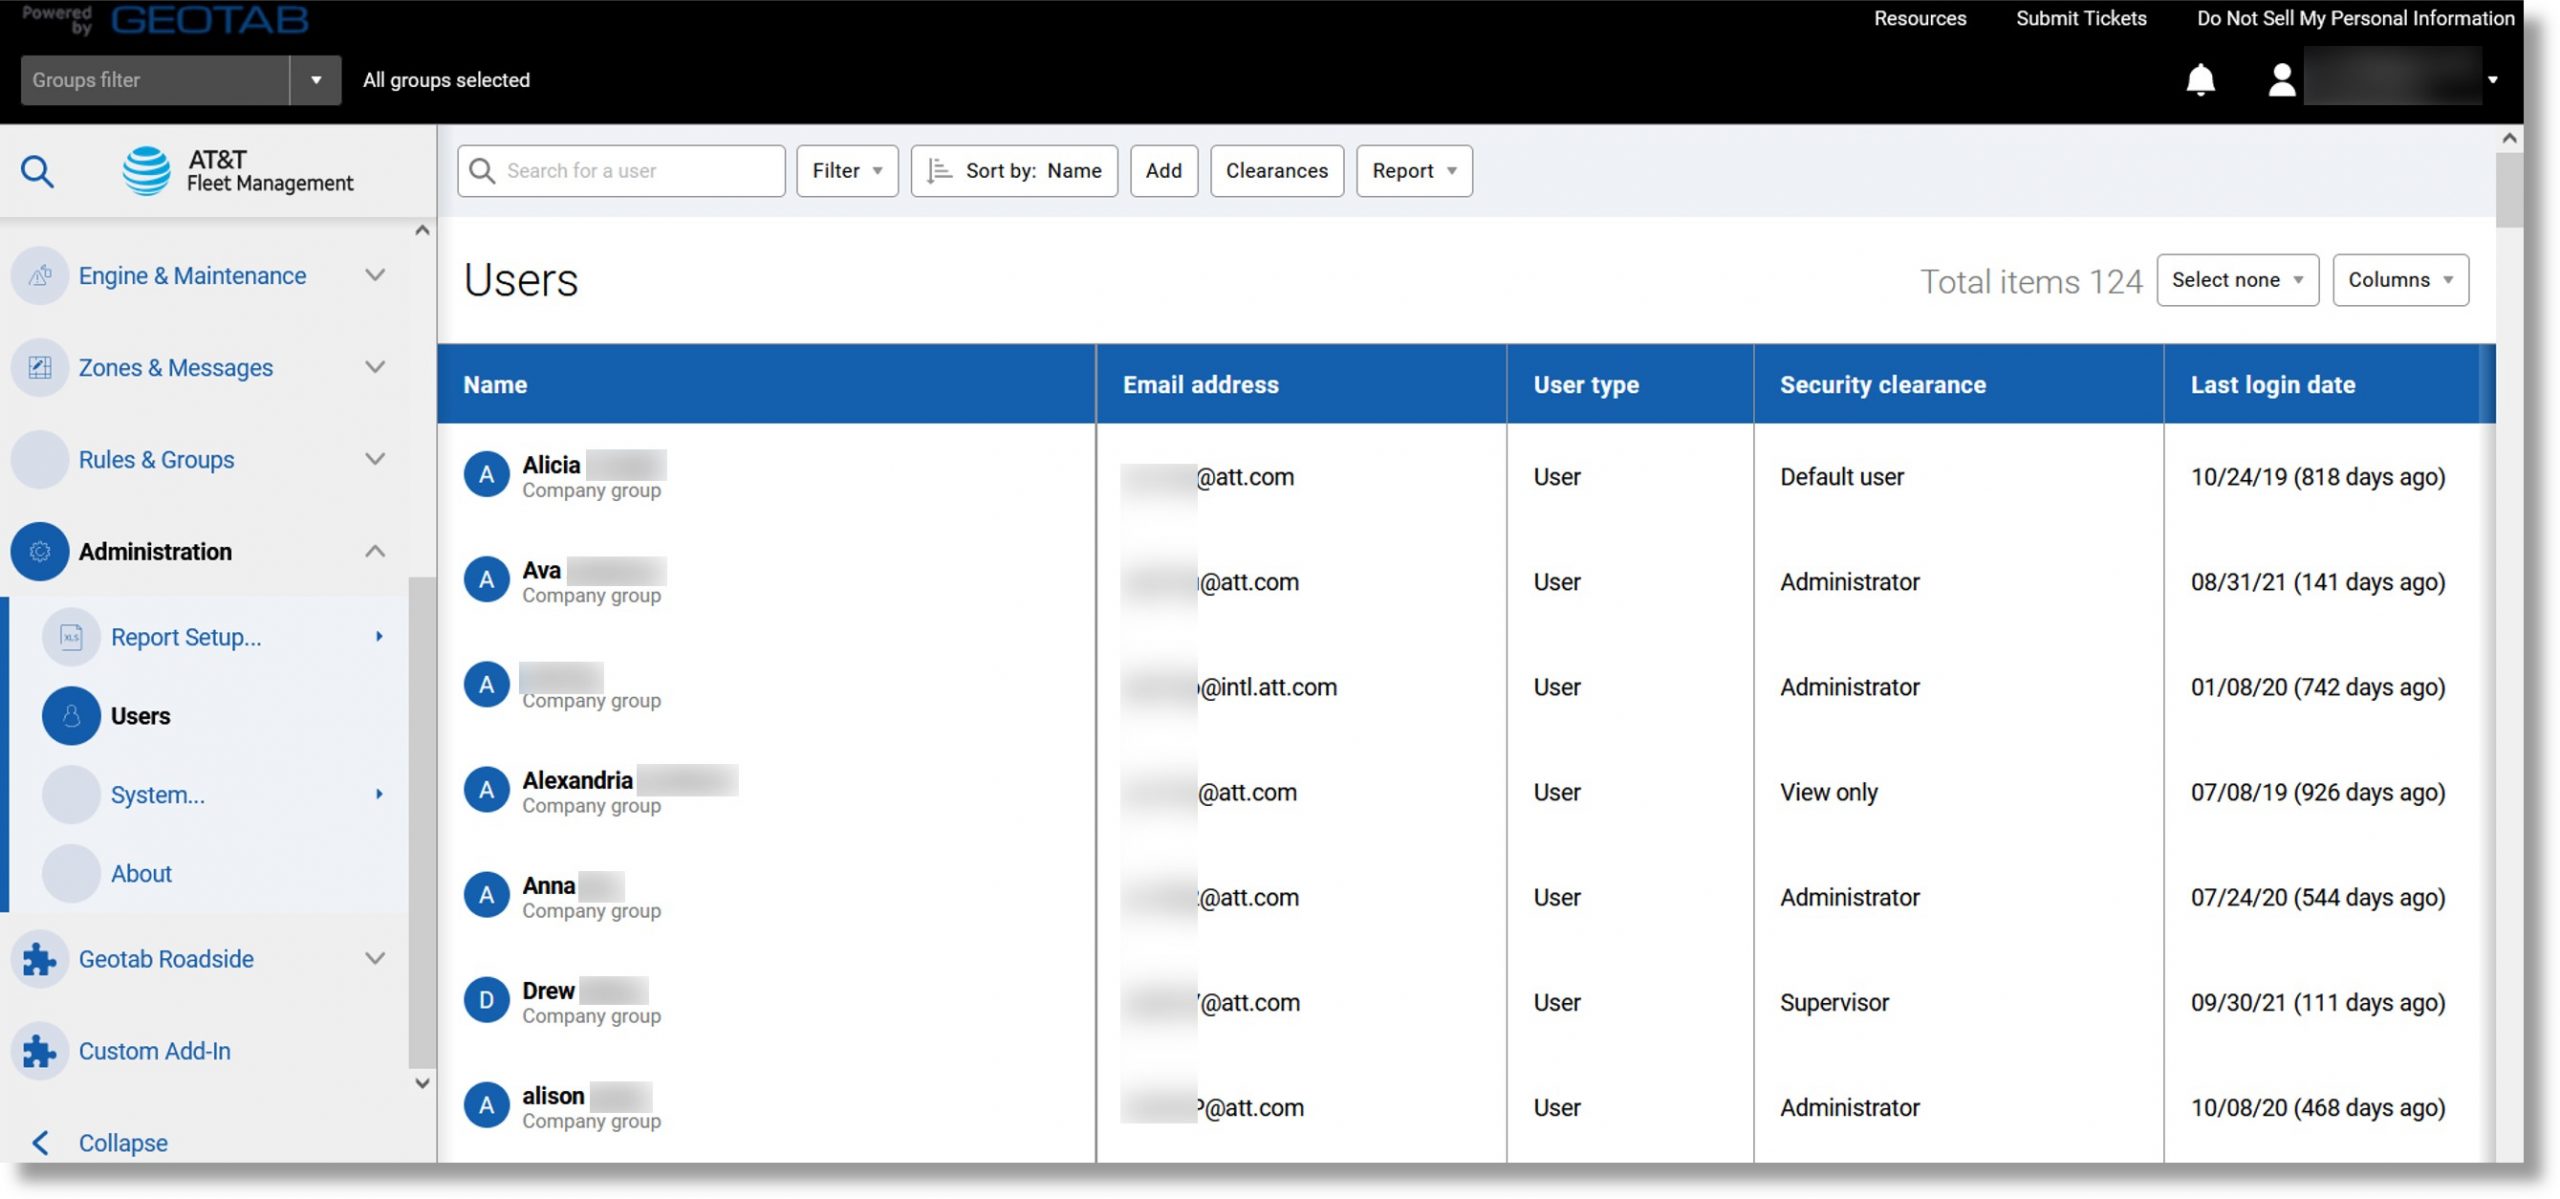
- Click on Administration in the menu on the left side of the database and then click on Users.
- Click on the desired user to view or edit detail.
Available Data
User name, first/last name, groups, last access date, security clearance, data access, active from/to, employee number, driver ID.
Top
Adding Users
- Click on Administration in the menu on the left side of the database and then click on Users.
- Click the Add button at the top of the page.
- Click in the field to the right of “User (Email)” and enter the user’s email address.
- Click in the field to the right of “First name” and enter the user’s first name.
- Click in the field to the right of “Last name” and enter the user’s last name.
- Click on the dropdown to the right of “Authorization type” and click on the desired type.
- Click on either Yes or No to the right of “Force password change on next login”.
Note: If you click on No you will be required to enter and confirm a password for the user.
- Click on the dropdown to the right of “Security clearance” and select the desired clearance. Note: By default, users can see information for all vehicles. To limit them to a specific group, select the group from the Data access dropdown list.
- If desired, add in the user’s designation, employee number, or any comments.
- If the user is a driver, click on the Driver tab.
- Click on the Yes button to the right of “This user is a driver” and then enter the information requested.
- Click on the UI Settings tab to configure the regional settings and UI settings.
- Click on the Map Settings tab to configure the default map type, view, and zone display.
- If the user is a HOS driver, click on the HOS Settings tab and select the desired options for your user.
- Click on the Save button at the top of the screen when complete.
- After creating the user, the system will send an email prompting them to create their password. To create a password for the user, set Force password change on next login to No.
Top
Security Clearances
| Security clearances allow administrators to control exactly what other users are allowed to see and do in the database. |
There are six default security clearances, ranked below from most permissions to fewest:
- Administrator provides Access to all data and features.
- Supervisor cannot administer groups, security clearances, or users; cannot change global system settings.
- View only can view all data but cannot make any changes.
- Default user is used primarily for vehicle tracking.
- Drive App user is used for HOS drivers using Geotab Drive.
- Nothing is access to Getting Started & Help only.
Creating Custom Security Clearances
- Click on Administration in the menu on the left side of the database and then click on Users.
- Click on the Clearances button at the top of the page.
- Click on the clearance on which to base the custom clearance.
- Click on the Add Sub-clearance button at the top of the page.
- Click in the field to the right of “Name” and enter a name for the sub-clearance.
- Click on the X or Checkmark icon to the left of the desired permission to enable or disable it.
Note: an X designates that the permission is disabled, a checkmark designates that it is permitted.
- Click on the Save button at the top of the page when complete.
- The new clearance displays in the security clearance dropdown list when adding or editing a user.
Top
Mass Editing User Options
Edit information, driver settings, and regional and UI settings for multiple users at the same time.
- Click on Administration in the menu on the left side of the database and then click on Users.
- Click the check mark icon in the upper right of the Users list.
- Click on either “Select visible”, “Select individual”, “Select all”.
Note: You will need to click the checkmark to the right of the desired users if you click on “Select individual”.
- Click the Edit selected users button at the top of the page.
- Make the desired edits.
- Click on the Save button at the top of the page when complete.
Top


