AT&T Collaborate quick reference Polycom RealPresence Trio 8800 phone
 This guide contains the key information you need to get started using your Polycom® RealPresence Trio™ 8800 conference phone with the AT&T CollaborateSM service. You’ll learn how to access features on your Internet Protocol (IP) phone.
Collaborate is a Voice over IP (VoIP) system that transports calls over the AT&T IP network rather than over the traditional public switched telephone network. You can use Collaborate exactly as you use a traditional phone system.
For more detailed information about using this phone, see the Polycom RealPresence Trio User Guide, available from Polycom. Note that not all Polycom RealPresence Trio features are available with Collaborate.
For your reference, print this page and fill in the important information your administrator provides:
|
Your phone number (for external calls) |
|
| Your extension (for internal calls) |
|
| Your voicemail access number |
|
| Your administrator |
Name:
Phone number:
Email:
|
Select a feature or option
Dialing basics
Special features
Select a feature or option
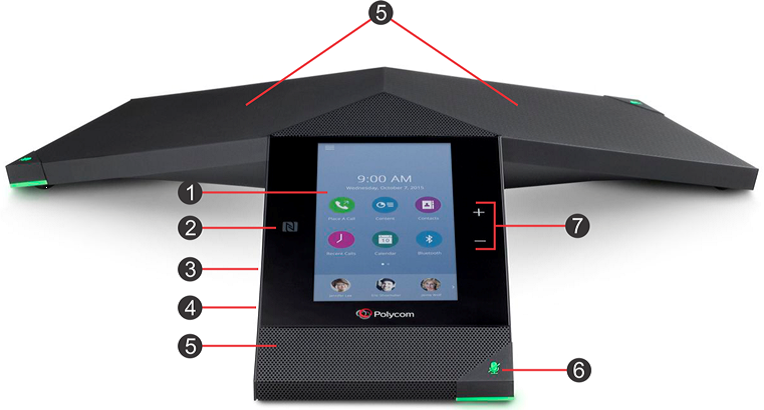
You can use the Polycom RealPresence Trio phone in any size room to hold conference and interactive video calls. Your phone’s 5-inch color LCD display is a touch screen with an onscreen virtual keyboard. The RealPresence Trio also has 3 illuminated Mute buttons, 1 on each leg.
You can manage up to 24 calls at the same time (1 active, others incoming or on hold).
Use these RealPresence Trio features.
| Feature |
Function |
|
Feature |
Function |
| 1 |
Touchscreen |
|
5 |
Speaker |
| 2 |
Near Field Communication (NFC) sensor |
|
6 |
Mute button and light |
| 3 |
USB port |
|
7 |
Volume control |
| 4 |
Device port |
|
|
|
The icons that appear on the RealPresence Trio 8800 screen may vary.
| Icon |
Description |
|
Icon |
Description |
 |
Contacts |
|
 |
Missed audio call |
 |
Place a call |
|
 |
Do Not Disturb |
 |
Active call in progress |
|
 |
Call forwarding |
 |
Transfer |
|
 |
Recent calls |
 |
Hang up/Decline |
|
 |
DialPad |
 |
Hold |
|
 |
Add |
 |
Resume |
|
|
|
Your organization determines which Collaborate features you can use and can also impose dialing restrictions. If you have questions about the features available to you or about any dialing restrictions, check with your administrator.
Top
Dialing basics
With Collaborate, you don’t need to use an out of network prefix (such as 9) when making calls.
How to make calls
Collaborate simplifies making calls.
| Make a call |
On the Home screen, do 1 of these things:
- Tap the Place a Call icon, and then use the onscreen keypad to enter the number you want to call.
- Tap the Contacts icon, and then scroll down to the contact you want to call.
- Tap to select the contact, and then tap the Phone icon.
- Tap the Recent Calls icon, scroll to the call you want to return, and then tap the number to select it
The call is placed automatically.
|
| Make an internal call |
- On the Home screen, tap the Place a Call icon.
- Enter the site prefix and the extension number.
- Tap the Phone icon.
You can also make internal calls by selecting a number from the Contacts or Recent Calls lists.
|
| Make a local call |
- On the Home screen, tap the Place a Call icon.
- Enter a 10-digit number, a 7-digit number within your own area code, or a special number (such as 411 or 911).
- Tap the Phone icon.
|
| Make a long distance call |
- On the Home screen, tap the Place a Call icon.
- Enter a 10-digit number. (You can enter 1 and the 10-digit phone number, but 1 isn’t required.)
- Tap the Phone icon.
|
| Make an international call |
- On the Home screen, tap the Place a Call icon.
- Enter 011 (the international code), the country code, and the phone number.
- Tap the Phone icon.
For more information, see the AT&T International Dialing Guide at https://www.business.att.com/bt/dial_guide.jsp.
|
| Return the most recent incoming call |
- On the Home screen, tap the Place a Call icon.Place a Call icon.
- Enter *69.
- Tap the Phone icon.
When prompted, press 1.
|
| Return a call or redial a number from the Recent Call list |
- On the Home screen, tap the Recent Calls icon.
- On the Recent Calls screen, select a contact. The call is placed automatically.
|
| Redial the last number called |
- Tap the Place a Call icon, and then tap the Recent Calls icon.
- In the Recent Calls list, tap the first outgoing number that appears.
|
| Redial a number called earlier |
- Tap the Place a Call icon, and then tap the Recent Calls icon.
- In the Recent Calls list, tap a phone number.
|
| Put a call on hold |
- On the Calls screen, tap the Hold icon.
|
| Resume a call |
- On the Calls screen, tap the Resume icon.
|
| End a call |
- On the Calls screen, tap the Hang Up icon.
|
Top
Special features
The special features of Collaborate described below can save you time.
With some features, you tap icons. With others, you enter special feature codes (for example, *86) from the phone’s virtual keypad. In some cases, you can access features in multiple ways. For more information about feature codes, see Feature access codes.
Note: When using a star (*) feature code, enter the code, and then tap the Phone icon. The call won’t be dialed automatically.
Special calling features
Manage calls with these special calling features from Collaborate.
| Description |
How to use the feature |
|
Auto Call Back Busy
If you call a phone number that’s busy, Auto Call Back Busy checks the busy number for the next 30 minutes. When the phone number becomes free, Auto Call Back Busy rings you and connects the call.
You can cancel Auto Call Back Busy at any time, and you can have multiple Auto Call Back Busy sessions running at the same time.
Note: If you place a call to a number that has voicemail, you’ll be sent to voicemail and Auto Call Back Busy won’t check the number.
|
Turn on Auto Call Back Busy
- Make your call. When a number is busy, a voice prompt offers Auto Call Back Busy.
- Follow the voice instructions.
- When the voice prompt confirms that Auto Call Back Busy is turned on, end the call.
- When the number you called becomes free, your phone rings. Answer the call to connect to the number you originally called.
Cancel all Auto Call back Busy sessions
- On the Home screen, tap the Place a Call icon.
- Enter *86, and then tap the Phone icon.
|
|
Call Waiting
If you see a new caller’s ID in your phone’s display window while you’re on a call, Call Waiting is turned on and you have an incoming call.
If you don’t answer the new call, it will be routed to your voicemail (if available) or to your chosen “when I don’t answer” call treatment.
If you don’t want to be notified when callers are waiting, you can turn Call Waiting off for the current call.
|
Turn Call Waiting off for the current call
- On the Home screen, tap the Place a Call icon.
- Enter *70 and the number you want to call.
- Tap the Phone icon.
|
|
Account codes
An account code enables your Collaborate service to track call data by account or category for outbound calls made from your organization. You may be assigned 1 of these types of account codes:
- Mandatory—For all calls except 911, you’re always prompted and must enter an account code when calling outside your organization.
- Optional—You can enter a feature access code followed by the account code when calling outside your organization.
|
Call using a mandatory account code
1. On the Home screen, tap the Place a Call icon.
2. Enter the phone number you want to call.
3. When prompted, tap the DialPad icon, and then enter the account code. The call is placed automatically.
Turn on account codes for a single call
1. On the Home screen, tap the Place a Call icon.
2. Enter *50.
3. When prompted, tap the DialPad icon, and then enter the account code.
4. Enter the phone number you want to call. The call is placed automatically.
|
|
Block and unblock Caller ID
When Caller ID is turned on, your number and name appear on the phones you call.
If permitted by your organization, you can block your caller ID:
- For a single call outside your organization.
- For all phone calls.
Your administrator can block your line’s caller ID for all calls.
|
Block your caller ID for a single call
- On the Home screen, tap the Place a Call icon.
- Enter *67 and the number you want to call.
- Tap the Phone icon.
Unblock your caller ID for a single call
- On the Home screen, tap the Place a Call icon.
- Enter *65 and the number you want to call.
- Tap the Phone icon.
Block your caller ID for all calls
- On the Home screen, tap the Place a Call icon.
- Enter *31.
- Tap the Phone icon.
Unblock your caller ID for all calls
- On the Home screen, tap the Place a Call icon.
- Enter #31.
- Tap the Phone icon.
|
|
Call Transfer
You can transfer a call to any extension within your organization or to any 10-digit phone number. Call Transfer has 2 forms:
- Unattended transfer—Transfers your call to the new caller directly and drops you from the call.
- Attended transfer—Enables you to speak with the person you’re transferring the call to before you transfer the call. If there’s no answer or the person doesn’t want to take the call, you can cancel the transfer and talk with the caller.
|
Make an unattended transfer
- During a call, tap the Transfer (Blind Transfer) icon.
- Enter the phone number to which the call will be transferred.
- Tap the Transfer icon again. The call is transferred and you’re dropped from the call.
Make an attended transfer
- During a call, tap the Transfer icon.
- Enter the phone number to which the call will be transferred.
- Wait for the person to answer, and then speak.
- If the person agrees to accept the call, tap the Complete Transfer icon. The call is then transferred from your phone.
- If the person isn’t available or doesn’t want to accept the transferred call, tap the Cancel icon to resume the original call.
|
|
Conference calls
You can conduct a conference call with multiple participants from your phone.
|
Start a conference call by phone
- Call the first person.
- After the first person answers, tap the Add icon. This places the call on hold.
- Call the second person. When the second person answers, tap the Merge Calls icon. The second person is added to the call.
Add more participants
- Repeat steps 2 and 3 above, from Start a conference call by phone. Participants are added automatically.
|
|
Do Not Disturb
When you don’t want to receive calls, you can turn on Do Not Disturb.
- Private lines—If you have voicemail, all incoming calls are immediately routed to your voicemail. If you don’t have voicemail, calls are routed to your “when I’m busy” call treatment.
- Shared lines—Your phone won’t ring, but the line blinks and you or someone else can answer the call.
|
Turn Do Not Disturb on or off
- On the Home screen, tap the Settings icon.
- Select Features, and then select Do Not Disturb.
- Tap Enable (on) or Disable (off).
|
|
Intercom Over Speakerphone
You can initiate an Intercom Over Speakerphone call to other Collaborate users in your organization.
The phone of the person you’re calling automatically answers the call in speakerphone mode. You can then have a conversation.
|
Make an Intercom Over Speakerphone call
- On the Home screen, tap the Place a Call icon.
- Enter *96.
- Enter an extension number.
- Tap the Phone icon.
- Wait to hear a beep, and then speak.
|
|
Reject a call
If you don’t want to answer a call while it’s ringing, you can reject the call. If you have voicemail, the call is then routed to your voicemail. If you don’t have voicemail, the call is routed to your chosen “when I don’t answer” call treatment.
Note: If the ringing line is a shared line, your phone will stop ringing, but the shared lines will continue to ring on other phones.
|
Reject a call
- From the Incoming Call screen, tap the Decline icon.
|
|
Manage multiple calls
A phone number assigned on an IP phone is called a line appearance. When a call comes in to a number, all phones with that number as a line appearance ring at the same time. When the call is
|
Move between multiple calls
The touchscreen shows all calls and their current state (for example, active or on hold).
- To move between calls, tap the call you want to be active. The previously active
|
|
answered, how it’s handled depends on the line’s call presence.
Collaborate offers 2 call presence choices:
- Shared call presence—When a call is answered and put on hold, any other phone with that line appearance can take the call off hold.
- Not shared call presence—When a call is answered, it becomes exclusive to the phone that answered it and no longer appears on the other phones.
|
call is automatically put on hold and the held call becomes active. |
|
Call Forwarding
You can forward calls to other numbers. The forward-to number can be an extension or any 10-digit phone number.
Collaborate provides these types of call forwarding:
- Call Forwarding – Always—All calls to your phone are forwarded. This is also known as Send All Calls.
- Call Forwarding – No Answer—If you don’t answer, the call is forwarded.
- Call Forwarding – Busy—Calls that come in while your phone is busy are forwarded.
- Call Forwarding – Not Reachable—Applies when your phone can’t be reached by the Collaborate network (not simply when you don’t answer or are busy). You can set this up in advance.
Note: Your administrator establishes your access to call forwarding. If you have questions about your access to these features, check with your administrator.
|
Turn on call forwarding
- When your phone is idle, tap the Place a Call icon, and then enter:
- *72 for Call Forwarding – Always
- *92 for Call Forwarding – No Answer
- *62 for Call Forwarding – Busy
- *94 for Call Forwarding – Not Reachable
- Enter the phone number to which calls will be forwarded.
- Tap the Phone icon. A voice prompt confirms that call forwarding is turned on.
Turn off call forwarding
- When your phone is idle, tap the Place a Call icon, and then enter:
- *73 for Call Forwarding – Always
- *93 for Call Forwarding – No Answer
- *63 for Call Forwarding – Busy
- *95 for Call Forwarding – Not Reachable
- Tap the Phone icon. A voice prompt confirms that call forwarding is turned off.
|
Top