AT&T Collaborate app for Android smartphones
The AT&T Collaborate™ service provides the Collaborate app to help you manage calls and conferences on the go. The app provides voice, video, and advanced communications features.
Basic Voice Seat provides voice-only features and the Mobile Audio Only app.
The Unified Communications (UC) bundle provides voice features, plus video and advanced communications features.
The Mobile app provides these features:
- Voice over IP (VoIP) calling
- Voice calling
- Collaborate service call settings
- Instant messaging and presence (Unified Communications bundle only)
- Video calling (Unified Communications bundle only)
You can download the Mobile app for Android™ from Google Play™ Store.
Get started
Main tabs
Contacts
Presence
Chat tab
Audio and video calls
Side navigation
My Room
Search
Multi-device support
Other features
Get started
After you start the app the first time, when you sign in, you can choose automatic sign-in for future use. You can use either basic or advanced sign-in.
- Enter the Collaborate app username and password that your administrator provided.
Note: Your app username starts with your 10-digit Collaborate phone number followed by @hcomm.att.net (for example, 555-123-4567@hcomm.att.net).
- Decide if you want the app to remember your password.
- Decide if you want to sign in to the app automatically.
- Tap Sign In.
Note: If you choose to sign in automatically, the next time you start the Mobile app you’ll be signed in automatically and be taken to the Contacts list. If you choose to not sign in automatically, the Sign In page appears each time you start the app.
A dialog box appears with information about emergency calls and an option to update your device’s registered location.
Basic sign-in has 3 options:
- Update location—Set the registered location, then sign in.
- Accept—Start using the app.
- Cancel—Return to the Sign In page.
Advanced sign-in has these options:
- Update location—Opens a Web browser where you can set the location. After you set your location, return to the Sign In page. If you successfully updated your location, you can sign in and use the app.
- Cancel—Sign-in is canceled and the Sign In page appears.
Sign in the first time
- Start the app. The Sign In page appears.
- Enter your Collaborate app username and password.
- Decide if you want the app to remember your password.
- Decide if you want to sign in to the app automatically.
- Tap Sign In.
Top
Main tabs
When you start the Collaborate app the first time, your Contacts list is empty. To find people in your company and add them to your Contacts list, use the Search field. To manually add contacts, tap Add.
Main tabs
| Icon |
What it means |

Contacts |
View your contacts from a Buddy list, your device’s address book, or your company directory. |

Chat |
View your chat history. |

Dial Pad |
Make calls. |

History |
View incoming, outgoing, and missed calls. |

My Room |
Join your personal chat room. |
Tabs contain information about contacts and communications options.
Top
The Contacts list on the Contacts tab contains 2 types of contacts:
- Presence-enabled: users who can chat and send instant messages.
- Non-presence enabled: phone or conference numbers. These contacts are stored on the server and are available on all of your app instances.
You can mark any contact as a favorite, and the contact then appears at the top of the Contacts list in the Favorites section. The Mobile app shows contact groups created from Desktop. Note that you can’t create or edit contact groups with the Mobile app.
You can filter your contacts:
- Collaborate Contacts
- To view all presence-enabled and non-presence enabled contacts, tap All.
- To view only the presence-enabled contacts that are online, tap Online.
- Contact Directories
- To view contacts from your device’s address book, tap Local Address Book.
- To search for contacts from the company directory, tap Directory.
Add contacts
To add contacts, do 1 of these things:
- To add a new presence-enabled contact, in the bottom-left bar, tap the plus sign (+), and then tap Add Contact.
- From the Contacts tab, search the directory.
- On the Add Contact page, enter the contact’s information, and then tap OK.
- By default, your presence information is always shared with a new contact.
- To add a local contact, in the bottom-left bar, tap the plus sign (+), and then tap Add Local Contact. The address book appears. Tap to select a contact from your device’s address book.
Add a conference contact
A conference contact is a special contact that you use to save a conference bridge. With a conference contact, you don’t need to remember a PIN code and a conference number for a recurring conference.
- Tap the plus sign (+), and then tap Add Conference.
- Enter the conference information, and then tap OK.
Add a buddy request
You can accept or ignore a buddy request. If you ignore the buddy request, you can share your presence information later.
- To share your presence information, from the Buddy contact card, tap Subscribe.
Note: The contact must accept your subscription request to create the presence relationship.
Edit contacts
These steps are the same for contacts if they are presence-enabled or not.
- From the Contacts list, tap a contact. The contact card opens.
- Tap the on-screen 3-dot symbol ( ), and then tap Edit. The Contact Information dialog box opens, where you can edit information.
- Do 1 of these things:
- To remove the presence relationship between you and the contact, tap the 3-dot symbol ( ) and tap Unsubscribe. You don’t see the contact’s presence information, and your contact doesn’t see yours. An unsubscribed contact remains on the Contacts list and always appears as offline.
- To re-establish a presence relationship, tap Subscribe.
- To remove the contact from your Contacts list, tap the on-screen 3-dot symbol
( ), and then tap Remove.
Top
Presence
Presence means that your friends can see if you’re available. You can see the presence of each contact to which you’ve subscribed and your contacts can see your presence on their Contacts list.
Presence icons
| Icon |
What it means |
 |
The green Presence icon indicates that you’re online and ready to communicate. |
 |
The yellow Presence icon indicates that you’re online through Desktop, but you’ve been idle or away from your computer for more than 10 minutes. |
 |
The red Presence icon indicates that you’re busy and don’t want to be disturbed. |
 |
The gray Presence icon indicates that you’re offline. Others can contact you only by calling or leaving a chat message. |
 |
The gray Question Mark icon indicates that a subscription is pending and you haven’t yet approved sharing your presence. |
 |
The red Phone icons shows you’re busy on a call. This is an automated presence status. |
 |
The red Meeting icon indicates that you’re busy in a meeting. This is an automated presence status. The Busy – In Call status overrides the Busy – In Meeting status, so this icon appears only for meetings with no call. |
Icons show your availability.
Presence is updated by appointments and meetings that you accept or make. Note that all-day meetings don’t change your presence to Busy – In Meeting.
Set your presence
- From the status bar in all tabs view, tap the Presence icon. The My Status page appears, where you can change your profile photo, personal message, and presence status.
Your profile photo is the picture that represents you to your contacts, on their Contacts lists and on chat pages.
Change your profile photo
- Tap a profile photo. A dialog box opens with options. You can select an existing image, take a new one with your phone camera, or clear your profile photo.
- In the area next to the profile photo, enter a status message. This status message appears in your friends’ Contacts list.
If you see the Chat Unavailable message, you can make calls, but your connectivity has been lost for chat and presence. For help, contact your administrator.
Top
Chat tab
The Chat tab shows the list of recent chats (instant message sessions) since the last time you signed in. Multiple chats between the same 2 people appear as 1 item in the list.
Open Chat view
- In the right pane where you can type new messages, tap a name from the Chat list. Recent and old messages appear.
New incoming messages show a notification badge next to the name. The icon remains until you read the message.
Chats are always listed in order they’re received, with the most recent one first.
Start a chat
To start a chat, do 1 of these things:
- From the Contacts list, tap a contact. A contact card opens. Tap the Chat icon.
- Press and hold a contact name. From the options provided, tap the Chat icon.
- In the Chat History list, tap a contact entry.
- From search results, tap a contact to open the contact card. Tap the chat icon.
When you start a chat, the Chat page appears. You can chat with a contact only when you’re both online. If your contact initiates a chat, you’ll see a notification badge on the Chat tab and the entry appears at the top of the Chat History list.
When a chat opens, the name of the recipient appears in the top bar along with a Presence icon before the name. Your chat contact’s messages appear in the blue background, and your messages appear in the white background.
Start a group chat
A group chat works the same way as a 1-on-1 chat. All messages from anyone are sent to everyone else. To participate in a group chat, all contacts need to be online. To start a group chat, do 1 of these things:
- In single chat session, tap the Add Participant icon (
 ) to change from a single to a group chat.
- In the Chat History list, tap a group chat.
When you start a group chat, the Chat page appears. To add more participants, tap the Add Participants () icon. Anyone in the group chat can add participants. You can’t remove participants.
- To view your group chat history, use the Chat tab.
- To leave a group chat, tap Leave chat. The chat is marked as Offline and you don’t receive messages from the chat. To rejoin the chat, tap the offline chat. You receive messages again, but you don’t receive messages sent in the chat while you were outside the room.
- To clear your chat history, use the Clear History menu. To view the list of group chat participants, tap View Participants. You can’t delete a chat room.
Top
Audio and video calls
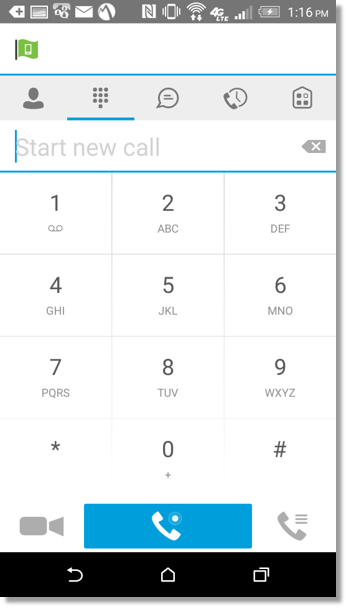 |
The Dial Pad tab displays a dial pad and a text field where you can enter numbers. Use the dial pad to make audio or video calls.
There are 3 buttons below the dial pad: Call ( ), Video call ( ), Video call ( ), and Dial Pad ( ), and Dial Pad ( ). The top text field also has an X arrow button, which deletes 1 character at a time. ). The top text field also has an X arrow button, which deletes 1 character at a time.
When you have a voicemail message, a badge notification appears on the Dial Pad tab and the voicemail icon under the number 1 turns from gray to blue. To open voicemail, press and hold 1. The Dial Pad menu contains 2 options, Pull Call and Retrieve Call.
|
The dial pad on the Dial Pad tab.
Make audio or video calls
To make a call, do 1 of these things:
- From the Contacts list:
- Tap a contact. A contact card opens.
- To make an audio call, choose the Call icon (). To make a video call, choose the Video icon ().
- From the options provided, press and hold on a contact name.
- From search results:
- Tap a contact. A contact card opens.
- Press and hold the Call or Video icon.
- Open the dial pad, enter a phone number, and tap the Call or Video icon.
- In the Call History list, tap a call entry.
- On the Chat page, tap the Call icon () to make an audio call. To make a video call, tap the Video icon ().
Answer a call
When you receive an incoming call, your phone rings. On the Incoming Call page, tap Accept or Decline. If you decline the call, a busy signal plays and the caller knows that you rejected the call.
If you’re in a Voice over IP (VoIP) call and receive an incoming call on your smartphone, the VoIP call rings while your smartphone alerts you of the call. When you answer the call on your smartphone, the VoIP call is put on hold.
In-call actions
From the In Call page, you can:
- End a call
- Mute the microphone
- Place a call on hold
- Adjust the volume
- Change an audio call to a video call, and change a video call to an audio call
- Open the Dial Pad
- Make a new call
- Transfer a call – Attended
- Transfer a call – Unattended
- Start a conference
- Park a call against an extension or phone number
- Record a call
- Transfer a call to a circuit-switched call
- Add more participants to a conference call while you’re in a conference
- Merge 2 separate calls
- Swap 2 separate calls
- View participants (on a conference call)
You can also use the Android Back button to leave the In Call page and move through the other app pages. To return to the In Call page, use the Active Call toolbar in the app or the active call notification entry in the Android notification center.
View missed calls and new messages
When you miss a call, the notification bar on your device displays an icon and message. To view the History page, tap the missed call. Notifications, used for missed calls or new messages, appear as badges on the tabs.
Voicemail
If you have pending voicemail messages, the notification bar on your device displays an icon and message showing the number of pending voicemail messages. To listen to your voicemail, tap the voicemail notification icon. The Mobile app dials the voicemail access number directly.
You can also listen to voicemail by pressing and holding 1. If messages are available, the 1 changes color. The voicemail notification appears as a badge on the Call tab.
Contact name lookup for incoming calls and call logs
When you receive a call, the Mobile app searches for the name in the following sources and in this order:
- Chat contact name
- Contact directories
- Your phone’s contact list
If the name is the same as one of the contacts, the name appears on the Incoming Call page.
Ad hoc conference calling
The Mobile app supports network SIP-based conference calls. While you’re on a 2 person or video call, you can add more participants.
Add conference participants
To add conference participants, do 1 of these things:
- Add participants from the address book.
- Tap Conference. The address book opens.
- Search for and select new participants.
- Start the conference. The participants appear on your device’s screen.
- Add participants in an existing Conference.
- Make a new call to a new participant.
- Tap Merge.
Call waiting
You can have only 1 active call at a time. If you accept a new incoming call, the current call is put on hold and the second call is connected. You can change between these 2 calls by tapping the Hold and Unhold buttons.
Make a new call while on an active call
You can start a new call while on an ongoing call.
- Make the first call.
- To start the second call, tap the New Call button.
- Select a contact, and then choose a number.
When the new call connects, the first call is put on hold. You can swap the 2 calls or merge them into a conference call.
Call transfer
You can transfer VoIP calls to another person. These are 2 forms of transfer:
- Attended Transfer—Make the first call. When the person answers, select a contact, and then choose the number where you want to transfer the call. Tap the Call First option. When the second person answers, tap the Complete button to talk with the second person privately before completing the transfer and being dropped from the call.
- Unattended Transfer—Make the first call. When the person answers, select a contact, and then choose the number where you want to transfer the call. Tap the Transfer option. The call is transferred and you’re dropped from the call.
Call Pull
Use the Call Pull feature to seamlessly transfer a call from one of your phones to another, for example, a VoIP desk phone and a mobile phone with the Collaborate app. If you have an active call on your desk phone, you can seamlessly transfer the call to your mobile phone by tapping the Call Pull button. Depending on the app, dialing settings, and service configuration, the call can be pulled as a VoIP or circuit-switched call to your mobile phone. The call stays active as it’s transferred.
Call Park
Using the Call Park feature, you can park a call on an extension. The parked call is placed on hold until it’s retrieved. If you don’t retrieve the call within a certain time, Collaborate calls to remind you.
Call Recording
The Call Recording feature allows you to record your incoming and outgoing calls. Your administrator assigns your call recording settings. Depending on your settings, you can start, pause, resume, and end your recordings.
To manage call recording, open the Communications window, and then use the Record Call menu.
Bluetooth support
You can control incoming and ongoing calls from a compatible Bluetooth® headset.
The Mobile app supports mute and volume control from a Bluetooth headset. To answer and end calls, you must have the Mobile app on your device.
Swipe between chat and audio/video communication views
You can switch between Chat and Audio or Video communication sessions for your My Room, other users’ My Room, and 2-way Chat sessions. To see if you can switch between sessions, look for dots at the bottom of your screen. To switch between sessions, simply swipe.
Call history
To view call history, tap the History tab. The Mobile app saves a call history for all calls, even calls you missed.
Call history makes it easy for you to call back when you miss a call or when you want to dial a contact you’ve recently spoken with.
The call list shows the type of call (a green arrow means incoming, a blue arrow means outgoing, and a red arrow means missed). It also shows the name, number (if available), and the caller’s status. To the right, the date and time of the call appear.
Top
Side Navigation
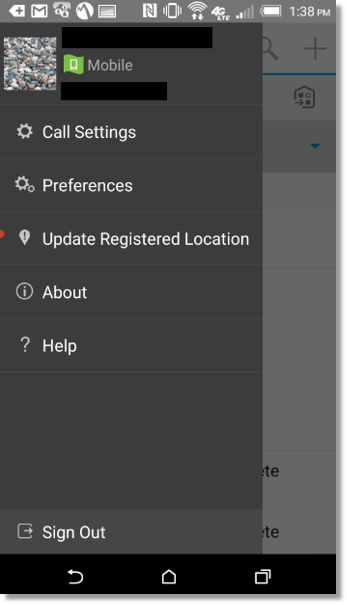 |
The Side Navigation contains these options:
- My status
- Call Settings
- Preferences
- Update Registered Location
- About
- Help
- Sign Out
|
My status
To set your presence, tap your personal status from the side navigation. The My Status page appears, where you can change your profile photo, personal message, and presence status.
Your profile photo is the picture that represents you in your friends’ Contacts lists and in chat pages. Select an existing image, or take a new one with your device’s camera. To clear your profile photo, tap the photo. You can enter a status message in the area next to the profile photo. This status appears in your friends’ Contacts lists.
If you see the Chat Unavailable message under any tab, you can still make calls, but your connectivity for chat and presence is lost. For help, contact your administrator.
Presence rules
You can configure how incoming calls are handled based on your presence. When your presence state changes, the calling rules associated with the presence are applied.
You can set 1 of these options for each presence rule:
- No Rules
- Forward to Number
- Silent Alerting
Call settings
In the app’s Preferences window, you can turn the following features on or off:
- Do Not Disturb
- Call Forwarding
- Hide number (Caller ID Blocking)
- Virtual Office
- Outgoing calls
- Simultaneous Ring
- Call Waiting
- Your phone number
- My Room
Do Not Disturb
When you turn on Do Not Disturb, all calls are blocked and typically sent to voicemail.
Call Forwarding
To forward calls, tap 1 of these Call Forward options and enter the forward-to number:
- Call Forward Always
- Call Forward Busy
- Call Forward Not Reachable
Caller ID Blocking
You can show or hide your phone number when you call or communicate with others. To hide your number, set Caller ID Blocking to Enable. To show your number, set it to Disable.
Virtual Office
Virtual Office extends the features of your desk phone to other devices, regardless of the network or handset manufacturer. Callers dial your number and reach you on the phone you choose. Your desk phone, mobile phone, or a device running the Collaborate app can ring simultaneously. You can move active calls from one device to another without hanging up.
- To add Virtual Office numbers, tap the Add New Location button.
- To activate parallel ringing, use Alert all locations.
- To prevent a call from going to voicemail, tap Diversion inhibitor.
- To hear a message before your phone rings, tap Answer Confirmation. This may be useful when you use a mobile phone number to prevent incoming calls from going to mobile voicemail.
- To turn on calling features such as Call Transfer and Meet Me Conferencing, tap Call Control.
Preferences
You can set these preferences:
- Language is English
- Remember password
- Sign in automatically
- Troubleshooting
Language support
Currently, the Mobile app is available in U.S. English.
Troubleshooting
If you experience issues with the Mobile app, use the troubleshooting function. Troubleshooting collects and sends diagnostic information (app and media engine diagnostic logs) to a predefined support email address. Troubleshooting is managed by a menu entry in Settings. You can access it from the following 2 areas:
- From the Settings button on the Sign In page. This opens the page that contains the help and troubleshooting-related entries. You can access troubleshooting before you sign in, which is useful when you have issues with signing in or connectivity.
- From the Preferences page, accessible from the side navigation. You must first sign in to the Mobile app.
Automatic sign in
You can choose to sign in automatically using a default account when you start the app. When you start the app and sign in automatically at system startup, you can be available for communication faster.
Help page
The Mobile app provides Web-based help from the Settings view.
Sign out
You can sign out at the bottom left.
Top
My Room
My Room is an always-available permanent room that you can use to chat with anyone who joins. To enter My Room, tap the My Room icon () on the Tab bar.
To add more participants, tap the Add Participants icon. Participants can also join your room from your contact card. After participants join the chat room, they can tap the Call button of that page to automatically join the conference.
My Room uses your permanent chat room, permanent collaboration room, and a conference bridge (audio). All My Room sessions start as chats, but you can add a call to the session while it’s in progress.
Others can join your room by clicking your name on their Contacts list and selecting Join Room from your contact card.
Top
Search
You can search Collaborate Contacts, your phone’s address book, and the Directory. The search appears in a separate field on the Contacts tab. When you select a filter (All, Online, Local Address Book, or Directories), search results show contacts from only the current selected category.
Top
Multi-device Support
The Mobile app supports users with multiple devices in these ways:
- Chat invitations are sent to all your devices. When answered, the chat messages go to the device that has sent a reply message.
- Retrieving your own presence notifications, when another app updates your presence. The Mobile app updates its own status based on the information it receives from the server.
- Accepting a shared presence invitation in 1 app is also recognized by another app, and both apps start receiving presence updates.
- A new presence subscription made in 1 app is recognized in another. If the contact blocks the invitation, the server sends presence notifications to all of your apps, indicating that the subscription was terminated. You also see this information. If the app receives 2 presence authorization requests from 2 or more devices for the same user, it shows only 1 request.
- Removing a contact from a Contacts list in one device is recognized in another app, and the Contacts list is updated in both apps.
Top
Other features
Manage privacy
When you add a contact to the Contacts list, these contacts see a New Subscriber dialog box asking if they’ll allow you to see their presence. Their response is stored in the contact’s presence policies entry in your Contacts list.
Top