Fax – Outbound Fax Settings Overview | AT&T Office@Hand
Article #3798
Outbound Fax Settings is where you can change the information for your outbound fax. You can edit the cover page information, set up the outbound fax number and email addresses permitted to send faxes. Follow the steps below to view and customize your Outbound Fax Settings.
Users
- Go to Settings > Outbound Calls/Faxes > Fax Settings.
- Continue to Outbound Fax Settings.
For Administrators
- Click Users > User list.
- Under Users with extensions, select the name of the User that you want to modify, and then click on Outbound Calls/Faxes.
- Under Outbound Calls/Faxes, click Fax Settings.
- Continue to Outbound Fax Settings.
Outbound Fax Settings
You can configure the following sections:
- Cover Page Info
- Fax Number
- Cover Page
- Faxes Sent via Email
Cover Page Info
You can customize the information that will be printed on your fax cover page.
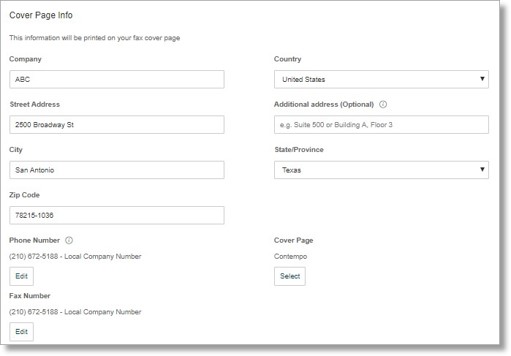
Phone Number
The number you select here will be displayed as the sender’s Phone Number on your Cover Page. If you select your company’s Main Number, your extension will also be added to the Cover Page.
- Click Edit.
- Click on the radio button of the number that you want to display as your Caller ID and click Done to save your settings.
- Click Save when redirected back to Fax Settings to confirm.
Fax Number
You can select a phone number you want to display as your Caller ID number for Fax Number.
- Click Edit.
- Click on the radio button of the number that you want to display as your Caller ID and click Done to save your settings.
- Click Save when redirected back to Fax Settings to confirm.
Cover Page
The cover page is used to identify who the fax is from and who the intended recipient of the fax is. It does not have to be used if not needed. You can select the default cover page format you want to use from the preset templates.
- Click Select.
- Click the drop-down arrow to select from the preset templates and click Done to save your settings.
- Click Save when redirected back to Fax Settings to confirm.
Faxes Sent via Email
You can add up to 25 additional emails to send faxes in this section.
- Click the On radio button under Omit cover page when email subject is blank to enable. Enter the email address on the Email addresses permitted to send faxes field and click Add.
Note: If this option is selected, the cover page will be used when you send a fax via email with a subject line. If you send it without a subject line, the cover page will not be used.
- Click Save.
QUICK TIP: For more information about sending faxes via email, go to Sending Office@Hand fax messages.
Key Words: 3798, add emails, permitted, allowed, send faxes, trusted email, User, General Outbound Faxing, Outbound Faxing
Was this page helpful? Yes No