Managing Messaging Notifications in the AT&T Office@Hand Online Account
Article # 97409
This article provides the steps on how to configure messaging notifications in the AT&T Office@Hand Online Account.
You can use the Admin Portal to set email and text message notifications for new voicemails, missed calls, faxes, and other new activity in your AT&T Office@Hand account. If you’re an admin, you can also update these preferences for others.
To update the main email address that receives account notification emails, update the email address in your AT&T Office@Hand account.
NOTE: If you’re not an admin, your company admin may restrict your ability to update these preferences.
Accessing messaging notifications
- Go to the Admin Portal and sign in.
- To set your notifications:
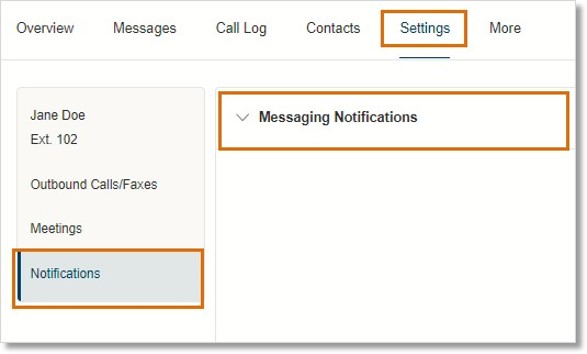
- If you’re an admin, click Admin Portal > My Extension in the top right, then click Settings in the top menu.
- If you’re not an admin, click Settings in the top menu.
- To set another user’s notifications:
- Click Users > User List in the top menu.
- Select a user from the Users with Extensions list.
- Go to Notifications > Messaging Notifications.
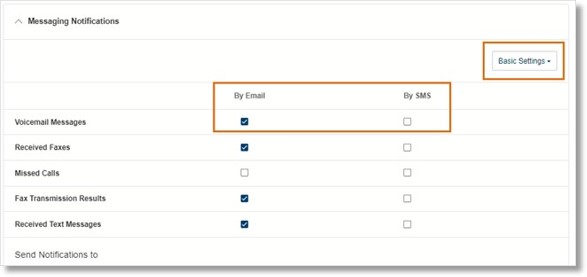
- Select Basic Settings or Advanced Settings from the dropdown in the upper right.

Configuring messaging notifications in Basic Settings
- Check the boxes to specify which notifications will be received.
- If you’ve set email notifications, enter each email address below Send Notifications to, separated by commas or semicolons.
- If you’ve set text message (SMS) notifications, select the carrier for the mobile number from the Select Carrier dropdown, enter the phone number where the notifications should be sent, then click Add. Repeat this process to add more phone numbers.
- To delete a number, click Delete below Actions.
- If your carrier isn’t listed, contact them to find out the email address where text messages can be received, then enter it into the Phone Number field (for example: yournumber@yourcarrier.com). Click Save.

Configuring messaging notifications in Advanced Settings
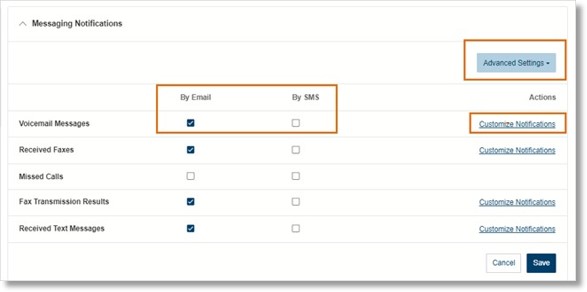
The Advanced Settings view lets you send notifications for each feature to a different email address or phone number.
- Check the boxes to specify which notifications will be received.
- Click Customize Notifications for each row you’ve selected.
- If you’ve set email notifications, select Include attachment with email and/or Mark message as read once emailed under Additional Settings.
- Enter each email address below Send Notifications to, separated by commas or semicolons. You can add more email addresses later.
- If you’ve set text message (SMS) notifications, select the mobile number’s carrier from the Select Carrier dropdown, then enter the phone number where the notifications should be sent.
Click Add. You can add more phone numbers later.
- To delete a number, click Delete under Actions.
- If your carrier isn’t listed, contact them to find out the email address where text messages can be received, then enter it into the Phone Number field (for example: yournumber@yourcarrier.com). Click Done.

- Repeat step 2 to customize notifications for other features.
- If you want to enter different email addresses and phone numbers across features, uncheck these options as needed in Customize Notifications:
- Use the same email as for voicemail: This feature is available if you’ve set email notifications for voicemail.
- Use the same text address as for voicemail: This feature is available if you’ve set text message notifications for voicemail.
- Use the same email and text address as for voicemail: This feature is available if you’ve set both email and text message notifications.
- Enter the email addresses and phone numbers.
- Click Done.
- Click Save.
Key Words: AT&T Office@Hand Online Account, Online Account, messaging notifications, notifications, Admin Portal
Was this page helpful? Yes No


